


shows a flashing red light as the SZ100 starts up. When the
SZ100 has started up successfully, the Alarm LED turns to a
solid green light.
2. Obtain an Ethernet cable. Connect one end of the Ethernet
cable to one of the LAN ports (port 1 or 2 recommended) on
the SZ100, and then connect the other end to your network’s
switch or router. DHCP server should be available in the
connected LAN environment for SZ100 to get the IP address.
NOTE: The SZ100 is a Universal Plug and Play (UPnP)
device. Once you connect it to the network, it will
automatically configure itself, obtain an IP address, and
make its presence known to other devices on the network.
3. Go to the admin PC and verify that the SZ100 is now
discoverable on the network. On Windows 7 and Windows 8,
go to Control Panel > Network and Internet > View network
computers and devices, and then locate the Network
Infrastructure section. The SZ100 should appear there. In
such scenarios, SZ100 and a system (laptop or a PC) should
have cross-over connection and the system should have an IP
address in the same subnet as SZ100. Configure SZ100 MGMT
and CONTROL interface and add it to the new LAN
connection. Use the new IP address to access SZ100.
NOTE: If you prefer not to use UPnP, you can type the IP
address of the SZ100 into a web browser instead. In case
there is no DHCP server on the network, the default IP
address and URL of the SZ100 is https://192.168.2.2:8443
with a network mask of 255.255.255.0. Otherwise, an IP
address is assigned automatically from your existing DHCP
service.
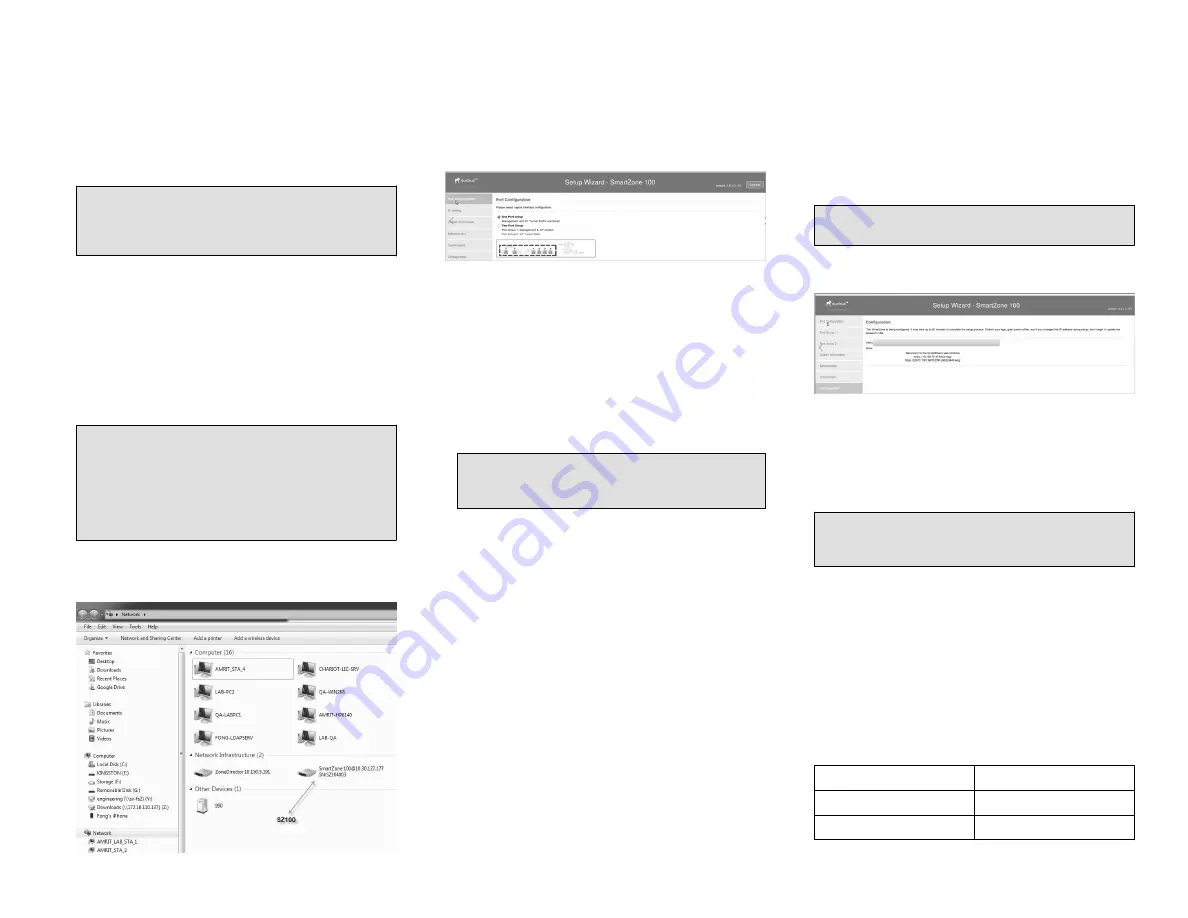
FIGURE 1 The SZ100 appears in the Network Infrastructure
section
4. Double-click the SZ100 that appears in the Network
Infrastructure section to start the SZ100’s Setup Wizard.
A web browser loads and the SZ100’s Setup Wizard appears,
displaying the Port Configuration screen.
FIGURE 2 The Port Configuration screen of the Setup Wizard
Step 2: Complete the Setup Wizard
1. When the Setup Wizard appears, complete the following
screens:
• Port Configuration: If you want to combine the
management, AP control, and AP tunnel traffic on a single
interface (recommended for simple setup), click One Port
Group. If you want to separate the management and AP
control traffic from the AP tunnel traffic, click Two Port
Group.
NOTE: If you clicked Two Port Group, verify that the
admin PC is connected to either port 1 or port 2 of the
SZ100.
• IP Setting: Configure the IP address settings of the SZ100
interface or interfaces either by assigning addresses
automatically (if a DHCP server exists on the network) or
manually:
– If you clicked One Port Group on the previous screen,
configure the SZ100’s IP address settings on the IP
Setting screen.
– If you clicked Two Port Group, configure the IP address
of the management and AP control interface on the Port
1 screen, and then configure the IP address of the AP
tunnel data interface on the Port 2 screen.
• Cluster Information: Select whether you want to create a
new cluster with this SZ100 or to join an existing cluster on
the network. If you want this SZ100 to join an existing
cluster, you must type the cluster IP address and admin
password in the boxes provided.
2. When the Confirmation screen appears, verify that all the
settings displayed on the screen are correct.
If you need to make a correction, click Back until the
appropriate setup screen appears, then make the changes.
3. If they are all correct, click Finish to apply the settings and
activate the SZ100 on the network.
A progress bar appears and displays the progress of applying
the settings, starting the SZ100 services, and activating the
SZ100 on the network.
When the process is complete, the progress bar shows the
message “100% Done.” The page also shows the IP address
through which you can access the SmartZone web interface
to manage the appliance.
NOTE: Take note of this IP address. You will need this later
to log on to the SZ100’s web interface.
FIGURE 3 Take note of the IP address of the web interface
Step 3: Connect the SZ100 to the Network
1. Connect Port 1 to the router or switch.
2. Connect Port 2 to another router or switch to which other
SmartZone appliances (if present) are connected.
NOTE: Depending on your network setup, you may also
connect Port 2 to the same router or switch to which Port
1 is connected.
Step 4: Connect the APs to the Network
1. Distribute the APs around your worksite.
2. Record each AP’s Ethernet MAC address (printed on the
bottom of every AP), and note each device’s exact worksite
location.
3. Connect the APs to a local power source.
4. The operating temperature and humidity for the APs must be
as below:
TABLE 3 Operating Temperature and Humidity Details
Operating Temperature
0ºC (32ºF) - 40ºC (104ºF)
Operating Humidity
5% to 85%, non-condensing
Humidity, Storage
95%, non-condensing
Copyright
©
2021 CommScope, Inc. All rights reserved.
Page 2 of 5
Published January 2021, Part Number 800-72271-001 Rev H


