background image

5

3. Operating

Reception status (Monitor-on duration : 30

±

5sec) 

When the Call button of the door station is pressed, monitor is to be turned on within 3
seconds along with emitting ringing sound. 

Controlling the volume level of ringing tone is possible with turning the ringing-tone-
control-dial upwards or downwards. 

Conversation status (In case of receiving a call : 60

±

5sec) 

After proper completion of wiring between a monitor and a door camera, by pressing the
Monitor button in the monitor-on status makes conversation begin.  

When having a call from a door station, entrance view will be displayed and monitor and
talk LED blinks. Press the Talk button to begin conversation. 

To adjust volume level of talk-volume, turn the talk-volume-control-dial upwards or
downwards. 

Monitor must deliver clear voice to the receiver and it should be automatically turned off
after elapsing 60

±

5sec  

To turn on the monitor again, press the Monitor button on the monitor. 

Interphone can come in the conversation by picking up the handset while monitor and
camera are having a conversation. 

When you feel like to hang up the phone or after finishing the conversation, press the Talk
button. 

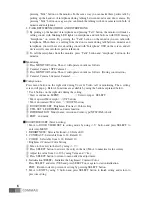
DOOR OPEN 

When the OPEN BUTTON is pressed (KEY-shaped icon), door is opened. 

(This function works in case a door camera provides door release function.)  

Function is same on the interphone. 

OPERATION OF CAMERA 1, CAMERA 2 FUNCTIONS     

With the wiring completed, press "Talk" button then "Monitor" button (or "Door" button
then "Talk" button) to watch images from Camera 1 or Camera 2 and to talk. When you
press "Monitor" button once, you will see image from Camera 1,, when press the button
twice you will see Camera 2, and pressing the button three times will return the display back
to stand-by status.  
(When the camera is not connected you will not see the display.) 

On the stand-by mode, when there is a calling from Camera 1 or Camera 2, you will hear the
calling sound and LED of monitoring and talk button will be blinking, and the image from
camera will be shown on the screen, with OSD showing whether the camera is from "DOOR
1" or "DOOR 2".   

OPERATION OF INTERPHONE   

1. TALK WITH DOOR 

When there is a calling from the door and when the interphone is connected to the monitor
unit, you will hear the calling sound from interphone as well, like from the monitor.  

You can talk with the door(visitor) by picking up the handset of interphone, and can open
the door by pressing "Door" button.  

When the interphone and door camera are talking, you can make the three parties talk by

Содержание CDV-40Q

Страница 1: ...sponsible for any safety accidents caused by abnormal operation of the product Thank you for purchasing COMMAX products Please carefully read this User s Guide in particular precautions for safety bef...

Страница 2: ...ou use the product 1 Greetings Table of contents MEMO Greetings 1 Contents table 1 1 Safety Warning Caution 2 2 Part names and functions 4 3 Operation 5 4 Installation method 9 5 Wire connection 10 6...

Страница 3: ...or it may cause an electric shock fire when using a damaged power cable Please don t handle the power cable with a wet hand It may cause an electric shock Please plug out the power cable from the soc...

Страница 4: ...e power cable Please don t use any chemical products such as wax benzene alcohol or cleanser Please don t drop the product on the ground and don t apply a shock It may cause a failure Please use the d...

Страница 5: ...Talk button Terminal for external connection MENU button SEL button UP button DOWN button Power switch Speaker No Use of two door cameras setting In order to use two door cameras at the same time plea...

Страница 6: ...Talk button DOOR OPEN When the OPEN BUTTON is pressed KEY shaped icon door is opened This function works in case a door camera provides door release function Function is same on the interphone OPERATI...

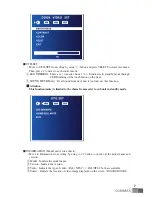
Страница 7: ...s menu button on the right side during Voice Video call or monitoring Then setting screen will pop up Below 4 functions are available by using the buttons explained below Use 4 buttons on the right si...

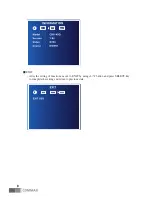
Страница 8: ...all sound from door unit it too loud use this function Attention This function mute is limited to the chime from master to sub unit in standby mode INFORMATION Model and version check Move to Informat...

Страница 9: ...8 EXIT After the setting of functions move to EXIT by using button and press SELECT key to complete the setting and return to previous state...

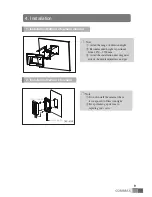
Страница 10: ...irect sunlight Keep cleaning up its lens to capture good views SCREW T4X18 2EA SCREW M3X8 1EA DRC 40CK 1 Installation Method of camera monitor Note Avoid the range of direct sunlight Recommended heigh...

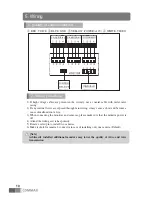
Страница 11: ...d through mis wiring it may cause a short and become a cause of malfunction or fire 3 When connecting the monitors and cameras please make sure that the monitor power is off 4 Attend the wiring as it...

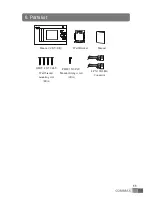
Страница 12: ...0 2EA POWER CORD 480 CDV 43Q MANUAL CDV 40Q GH1T 4 X 50 ZnY PHM 3 X 6 ZnY 4P 300 2EA POWER CORD 480 Monitor CDV 40Q GH1T 4 X 50 ZnY Wall bracket mounting scre 4EA PHM 3 X 6 ZnY Monitor fixing screw 1E...

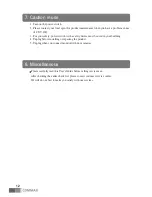
Страница 13: ...ith a safety device must be used in your building 4 Unplug before installing or repairing the product 5 Unplug when you connect monitor with door cameras Please carefully read this User s Guide before...

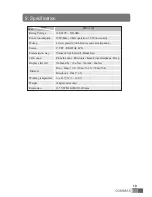
Страница 14: ...reen 4 TFT DIGITAL LCD Transmission way Volume Switch Circuit Hands free Call sound From the door Electronic chime From interphone Beep Display after call On Stand by 30 5sec On talk 60 5sec Door 28m...

Страница 15: ...513 11 Sangdaewon dong Jungwon gu Seongnam si Gyeonggi do Korea Int l Business Dept Tel 82 31 7393 540 550 Fax 82 31 745 2133 Web site www commax com Printed In Korea 2011 02 104...

Отзывы: