background image

Start engraving 1

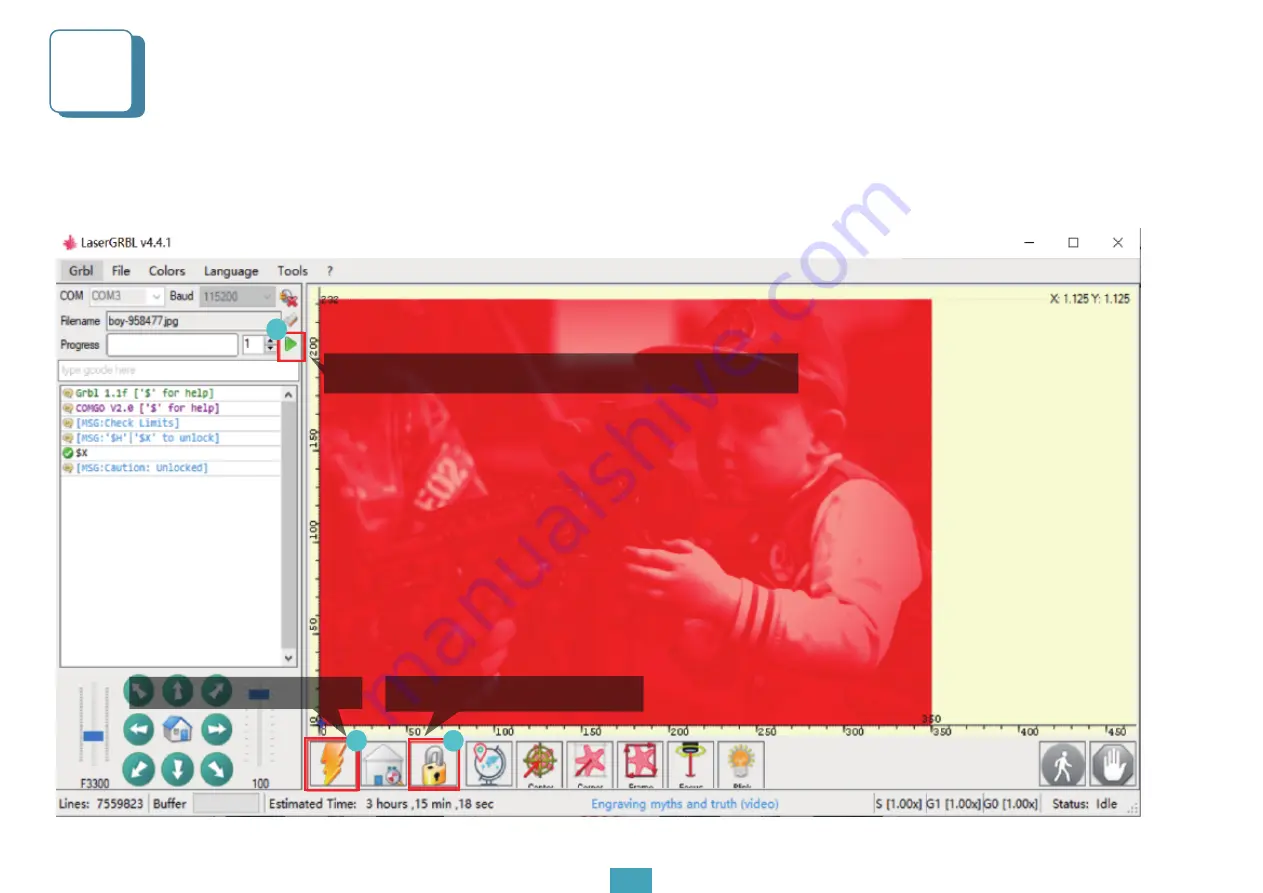
Manually move the laser head of the machine to the engraving position, click the reset button, then click the unlock button. 
When the green button appears, please click to start engraving

5

09

1

2

3

3. When the green button appears, click it to start engraving

2. Then, click the Unlock button

1. Click the Reset button

Содержание COMGO Z1 LaserGRBL

Страница 1: ...User Manual V1 1 COMGO Z1 LaserGRBL Beginner s Guide ...

Страница 2: ...in 2017 by people who have a serious passion for technology that helps you make things With this deep rooted dedication we wanted to make the digital manufacturing pro cess more accessible giving educators engineers manufacturers small businesses and tinkerers the power to make anything Headquartered in Southern Chi na Shenzhen Comgrows dedicated staff is committed to providing the kind of service...

Страница 3: ...5 575 205mm 22 64 22 64 8 07inch How to level the focus 400 400mm 15 75 15 75 inch 5 0 KG 11lbs Aluminum 42mm 42mm 34mm Diode lasers 445nm LaserGRBL Windows XP Windows7 Windows8 Windows10 Lightburn Windows Mac OS and Linux Laser GRBL Lightburn AC110V 230V 1 6W 5W 10W 1 6W 30 100mm 5W 23mm 10W 45mm S0 S1000 0 100 USB 0 1mm NOTE The focal length is the distance from the lower face of the laser modul...

Страница 4: ...ter in real time and the engraver needs to stay connected to the computer and cannot close the engraving software LaserGRBL or LightBurn during the engraving pro cess In addition the configura tion of the computer can affect the speed and even the quality of the engraving The following will focus on the installation and use of LaserGRBL software Note It is recommended that you adjust your computer ...

Страница 5: ...the machine or from the LaserGRBL website LaserGRBL website http lasergrbl com download to download software installation packages 2 Double click Install 4 Create a desktop icon Choose Next to continue 5 Complete setup 3 Choose the installation path Default path C Program Files LightBurn Choose Next to continue ...

Страница 6: ... driver is installed and please install the CH340 driver 1 Connect the COMGO Z1 laser engraver to a computer with LaserGBRL software and plug in the power supply 2 Open LaserGRBL software and select the correct port number and baud rate software 115200 Connect COMGO Z1 Laser Engraver 2 04 Tip One computer can open several LightGRBL softwares to connect several engraving machines When you operate s...

Страница 7: ...Reset 3 05 1 the connect button 2 Prompt for firmware version number after the connection 3 the reset button ...

Страница 8: ...g to the set mode if you wanna use the cut mode please select vector image and no fill Set up conversion tools e g grayscale mode dot matrix mode vector graphics etc The higher the quality of the picture the better the engraving effect will be 2 Set engraving parameters please see the next page for details 06 1 1 2 3 2 3 ...

Страница 9: ...ble for engraving grayscale images If you want to cut please select vector or centerline engraving mode and choose no fill 2 Engraving quality essentially refers to the line width of the laser scan This parameter depends primarily on the size of the laser spot of the engraver The Z1 engraver applies a square spot of 08mm Therefore the recommended engraving quality range is 8 20 commonly 12 3 At the...

Страница 10: ...ts 2 In the laser mode selection there are two commands M3 and M4 for laser on It is recommended to use the case where the M4 command is recommended for engraving in 1bit jitter mode and the M3 command is recommended for other modes If your laser only has M3 command please check if the laser mode configuration is turned on in GRBL For the description of GRBL configuration please refer to the official...

Страница 11: ...o the engraving position click the reset button then click the unlock button When the green button appears please click to start engraving 5 09 1 2 3 3 When the green button appears click it to start engraving 2 Then click the Unlock button 1 Click the Reset button ...

Страница 12: ...t engraving please ill in the box with the number of repeat engravings 2 Emergency stop Priority recommended to use the reset button If you wanna continue engraving please click the reset button unlock button and then the start button to start again Or you can also choose to start from the stop position When it stops during carving it is better not to change the position of the carving machine ...

Страница 13: ...Engraving Parameters 6 01 11 ...

Страница 14: ...Engraving Parameters 6 01 12 ...

Страница 15: ... button When the button is clicked the current position is taken as the origin Preview button When the button is clicked the X and Y axes will be moved to the maximum square size of the engraving pattern Unlock button After resetting you need to click the unlock button Origin button When the button is clicked the current position is taken as the origin Open Light button Click the button and the la...

Страница 16: ...r is 115200 3 If it is the first time to install GRBL software the above operations are unable to connect or disconnect immediately after connection you can use Lightburn software to connect with check the product firmware version number if it is COMGO V1 0 you only need to refresh the firmware we recommend updating our latest firmware https drive google com drive folders 1YP jvHf4 4DqBkkCXpYm6Bc9hpi_...

Страница 17: ...ine does not move during the engraving process Solutions 1 Please check whether GRBL is connected to the machine 2 Please check whether the product power supply has power supply check the red indicator 3 If there are no problem with the above operations please check whether there is a red alarm in the lower right corner of GRBL software If so it means the gyro alarm has been triggered please enter...

Отзывы:

Похожие инструкции для COMGO Z1 LaserGRBL