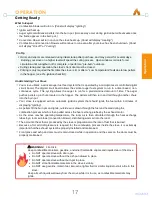
Comfort Bilt HP22N Скачать руководство пользователя страница 19

19

comfortbilt.net

Operation

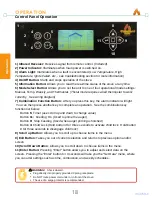
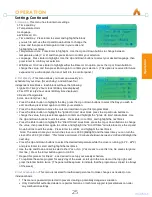
Control Panel Display

Mode: 

Displays the current operation mode. 

(Manual, Temp, Weekly, or Thermostat)

.

Work Stage:

  Displays the operational stage the stove is currently in. 

(Igniting, Heating, Fire Off,

Cleaning, Standby, Stop, etc...)

Desired Temperature:

  In Temp or Weekly mode, this will show the currently set temperature.

Heat Power Level: 

 Displays the current set Heat level. 

(In Manual mode, you can directly set

this.  In other modes, this will change automatically, based on other requirements set by the
stove)

Current Temperature:

 Displays the temperature that is being read by the room temperature

sensor wire.

Current Time Period: 

 In weekly mode, this displays the current time setting.

Day and Time:

  Displays the day of the week and current time.

ECO Mode Indicator:

  Indicates when ECO is currently active. 

(ECO allows the stove to cycle

on and off automatically in the Temp and Weekly modes)

Safe Mode Indicator:

  If the vacuum or limit switches are being bypassed, the stove will display

the word "Safe Mode" in this box. 

(See Settings for more info)

On/Off Indicator:

  Indicates if the stove is on and in operation or in the process of shutting

down.

Information Bar:

 Displays real-time messages. 

(such as "feeding on" when performing auger

priming for instance)

Wi-Fi Indicator: 

(Requires wi-fi adapter, not currently supported)


Child Lock Indicator:

  Indicates when child lock is currently active. 

(Child lock will lock the

panel so no other buttons can be pressed)

1.
2.

3.
4.

5.

6.
7.
8.

9.

10.

11.

12.
13.

Operation

Содержание HP22N

Страница 1: ...er and save for future reference Failure to follow these instructions could result in property damage bodily injury or even death Contact local building or fire officials about restrictions and instal...

Страница 2: ......

Страница 3: ...r approved Disable safety switches Do not touch glass until it is cooled NEVER allow children to touch glass or door Keep children away if you expect that children may come into contact with the stove...

Страница 4: ...convection fans will continue to run until the stove cools Over Fire Protection If the stove is being over fired or burning too hot the high limit switches will automatically shut down the stove to a...

Страница 5: ...itional Warnings Getting Familiar with Your Stove What s Included Table of Contents Getting Started 6 Installation 8 Operation 16 Troubleshooting Video Total Power Loss Low Temperature Alert High Temp...

Страница 6: ...mfortbilt net Getting Started Getting Familiar with your Stove Removable Ash Pan Drawer Control Panel Pellet Feed Chute Burn Pot Heat Exchange Tubes Heat Tube Cleaner Scraper Inside the Stove Body Aug...

Страница 7: ...nel Bracket WARNING CAUTION Risk of cuts abrasions or flying debris Wear protective gloves and safety glasses during installation Metal edges may be sharp What You May Need High temperature silicone 5...

Страница 8: ...on The universal mounting bracket will also allow for the control panel to be mounted to the side farthest from the exhaust port for specific vertical venting scenarios The two left and the far right...

Страница 9: ...under the top vent adapter with vertical installation CANADA REQUIRED USA RECOMMENDED The stove must be installed on a noncombustible floor with proper floor protection or on a masonry hearth When a c...

Страница 10: ...the vent size used Install vent at clearance specified by the vent manufacturer Take into consideration any upward turning elbows or tees Back walls to Stove rear corners 5 13cm Back wall to Stove ba...

Страница 11: ...window that opens C Minimum 24 clearance from any adjacent building D Minimum 7 clearance above any grade when adjacent to public walkways E Minimum 24 clearance above any grass plants or other combu...

Страница 12: ...high temp silicone 500 Install termination cap Confirm all required Stove clearances to combustibles The vent must have a support bracket every 5 of pellet vent when on the exterior of the structure V...

Страница 13: ...venting sections the maximum permissible horizontal venting length is 4 ft Contact local building or fire officials about restrictions and installation inspection requirements in your area Contact you...

Страница 14: ...ounded or GFCI power outlets are provided All vertical chimney vents must have wall supports All exhaust systems must have a spark arrestor Check with local building officials to see if other codes ma...

Страница 15: ...on Through Roof Vertical Installation Class A Chimney Retrofit Installation Masonry Fireplace Hearth Install Freestanding Masonry Chimney install Installation Note You may need a short horizontal sect...

Страница 16: ...has established standards for wood pellet manufacturers Only use pellets that meet or exceed PFI standards for premium fuels Depending on the source material pellets may have differing ash contents F...

Страница 17: ...ted in the hopper The pellets will then turn and fall through another chute into the burn pot Your stove is equipped with an automatic ignition system that should ignite the fuel within 5 minutes of d...

Страница 18: ...ode requires wired thermostat to work correctly See wiring diagram 7 Combination Function Button After you press this key the alarm indicator will light You can then press another key to complete an o...

Страница 19: ...eekly mode this displays the current time setting Day and Time Displays the day of the week and current time ECO Mode Indicator Indicates when ECO is currently active ECO allows the stove to cycle on...

Страница 20: ...b and rod may get extremely hot during operation Plug Unit In Plug the power cable into the power outlet at the wall and into the main power switch assembly block at the back of the stove Then flip th...

Страница 21: ...t room temperature will be displayed in the temperature display box on the screen as will the Call to temperature If the room temperature falls below the call to temperature the stove s heat power lev...

Страница 22: ...om the thermostat to the bottom circuit board To activate the remote pull the plastic battery separator tab from the back battery compartment All Comfortbilt pellet stoves come with an infrared remote...

Страница 23: ...ing operation the stove may display Cleaning periodically This is an automatic cleaning that the stove will perform The stove will continue operation until something interrupts that operation Low Temp...

Страница 24: ...er voltages for each Heating or Ignition level Feed rates are factory set and should not be altered 4 Set Ash Cleaning Cycle This menu allows you to alter the stove s automatic ash cleaning schedule f...

Страница 25: ...to select and highlight the last block Use the Up and Down arrows to select either Yes or No Yes means to use this line No means to ignore this line Press the Enter button again to confirm Repeat thi...

Страница 26: ...acuum This will engage and become shaded when the main chamber is under negative pressure anytime the combustion fan is running POF Proof of Fire This will engage when the exhaust housing is hot above...

Страница 27: ...nt the stove from being able to transfer internal heat out into the room and could cause the stove to overheat and shut down 9 Set Blower This menu allows the room blower fan to be toggled On or Off T...

Страница 28: ...cessed from inside the hopper Along the top edge of the inside of the hopper on the right and the left sides you will find the two screws that hold the side panels Loosen and remove these screws takin...

Страница 29: ...rom any combustible materials If ashes are disposed of by burial or otherwise dispersed they should remain inside the enclosed container until all cinders have cooled Ash Pan Drawer Weekly or as Neede...

Страница 30: ...chamber behind it As long as there is adequate gasket material around the perimeter it will provide a proper seal Using a slender hose attachment for your ash vacuum thoroughly vacuum out these chambe...

Страница 31: ...astic sleeve Solutions Problem Alarm Low Temperature Check Hopper Burn Pot Message When the low temp alarm occurs it means that the computer has lost communication to the proof of fire switch POF This...

Страница 32: ...he igniter is in a good position and getting hot at the tip within three minutes see igniter troubleshooting video Ensure that the burn pot is seated and oriented correctly small hole and ring toward...

Страница 33: ...elp maintain a more accurate temperature range for the space NOTE Activating the ECO function or installing a remote thermostat will activate the electronic igniter much more frequently causing more e...

Страница 34: ...r 115VAC 60Hz 0 70 Amps Combustion Blower 115VAC 60Hz 0 55 Amps Auger Motor 115VAC 60Hz 0 55 Amps Igniter 115VAC 60Hz 3 2 Amps Any generator UPS or battery backup system must have a Pure Sine Wave pow...

Страница 35: ...s 5 Years 1 Year Warranty does not cover damage or breakage due to misuse improper handling or modifications There is no warranty on the paint glass fire brick or any gaskets or against damage caused...

Страница 36: ...d Circuit Board 4 wire Data Cable TX RX VCC GND Hot ACL Common ACN Auger Feeding Blower Fan Blower Combustion Fan Exhaust Igniter Fire N A Reserved Wiring Harness Control Panel Auger Blower Fan Combus...

Страница 37: ...Pressure Switch Hopper Lid Switch Proof of Fire Sensor 4 Wire Data Cable Room Temp Sensor 92 C Overheat Sensor Auger Motor w Gearbox Exhaust Fan Assembly Room Blower Assembly Auger Motor Capacitor Au...

Страница 38: ...Schedules Repairs Date Work Done Date Work Done...

Страница 39: ...Schedules Repairs Date Work Done Date Work Done...

Страница 40: ...CONTACT US W W W C O M F O R T B I L T N E T For the most up to date information visit 9241 GLOBE CENTER DR STE 120 MORRISVILLE NC 27560 919 973 4079 QUESTIONS...

Отзывы: