background image

13


 System operate 

Klik op Setting

 System

 Basic info

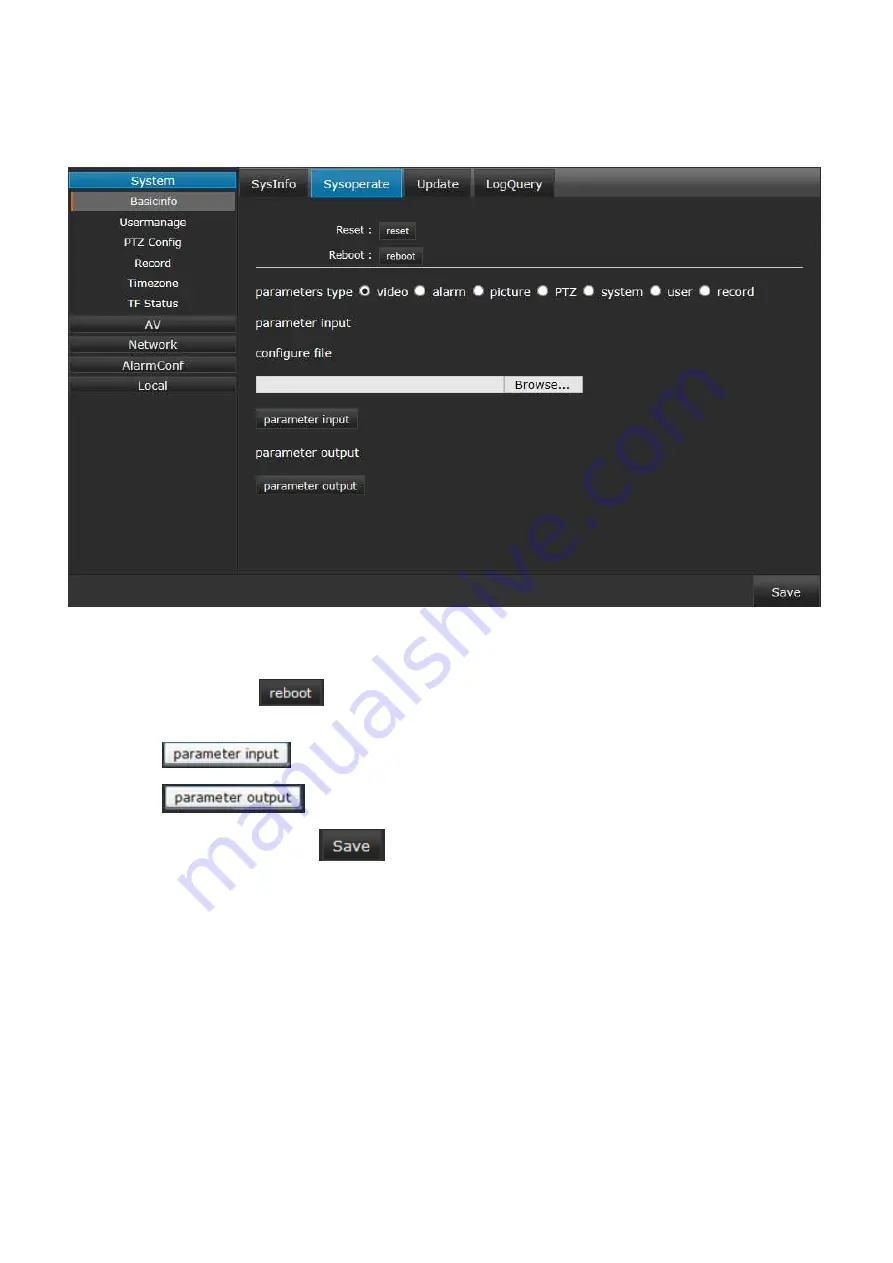
 Sysoperate, IP Speed Dome “System operate” interface. Zie afbeelding 

3-16:


Afbeelding 3-16. 


  Rest (herstellen): Fabrieksinstellingen herstellen 

  Reboot: Klik op 

 om de IP speed dome te rebooten 

  Parameters type: Selecteer het parametertype dat u wilt instellen 
  Parameter  input  (parameteringang):  Selecteer  het  configuratiebestand  dat  u  nodig  heeft  en  klik  op  


  Parameter  output  (parameteruitgang):  Selecteer  het  configuratiebestand  dat  u  nodig  heeft  en  klik  op  


Nadat de instellingen zijn voltooid, klik op 

 om op te slaan.


Содержание IPPTZ110IRA

Страница 1: ...i 4 FULL HD IP PTZ CAMERA ART IPPTZ110IRA Before installation please read the operation manual carefully ...

Страница 2: ... view 7 System specification setting 11 System 11 Basic info 11 User manage 17 Serial 18 Record 19 Time zone 21 Micro SD status 22 AV 23 Video channels 23 Video parameters 24 Shot parameters 25 Network 26 Ethernet 26 DDNS 27 Netport 28 Other protocol 29 Alarm configuration 30 Linkage 32 INPUT OUTPUT alarm 33 Motion 34 Local 35 Local Settings 35 Playback 36 Search video and playback 36 4 Appendix 3...

Страница 3: ...duct is used according to this manual please contact our technical support department or your product suppliers This manual content will be updated unscheduled our company reserves the right to do manual contents update without further notice The default username for this device is admin and the password is blank Default IP address is 192 168 1 188 HTTP port is 80 PACKING LIST Open the package and...

Страница 4: ... Alarm linkage output micro SD card video recording snapshot FTP upload e mail notification link Preset ONVIF Profile S protocol GB T28181 protocol 360 horizonal continuous rotation vertical 0 90 255 Presets Low power consumption MTTF up to 30 000 hours 1CH alarm input 1CH alarm output build in micro SD card slot audio input output 100M Ethernet IP66 protection level ...

Страница 5: ...ld start below 20 C then it will turn on the IR leds automatically and operate normally after heating in 30 minutes Hardware installation steps Please make sure LAN and WAN are working smoothly before the Network High Speed Dome installation After checked all the network system in good condition keep your hands clean and dry following the steps below Open the box to check the goods Take out all go...

Страница 6: ... After connect the power source the IP speed camera will start operation automatically Connection instruction Multi function RJ45 line Analog video output GND Reset button Power supply input 24 VDC RJ45 Alarm input Alarm output ...

Страница 7: ...ity page click the Custom Level and then follow steps to set the IE browser Download and Install ActiveX Users have to install ActiveX Control when visit Network High Speed Dome at the first time via IE browser Download and install the ActiveX Input the IP address default address http 192 168 1 188 in Internet Explorer to enter into login page users can refer to the NETWORK SETTINGS under SETUP me...

Страница 8: ...rface click Run As Figure 3 2 Figure 0 2 A User Account Control interface will pop out click Yes to install As figure 3 3 Figure 3 3 In download interface you can also select save to save ActiveX in default storage file such as D TDDOWNLOAD Then open the file an install the ActiveX As figure 3 4 and 3 5 ...

Страница 9: ...6 Figure 3 4 Figure 3 5 Click Install in the below interface as Figure 3 6 Figure 3 6 Click Finish in the below interface to complete the installation as Figure 3 7 ...

Страница 10: ... completes input IP address http 192 168 1 188 of the Network High Speed then turn to login page input username default is admin and password default is blank click login to enter into main interface see Figure 3 8 Figure 0 8 Live view Live preview interface as figure 3 9 ...

Страница 11: ...eate JPG picture and store in the specified folder automatically The default file storage path is C IPCamera users can set it at the Setting Local Local setting Full screen click icon to get full screen preview press ESC or right mouse click to exit full screen preview Manual video click icon to do manual video operation and store in the specified file automatically Video format is mp4 the default...

Страница 12: ...pen it click again to close it As Figure 3 9 Low illumination click to open it click again to close it As Figure 3 9 BLC click to open it click again to close it As Figure 3 9 3DNR click to open it click again to close it As Figure 3 9 Video formats select the video format 50HZ for PAL 60HZ for NTSC Click to save it As Figure 3 9 Exposure compensation select the exposure compensation at the drop d...

Страница 13: ...via the PTZ buttons to set area scan click to set left limit click to set right limit and area scan remembered automatically When set the area scan users have to select Small radian scan scan radian less then 180 Big radian scan scan radian more then 180 first and then set left limit right limit Click to call area scan As Figure 3 12 Pattern scan at the pattern scan drop down list users can select...

Страница 14: ...set the delay time Select preset ID and click to delete it Finally click to save it and Click to call pattern scan As Figure 3 14 Figure 3 14 System specification setting System Basic info System information Click Setting System Basic info Sysinfo IP Speed Dome Device Info interface As figure 3 15 ...

Страница 15: ...on number UBOOT version Display the product system UBOOT version number Kernel version Display the product system kernel version number APP version Display the product software version and the system version date PTZ version Display the IP speed dome version model OCX version Display the OCX version number After setting complete click to save it ...

Страница 16: ...16 Rest Restore factory settings Reboot Click to do IP speed dome reboot operation Parameters type Select the parameters type which you have to derive Parameter input Select the configure file which you need and click Parameter output Select the configure file which you need and click After setting complete click to save it ...

Страница 17: ...ome Update interface As figure 3 17 Figure 3 17 System update System update online Operation method Click find the specified file and select the upgrade package click or double click to operate the program file As Figure below Click system upgrade automatically ...

Страница 18: ...g in check the whether the software version is updated Note after system upgrade successfully you need to reset camera data in Sysoperate clear IE cache and install ActiveX again before logging in web system clear IE cache as figure below Non professional technicians do not operate the system upgrade Please do not power off during installing update ...

Страница 19: ...e alarm log type there are alarm exception operation information selectable Begin time End time Set the log search time period click icon and the log information will display click to open or download the corresponding log information After setting complete click to save it ...

Страница 20: ...anage as Figure 3 19 Figure 3 19 Add User Add a new users and select the new user limits of authority Modify Select the added user and modify the users password Del User Delete the added users After setting click to save it ...

Страница 21: ...s Figure 3 20 Figure 3 20 Serial setting Address Click to select or modify the IP speed dome address Baud rate Click to select or modify the baud rate Protocol Click to select or modify the protocol After setting click to save it ...

Страница 22: ...atically note users have to turn off the power when take off or insert the micro SD card Disp strategy as insufficient storage space select stop Stop recording or cover overwrite File len Set the file length 1 15 mins selectable Cur setting Set the current video record time max 10 periods day After setting click to save it Please do not power off during backup the video ...

Страница 23: ...End time Set the video record end time File type Set the upload file type such picture or video users have to set the FTP parameters first at Alarm conf Alarm Linkage FTP Settings and enable FTP upload at Alarm conf Alarm conf function item more details please refer to Alarm conf After setting click to save it ...

Страница 24: ...e zone Zone service Select zone service and click in front of Auto connect to service to make the IP speed dome time zone same with NTP server Summer time setting as Figure 3 24 Start Click to start summer time Begin time Set begin summer time End time Set end summer time Offset time Set summer offset time there 30 60 90 120 minutes selectable After setting click to save it ...

Страница 25: ...e micro SD card status successful fail Micro SD format Display the micro SD card format not support to display micro SD format Total used Display the micro SD card total capacity and used capacity Percent Display the percentage of used and unused space Format Click to format the micro SD card ...

Страница 26: ...et the devices video encoding quality 1 100 levels selectable Profile Set the video encoding level High Base Main selectable GOP Set the GOP value 1 50 selectable Rate control CBR Constant Bit Rate VBR Variable Bit Rate selectable CBR rate Set the constant bit rate value 2000 6000 Kbps selectable VBR max rate VBR min rate Set the variable bit rate value Format Video compression format support H 26...

Страница 27: ... the BPS information on the screen Time Select the time display format and display it on the screen Name User can edit the video image name click it to display the video image name Text Support at most 5 items chars display user defined Note Users can drag the information to optional position with mouse After setting click to save it ...

Страница 28: ...omatic manual As users select semi automatic manual click to adjust focus and to zoom AF sensitivity Set the AF sensitivity 1 255 selectable AF Area Select select AF area support all region focus center focus AF search model Support full view 1 5m 3m 6m infinity model Digital zoom Click to enable digital zoom After setting click to save it ...

Страница 29: ... Ethernet setting Set the IP address default 192 168 1 188 the Mask default 255 255 255 0 the Gateway default 192 168 1 1 DHCP setting If the router comes with DHCP function click to enable DHCP switch IP speed dome will get the IP address from the router automatically After setting click to save it ...

Страница 30: ...e Dynamic Domain Name Server Enable DDNS users have to enter the router to manually map the WEB and RTSP port Server Select DDNS server type Device domain name Input the registered domain User name Input the registered user name Password Input registered password After setting click to save it ...

Страница 31: ...28 Netport Net port setting as Figure 3 31 Figure 3 31 WEB port HTTP access port default is 80 user defined FTP port FTP server appointed port number RTSP port video data decoding port default is 554 ...

Страница 32: ...29 Other protocol Other protocol as Figure 3 32 Figure 3 32 Click to enable the other protocol and select the appointed protocol After setting click to save it ...

Страница 33: ...rm conf Alarm conf Alarm period IP Speed Dome Alarm period interface As Figure 3 33 Figure 3 33 Add task Add new alarm period Del task Delete the specified time period Copy to Copy the current alarm period to the other day After setting click to save it ...

Страница 34: ...4 Alarm Strategy Select alarm output type linkage picture Picture or video Record FTP upload Click to enable FTP alarm upload Email Click to enable E mail alarm upload Record time Set video record time Snap Set picture snapshot number and frequency time Device alarm Set alarm linkage devices After setting click to save it ...

Страница 35: ...password send email and receive email The port is 465 send email is same with receive email click FTP setting Set the FTP server include the server address user s PC IP address username password and the upload file path users must set the same file path in the computer PC cannot create a file automatically After setting click to save it ...

Страница 36: ... as Figure 3 36 Figure 3 36 IO channel Set the alarm linkage device input port Preset Click to enable linkage preset and set the preset number IO out Click to enable device alarm output port and set the IO output number After setting click to save it ...

Страница 37: ... Figure 3 37 Figure 3 37 Enable Click to enable motion detection there are max 4 motion detection Sensitivity Set the sensitivity 1 10 levels adjustable Clear all Clear all motion detection setting After setting click to save it ...

Страница 38: ...al setting Set the video record length time and file store path Prerecord setting Click to enable prerecord and select prerecord time 5 30s selectable Play performance setting Set the alarm video performance select normal real time fluency After setting click to save it ...

Страница 39: ...ard file search input the start and end time select the video type device or local click search The video record file will display automatically Video playback operation Select the record video double click to playback click icon to pause click icon to speed up quick back As figure 3 39 File video playback Click icon to find the stored video format mp4 double click to play it Video playback snapsh...

Страница 40: ...nt lamp Water bottom Customized Iris control AUTO Manual Electronic shutter AUTO 1 25 1 5 000 s Manual 1 5 1 5 000 s AGC 100 150 200 300 400 600 800 1600 3200 6400 12800 25600 51200 102400 BLC OFF ON WDR OFF ON Day Night Auto COLOR B W Rotation Normal H Mirror V Mirror DNR OFF ON IR Beam Distance 80m Angle Field of IR Change with focus IR Control Brightness and angle changed with scene Operation H...

Страница 41: ...ers can be moving Image Brightness Contrast Saturation Sharpness adjustable through client and Internet Explorer Protocols GB T28181 ONVIF Profile S Network protocol IPv4 TCP UDP HTTP HTTPS SMTP FTP NTP DNS DDNS DHCP RTSP RTP RTCP SNMP Micro SD card Max 64 GB not in equipment Poe Support Alarm input 1 channel Alarm output 1 channel support alarm linkage Alarm action Micro SD card video recording F...

Страница 42: ...rer 2 Fail to visit Network High Speed Dome via IE after upgrade Solution Delete the caching of Browser 3 The images do not flow TCP 80 Web port 5050 Communication port audio video data transmission port talkback data transmission port UDP 5050 Audio video data transmission port Onvif port 80 RTSP port 554 RTSP stream port 554 Search port 10000 Telnet port 23 Onvif search port 3702 Video stream po...

Страница 43: ... Web port has been modified Solution Contact Network Administrator to obtain related information 5 The color of images is abnormal green or other colors Sometimes Network High Speed Dome images cannot display properly for the difference between Graphics Cards the images appears to be green or other colors then you should run the program Config exe or run C windows system32 Config exe to set the fo...

Страница 44: ...41 ...

Страница 45: ...42 TELECAMERA IP PTZ FULL HD 4 ART IPPTZ110IRA Leggere attentamente questo manuale di istruzioni prima di effettuare l installazione ...

Страница 46: ...ta 7 Impostazione del sistema 11 Sistema 11 Informazioni di base 11 Gestione utenti 17 Interfaccia seriale 18 Registrazione 19 Fuso orario 21 Stato scheda Micro SD 22 AV 23 Canali video 23 Parametri video 24 Parametri di ripresa 25 Rete 26 Ethernet 26 DDNS 27 Porte di rete 28 Altri protocolli 29 Configurazione allarme 30 Collegamenti 32 Allarme di ingresso uscita 33 Movimento 34 Impostazioni local...

Страница 47: ...tenuto del presente manuale verrà aggiornato con cadenza non programmata la nostra azienda si riserva il diritto di aggiornare il contenuto del manuale senza ulteriore avviso Il nome utente predefinito per questo dispositivo è admin e la relativa password è vuota L indirizzo IP predefinito è 192 168 1 188 e la porta HTTP predefinita è 80 CONTENUTO DELLA CONFEZIONE Aprire la confezione e verificare...

Страница 48: ...legamento allarmi registrazione video su scheda micro SD acquisizione immagini caricamento su FTP notifica e mail collegamento preposizionamenti Protocollo ONVIF Profilo S protocollo GB T28181 Rotazione orizzontale continua di 360 verticale 0 90 255 preposizionamenti Basso consumo energetico MTTF tempo medio tra i guasti fino a 30 000 ore 1 canale di ingresso di allarme 1 canale di uscita di allar...

Страница 49: ...ccenderà automaticamente i LED IR e funzionerà normalmente dopo un riscaldamento di 30 minuti Fasi dell installazione hardware Accertarsi del corretto funzionamento della rete LAN e WAN prima di procedere all installazione della telecamera dome high speed di rete Dopo aver verificato che l impianto di rete si trovi in buone condizioni seguire la seguente procedura dopo aver lavato e asciugato le m...

Страница 50: ...egato l alimentatore la telecamera IP speed dome entrerà automaticamente in funzione Collegamenti Linea RJ45 multi funzione Uscita video analogica GND MASSA Pulsante reset Ingresso alimentazione 24 VDC RJ45 Ingresso di allarme Uscita di allarme ...

Страница 51: ...su Custom Level Livello personalizzato ed effettuare le seguenti impostazioni Scaricamento e installazione del controllo ActiveX Quando si accede la prima volta alla telecamera dome high speed di rete tramite il browser IE è necessario installare un controlloActiveX Scaricamento e installazione del controlloActiveX Inserire l indirizzo IPdella telecamera l indirizzo predefinito è http 192 168 1 18...

Страница 52: ...ra 3 2 Figura 0 2 Verrà visualizzata una finestra a comparsa User Account Control UAC Controllo dell account utente fare clic su Yes Sì per effettuare l installazione Fare riferimento alla Figura 3 3 Figura 3 3 Nel messaggio di avviso relativo alla scaricamento è possibile anche selezionare Save Salva per salvare il controllo ActiveX nella cartella predefinita per esempio D TDDOWNLOAD Aprire quind...

Страница 53: ...6 Figura 3 4 Figura 3 5 Fare clic su Install Installa nella procedura guidata illustrata in Figura 3 6 Figura 3 6 Fare clic su Fine Fine nella procedura guidata illustrata in Figura 3 7 ...

Страница 54: ... speed di rete per accedere alla pagina di login inserire il proprio User Name nome utente il cui valore predefinito è admin e la relativa password per impostazione predefinita è vuota quindi fare clic su Login Accesso per accedere alla pagina principale vedere Figura 3 8 Figura 0 8 Visualizzazione in diretta La pagina di visualizzazione in diretta è illustrata in Figura 3 9 ...

Страница 55: ...impostarlo in Setting Impostazione Local Locale Local setting Impostazioni locali Schermo intero fare clic sull icona per l anteprima video a schermo intero premere ESC o fare clic con il pulsante destro del mouse per uscire da tale modalità Operazioni video manuali fare clic sull icona per effettuare operazioni video manuali e salvare i file automaticamente Il formato video è mp4 il percorso pred...

Страница 56: ...selezionarla fare nuovamente clic sulla casella di controllo per deselezionarla Fare riferimento alla Figura 3 9 3DNR fare clic sulla casella di controllo per selezionarla fare nuovamente clic sulla casella di controllo per deselezionarla Fare riferimento alla Figura 3 9 Video formats Formati video selezionare il formato video 50 Hz per il sistema PAL 60 Hz per il sistema NTSC Fare clic su per sal...

Страница 57: ...e il limite sinistro e fare clic su per impostare il limite destro Quando è impostata la scansione area è necessario selezionare l ampiezza angolare di scansione scegliendo tra Small radian scan scansione di un angolo inferiore a 180 o Big radian scan scansione di un angolo superiore a 180 e quindi impostare il limite sinistro destro Fare clic su per richiamare la scansione area Fare riferimento a...

Страница 58: ...to e fare clic su per eliminarlo Infine fare clic su per salvarlo e fare clic su per richiamarlo Fare riferimento alla Figura 3 14 Figura 3 14 Impostazione del sistema Sistema Informazioni di base Informazioni sul sistema Fare clic su Setting System Basic info Sysinfo Impostazione Sistema Informazioni di base Info sistema per accedere alla scheda con i dati della telecamera IP Speed Dome Fare rife...

Страница 59: ...sion Versione UBOOT visualizza il numero di versione del booter di sistema Kernel version Versione kernel visualizza il numero di versione di kernel del sistema APP version Versione app visualizza la versione del prodotto software e la data della versione di sistema PTZ version Versione PTZ visualizza la versione del modello di IP speed dome OCX version Versione OCX visualizza il numero di version...

Страница 60: ...eset Ripristino ripristina le impostazioni di fabbrica Reboot Riavvio fare clic su per effettuare il riavvio della telecamera IP speed dome Parameters type Tipo parametri selezionare il tipo di parametri da ottenere Parameter input Ingresso parametri selezionare il file di configurazione desiderato e fare clic Parameter output Uscita parametri selezionare il file di configurazione desiderato e far...

Страница 61: ...iferimento alla Figura 3 17 Figura 3 17 System update Aggiornamento del sistema l aggiornamento del sistema viene effettuato online Procedura da seguire Fare clic su individuare il file specifico selezionando il pacchetto di aggiornamento fare clic su o fare doppio clic sul file per aprirlo Fare riferimento alla seguente figura Fare clic su l aggiornamento di sistema viene avviato automaticamente ...

Страница 62: ...etto aggiornamento del sistema è necessario reimpostare i dati della telecamera nella scheda Sysoperate Operazioni di sistema cancellare la cache cronologia di navigazione di IE e installare nuovamente il controllo ActiveX prima di accedere al sistema tramite web cancellare la cronologia di navigazione di IE come illustrato nella figura qui sotto L aggiornamento del sistema deve essere eseguito es...

Страница 63: ...llarmi exception eccezioni operation funzionamento information informazioni Begin time Orario iniziale End time Orario finale Impostare il periodo di tempo per effettuare la ricerca nel registro fare clic su per visualizzare i dati presenti nel registro e fare clic su per aprire o scaricare il corrispondente file registro Dopo aver completato l impostazione fare clic su per salvarla ...

Страница 64: ...Aggiungi utente consente di aggiungere nuovi utenti e selezionarne i livelli di autorizzazioni Modify Modifica consente di selezionare un utente aggiunto e di modificarne la password Del User Elimina utente consente di eliminare gli utenti aggiunti Dopo aver completato le impostazioni fare clic su per salvarle ...

Страница 65: ... per selezionare o modificare l indirizzo IP della telecamera speed dome Baud rate Velocità di trasmissione in baud Fare clic su per selezionare o modificare la velocità di trasmissione in baud della telecamera speed dome Protocol Protocollo Fare clic su per selezionare o modificare il protocollo della telecamera speed dome Dopo aver completato le impostazioni fare clic su per salvarle ...

Страница 66: ...quando si estrae o si inserisce la scheda micro SD Disp Strategy Strategia di gestione spazio di archiviazione è possibile selezionare la strategia da adottare nel caso di spazio di archiviazione insufficiente scegliendo Stop arresto registrazione o Cover sovrascrittura File len Lunghezza file impostare la lunghezza del file è possibile selezionare una durata di 1 15 minuti Cur setting Impostazion...

Страница 67: ... File type Tipo di file impostare il tipo di file da caricare come immagine o video prima è necessario impostare i parametri FTP in Alarm conf Alarm Linkage FTP Settings Configurazione allarme Collegamento allarme Impostazioni FTP e attivare FTP upload Caricamento FTP nella voce di menu Alarm conf Alarm conf function Configurazione allarme Configurazione allarme funzione per maggiori dettagli fare...

Страница 68: ...a di controllo a fianco di Auto connect to service Collegamento automatico al servizio per sincronizzare il fuso orario della telecamera di rete IP speed dome con quello del server NTP Le impostazioni relative all ora legale sono illustrate nella parte inferiore della Figura 3 23 Start Avvia Fare clic su per avviare l ora legale Begin time Orario iniziale consente di impostare la data iniziale del...

Страница 69: ...ro SD corretto errato Micro SD format Formato scheda Micro SD visualizza il formato della scheda Micro SD non supportato Total Used Spazio totale utilizzato visualizza lo spazio totale e lo spazio utilizzato della scheda micro SD Percent visualizza la percentuale di spazio utilizzato e inutilizzato Format Formattazione fare clic sul pulsante per formattare la scheda di memoria Micro SD ...

Страница 70: ...video è possibile selezionare High Base Main GOP imposta il valore GOP è possibile selezionare un valore nell intervallo 1 50 Rate control Controllo bit rate è possibile selezionare CBR velocità in bit costante VBR velocità in bit variabile CBR rate Velocità in bit costante imposta la velocità in bit costante È possibile selezionare un valore nell intervallo 2000 6000 Kbps VBR max rate VBR min rat...

Страница 71: ...azioni sullo schermo Time Ora spuntare la relativa casella di controllo e selezionare il formato di visualizzazione dell orario Name Nome spuntare la relativa casella di controllo e modificare il nome dell immagine video Text Testo è possibile inserire fino a 5 stringhe di testo personalizzate da visualizzare sullo schermo Nota è possibile trascinare le stringhe di testo con il mouse nelle posizio...

Страница 72: ... per regolare lo zoom AF sensitivity SensibilitàAF imposta la sensibilitàAF autofocus è possibile selezionare un valore nell intervallo 1 255 AFArea Select Selezione areaAF consente di selezionare l area per la messa a fuoco automatica È possibile selezionareAll Region Focus messa a fuoco di tutta la zona Center Focus messa a fuoco centrale AF search model SistemaAF è possibile selezionare full vi...

Страница 73: ...rizzo IP valore predefinito 192 168 1 188 la maschera valore predefinito 255 255 255 0 il Gateway valore predefinito 192 168 1 1 DHCP setting Impostazione DHCP se il router è dotato della funzionalità DHCP fare clic sulla casella di controllo per attivare il protocollo DHCP in questo modo la telecamera IP speed dome otterrà automaticamente l indirizzo IP dal router Dopo aver completato le impostaz...

Страница 74: ...mic Domain Name Server attivando il DDNS è necessario inserire il router per la mappatura manuale della porta WEB e RTSP Server selezionare il server DDNS Device domain name Nome dominio dispositivo inserire il dominio registrato User name Nome utente inserire il nome utente registrato Password inserire la password registrata Dopo aver completato le impostazioni fare clic su per salvarle ...

Страница 75: ... è illustrata in Figura 3 31 Figura 3 31 WEB port Porta WEB Porta di accesso HTTP il valore predefinito è 80 ed è personalizzabile FTP port Porta FTP numero di porta del server FTP prescelto RTSP port Porta RTSP porta di decodifica dei dati video il valore predefinito è 554 ...

Страница 76: ...a relativa alla impostazione di altri protocolli è illustrata nella Figura 3 32 Figura 3 32 Far clic su per attivare un altro protocollo e selezionare il protocollo desiderato al termine dell impostazione fare clic su per salvarlo ...

Страница 77: ...are la scheda Alarm period Periodo di allarme della telecamera IP speed dome Fare riferimento alla Figura 3 33 Figura 3 33 Add task Aggiungi attività aggiunge un nuovo periodo di allarme Del task Elimina attività elimina il periodo di tempo specificato Copy to Copia su copia il periodo di allarme corrente su un altro giorno Dopo aver completato le impostazioni fare clic su per salvarle ...

Страница 78: ... allarme l immagine Picture o il video Record di collegamento FTP upload Caricamento FTP fare clic su per attivare il caricamento dell allarme su FTP Email Messaggio e mail fare clic su per attivare l invio dell allarme tramite e mail Record time Durata registrazione impostare la durata della registrazione video Snap Istantanea impostare il numero di istantanee e la relativa frequenza Device alarm...

Страница 79: ...zzo mittente e Receive email Indirizzo destinatario La porta è 465 l indirizzo del mittente è lo stesso del destinatario FTP setting Impostazione FTP impostare il server FTP specificando l indirizzo del server indirizzo IP del PC dell utente Username Nome utente Password e il percorso di caricamento dei file gli utenti devono impostare lo stesso percorso di file nel computer il PC non può creare a...

Страница 80: ...a di ingresso del dispositivo di collegamento con l allarme Preset Preposizionamento Fare clic su per attivare un preposizionamento di collegamento e impostarne il relativo numero IO out Uscita I O Fare clic su per attivare la porta di uscita dell allarme dispositivo e impostare il relativo numero Dopo aver completato le impostazioni fare clic su per salvarle ...

Страница 81: ... su per abilitare il rilevamento del movimento sono disponibili 4 rilevazioni al massimo Sensitivity Sensibilità impostare la sensibilità è possibile selezionare un valore nell intervallo 1 10 Clear all Cancella tutto cancella tutte le impostazioni relative al rilevamento del movimento Dopo aver completato le impostazioni fare clic su per salvarle ...

Страница 82: ...ile Prerecord setting Impostazioni di preregistrazione Fare clic su per abilitare la preregistrazione e selezionare il tempo di preregistrazione è possibile selezionare un valore nell intervallo 5 30 s Play performance setting Impostazione prestazioni di riproduzione Impostare le prestazioni video di allarme è possibile selezionare Normal Normale Real Time Tempo reale Fluency Scorrevolezza Dopo av...

Страница 83: ...D è sufficiente inserire l orario iniziale e finale selezionare il tipo di video dispositivo o locale quindi fare clic su Search Cerca Le registrazioni video trovate verranno elencate automaticamente Comandi di riproduzione video selezionare la registrazione video di interesse fare doppio clic per riprodurla fare clic su per metterla in pausa fare clic su per spostarsi rapidamente in avanti indiet...

Страница 84: ...Automatico Manuale Otturatore elettronico Automatico 1 25 1 5 000 s Manuale 1 5 1 5 000 s AGC 100 150 200 300 400 600 800 1600 3200 6400 12800 25600 51200 102400 BLC Compensazione del controluce OFF ON WDR OFF ON Modalità Giorno Notte Automatica Colore BN Rotazione Normale Immagine speculare orizzontale Immagine speculare verticale DNR riduzione rumore OFF ON Portata led IR 80 m Campo di ripresa I...

Страница 85: ...ri spostabili Immagine Luminosità contrasto saturazione nitidezza regolabile tramite client e Internet Explorer Protocolli supportati GB T28181 ONVIF Profilo S Protocolli di rete IPv4 TCP UDP HTTP HTTPS SMTP FTP NTP DNS DDNS DHCP RTSP RTP RTCP SNMP Scheda Micro SD Max 64 GB non in dotazione Poe Supportato Ingresso di allarme 1 canale Uscita di allarme 1 canale supportato collegamento allarme Azion...

Страница 86: ...ra dome high speed di rete tramite IE dopo l aggiornamento Soluzione Eliminare la cronologia di navigazione del browser 3 Le immagini non scorrono correttamente TCP 80 Porta web 5050 Porta di comunicazione porta di trasmissione dati audio video porta di trasmissione dati di intercomunicazione UDP 5050 Porta di trasmissione dati audio video Porta Onvif 80 Porta RTSP 554 Porta stream RTSP 554 Porta ...

Страница 87: ...enere le relative informazioni 5 Il colore delle immagini è anomalo verde o altri colori Avolte le immagini della telecamera dome high speed di rete non possono essere visualizzate correttamente per la differenza tra schede grafiche le immagini sembrano verdi o di altri colori In tal caso eseguire il programma Config exe percorso completo C windows system32 Config exe per impostare i seguenti para...

Страница 88: ...41 ...

Страница 89: ...42 CAMÉRA 4 FULL HD IP PTZ ART IPPTZ110IRA Avant l installation veuillez lire attentivement le manuel opératoire ...

Страница 90: ...essentielles 11 User manage gestion utilisateur 17 Serial série 18 Record enregistrer 19 Time zone fuseau horaire 21 Micro SD status statut micro SD 22 AV 23 Video channels canaux vidéo AV 23 Video parameters paramètres vidéo 24 Shot parameters paramètres de prise 25 Réseau 26 Ethernet 26 DDNS 27 Netport 28 Other protocol autre protocole 29 Alarm configuration configuration alarme 30 Liaison 32 IN...

Страница 91: ...sent veuillez contacter notre service d assistance technique ou votre concessionnaire Le contenu de ce manuel sera mis à jour de manière aléatoire Notre société se réserve le droit de mettre à jour le contenu du manuel sans autre préavis Le nom d utilisateur par défaut de ce dispositif est admin et le mot de passe est nul L adresse IP par défaut est 192 168 1 188 et le port HTTP est 80 LISTE DE CO...

Страница 92: ...son alarme enregistrement vidéo sur micro SD instantané transfert FTP notification par courriel présélection du lien Profil ONVIF protocole S protocole GB T28181 Rotation horizontale 360 continue verticale 0 90 255 préréglages Faible consommation d énergie MTTF jusqu à 30 000 heures 1 canal entrée alarme 1 canal sortie alarme prise micro SD intégrée entrée sortie audio 100M Ethernet Niveau de prot...

Страница 93: ...nera normalement après une période de chauffe de 30 minutes Procédure d installation du matériel Avant de procéder à l installation de Network High Speed Dome veuillez vérifier que la LAN et la WAN fonctionnent correctement Après avoir vérifié que le tout le système du réseau est en bon état veillez à ce que vos mains soient propres et sèches et suivez la procédure ci dessous Ouvrez l emballage et...

Страница 94: ...ranché l alimentation électrique la caméra IP speed commencera automatiquement à fonctionner Instructions pour la connexion Ligne RJ45 multi fonctions Sortie vidéo analogique GND Bouton Reset Entrée alimentation 24 V CC RJ45 Entrée alarme Sortie alarme ...

Страница 95: ...Custom Level niveau de personnalisation et suivez les étapes de réglage du navigateur IE Téléchargement et installation de ActiveX Les utilisateurs doivent installer ActiveX Control lorsqu ils accèdent pour la première fois à Network High Speed Dome via le navigateur IE Téléchargement et installation de ActiveX Entrez l adresse IP adresse par défaut http 192 168 1 188 dans Internet Explorer afin d...

Страница 96: ...ne interface User Account Control contrôle du compte utilisateur s affiche Cliquez sur Yes oui pour lancer l installation Comme illustré à la Figure 3 3 Figure 3 3 Dans l interface de téléchargement vous pouvez également sélectionner save enregistrer pour enregistrer ActiveX dans le fichier de mémorisation par défaut comme par exemple D TDDOWNLOAD Ouvrez alors le fichier et installez ActiveX Comme...

Страница 97: ...3 4 Figure 3 5 Cliquez sur Install installer dans l interface illustrée ci dessous Figure 3 6 Figure 3 6 Cliquez sur Finish terminer dans l interface illustrée ci dessous pour terminer l installation Figure 3 7 ...

Страница 98: ...igh Speed puis revenez à la page de connexion Entrez votre nom d utilisateur username le nom par défaut est admin et votre mot de passe password le mot de passe par défaut est nul puis cliquez pour accéder à l interface principale voir Figure 3 8 Figure 3 8 Affichage en direct L aperçu de l interface affichage en direct est illustré à la figure 3 9 ...

Страница 99: ...ier d enregistrement par défaut est C IPCamera les utilisateurs peuvent le modifier en allant sur Setting Local Local setting paramètres local paramètres locaux Full screen plein écran Cliquez sur l icône pour afficher l aperçu en plein écran appuyez sur ESC ou cliquez avec le bouton droit de la souris pour quitter l affichage plein écran de l aperçu Manual video vidéo manuel cliquez sur l icône p...

Страница 100: ...re 3 9 Low illumination éclairage faible cliquez sur pour l ouvrir puis cliquez à nouveau sur pour fermer Comme illustré à la Figure 3 9 BLC cliquez sur pour l ouvrir puis cliquez à nouveau sur pour fermer Comme illustré à la Figure 3 9 3DNR cliquez sur pour l ouvrir puis cliquez à nouveau sur pour fermer Comme illustré à la Figure 3 9 Video formats formats vidéo sélectionnez le format vidéo 50HZ ...

Страница 101: ...sur pour régler la limite droite La zone d acquisition sera mémorisée automatiquement Lorsqu ils règlent la zone d acquisition les utilisateurs doivent avant tout sélectionner Small radian scan petit radian d acquisition inférieur à 180 Big radian scan grande radian d acquisition supérieur à 180 puis régler la limite gauche et la limite droite Cliquer sur pour appeler la zone d acquisition Comme i...

Страница 102: ...mer Enfin cliquer sur pour enregistrer et sur pour appeler l acquisition de la matrice Comme illustré à la Figure 3 14 Figure 3 14 Paramétrage des spécifications du système Système Informations essentielles Informations système Cliquer sur Setting System Basic info Sysinfo Paramètres Système informations essentielles information système interface Device info informations dispositif de la caméra IP...

Страница 103: ...n UBOOT affiche le numéro de version UBOOT du système de produit Version noyau affiche le numéro de version du noyau du système de produit Version APP affiche la version du logiciel du produit et la date de la version du système Version PTZ affiche le modèle de la version de IP speed dome Version OCX affiche le numéro de version OCX Au terme du réglage cliquer sur pour enregistrer ...

Страница 104: ... rétablir rétablissement des réglages du fabricant Reboot redémarrer cliquer sur pour lancer l opération de redémarrage de IP speed dome Parameters type type de paramètres sélectionner le type de paramètre à utiliser Parameter input entrée paramètre sélectionner le fichier de configuration nécessaire et cliquer Parameter output sortie paramètre sélectionner le fichier de configuration nécessaire e...

Страница 105: ...ré à la Figure 3 17 Figure 3 17 System update mise à jour système mise à jour du système en ligne Operation method méthode de fonctionnement cliquer sur trouver le fichier spécifié et sélectionner le pack de mise à jour Cliquer sur ou double cliquer pour appliquer le fichier de programme Comme illustré ci dessous cliquer sur le système se met automatiquement à jour ...

Страница 106: ... est à jour Remarque au terme de la mise è jour du système vous devez ramener les données de la caméra sur Sysoperate supprimer le cache IE et réinstaller ActiveX avant de vous connecter au système Internet supprimer la cache IE comme illustré ci dessous Les techniciens non professionnels ne doivent pas effectuer la mise à jour du système Veuillez ne pas couper l alimentation durant l installation...

Страница 107: ...us pouvez sélectionner alarme exception opération information Begin time End time heure début heure fin Sélectionner la période de recherche dans le journal et cliquer sur l icône Les informations du journal s affichent Cliquer sur pour ouvrir ou télécharger les informations du journal correspondantes Au terme du réglage cliquer sur pour enregistrer ...

Страница 108: ...t utilisateur ajouter de nouveaux utilisateurs et sélectionner les limites des autorisations dont ils disposent Modify modifier sélectionner l utilisateur ajouté et modifier le mot de passe des utilisateurs Del User supprimer util supprimer les utilisateurs ajoutés Au terme du réglage cliquer sur pour enregistrer ...

Страница 109: ... Serial setting réglage série Adresse Cliquer sur pour sélectionner ou modifier l adresse IP de speed dome Débit Cliquer sur pour sélectionner ou modifier le débit Protocole Cliquer sur pour sélectionner ou modifier le protocole Au terme du réglage cliquer sur pour enregistrer ...

Страница 110: ...marque couper l alimentation avant d insérer ou de retirer la micro SD card Stratégie affichage si suffisamment d espace est disponible pour le stockage sélectionner stop arrêt enregistrement ou cover écraser Longueur fichier régler la longueur du fichier de 1 à 15 min Paramètre actuel régler la durée de l enregistrement actuel 10 périodes max par jour Au terme du réglage cliquer sur pour enregist...

Страница 111: ...in de l enregistrement vidéo Type de fichier régler le type de fichier à transférer comme une image ou une vidéo régler d abord les paramètres FTP sous Alarm conf Alarm Linkage FTP Settings conf alarm liaison alarme paramètres FTP et activer le transfert FTP sous Alarm conf Alarm conf function conf alarme conf alarme fonction pour plus de détails se reporter à Conf alarme Au terme du réglage cliqu...

Страница 112: ...ner Zone service et cliquer sur devant Auto connect to service pour que la caméra IP speed dome utilise le fuseau horaire du serveur NTP Réglage de l heure d été comme illustré à la Figure 3 24 Début Cliquer sur pour activer l heure d été Heure début Régler l heure de début selon l heure d été Heure fin Régler l heure de fin selon l heure d été Heure d écart Régler l écart de l heure d été Vous po...

Страница 113: ...la micro SD card réussite échec Format Micro SD affiche le format de la micro SD card non pris en charge pour afficher le format de la micro SD Total utilisé affiche la capacité totale de la micro SD card et la capacité utilisée Pourcentage affiche le pourcentage d espace utilisé et disponible Format cliquer pour formater la micro SD card ...

Страница 114: ...us pouvez sélectionner de 1 à 100 niveaux Profil réglage du niveau d encodage de la vidéo vous pouvez sélectionner haut base principal GOP réglage de la valeur GOP vous pouvez sélectionner de 1 à 50 Contrôle débit vous pouvez sélectionner CBR Constant Bit Rate débit constant VBR Variable Bit Rate débit variable Débit CBR régler la valeur du débit constant Vous pouvez sélectionner 2000 6000 Kbps Dé...

Страница 115: ...à l écran Heure sélectionner le format d affichage de l heure et l afficher à l écran Nom l utilisateur peut modifier le nom de l image vidéo Cliquer sur l image pour afficher son nom Texte prend en charge 5 caractères affichés au maximum définis par l utilisateur Remarque les utilisateurs peuvent faire glisser les informations sur un emplacement optionnel à l aide de la souris Au terme du réglage...

Страница 116: ...emi automatic manual est sélectionné cliquer sur pour régler la mise au point et sur pour zoomer Sensibilité AF réglage de la sensibilité AF Vous pouvez sélectionner de 1 à 255 Sélection zone AF sélectionner la zone AF Prend en charge toutes les régions mises au point centres Modèle de recherche AF Prend en charge les modèles plein écran 1 5 m 3m 6m infini Zoom numérique cliquer sur pour activer l...

Страница 117: ...égler l adresse IP par défaut 192 168 1 188 le masque par défaut 255 255 255 0 la passerelle par défaut 192 168 1 1 Réglage DHCP si le routeur est équipé de la fonction DHCP cliquer sur pour activer l interrupteur DHCP La caméra IP speed dome prendra automatiquement l adresse IP du routeur Au terme du réglage cliquer sur pour enregistrer ...

Страница 118: ...e activer DDNS les utilisateurs doivent entrer le routeur pour définir manuellement le port WEB et RTSP Serveur sélectionner le type de serveur DDNS Nom domaine du dispositif entrer le domaine enregistré Nom d utilisateur entrer le nom d utilisateur enregistré Mot de passe entrer le mot de passe enregistré Au terme du réglage cliquer sur pour enregistrer ...

Страница 119: ...seau comme illustré à la Figure 3 31 Figure 3 31 Port WEB port d accès HTTP la valeur par défaut est 80 défini par l utilisateur Port FTP numéro du port désigné pour le serveur FTP Port RTSP port de décodage des données vidéo Par défaut 554 ...

Страница 120: ...rotocol autre protocole Autre protocole comme illustré à la Figure 3 32 Figure 3 32 Cliquer sur pour activer l autre protocole et sélectionner le protocole désigné Au terme du réglage cliquer sur pour enregistrer ...

Страница 121: ...rme période alarme interface Alarm period période alarme IP Speed Dome Comme illustré à la Figure 3 33 Figure 3 33 Ajouter tâche ajouter une nouvelle période d alarme Supprimer tâche supprimer la période indiquée Copier vers copier la période d alarme actuelle vers un autre jour Au terme du réglage cliquer sur pour enregistrer ...

Страница 122: ...type de sortie alarme liaison image Picture ou vidéo Record Transfert FTP cliquer sur pour activer le transfert FTP de l alarme Courriel cliquer sur pour activer le transfert de l alarme par courriel Heure d enregistrement régler l heure de l enregistrement vidéo Instantané régler le numéro et l heure de fréquence de l instantané Alarme dispositif régler les dispositifs de liaison alarme Au terme ...

Страница 123: ...urriel Le port est 465 envoi courriel et réception courriel sont identiques Réglage FTP régler le serveur FTP y compris l adresse du serveur adresse IP de l ordinateur de l utilisateur le nom d utilisateur le mot de passe et le parcours du fichier de transfert les utilisateurs doivent régler le même parcours de fichier sur l ordinateur l ordinateur ne peut pas créer automatiquement un fichier Au t...

Страница 124: ...nal ES régler le port d entrée du dispositif de liaison alarme Pré réglage cliquer sur pour activer le pré réglage de la liaison et régler le numéro du pré réglage Sortie ES cliquer sur pour activer le port de sortie de l alarme du dispositif et régler le numéro de sortie ES Au terme du réglage cliquer sur pour enregistrer ...

Страница 125: ...cliquer sur pour activer la détection de mouvement 4 détections de mouvement au maximum sont disponibles Sensibilité régler la sensibilité 1 à 10 niveaux sont réglables Supprimer tout supprimer tous les réglages de la détection de mouvement Au terme du réglage cliquer sur pour enregistrer ...

Страница 126: ... vidéo temps et le parcours d enregistrement du fichier Réglage pré enregistrement cliquer sur pour activer le pré enregistrement et sélectionner le temps de pré enregistrement Vous pouvez choisir de 5 à 30 secondes Réglage des performances de lecture régler les performances vidéo de l alarme normale temps réel courant Au terme du réglage cliquer sur pour enregistrer ...

Страница 127: ...er un fichier entrer l heure de début et de fin sélectionner le type de vidéo dispositif ou local cliquer sur recherche Le fichier d enregistrement vidéo est affiché automatiquement Opération de lecture vidéo sélectionner la vidéo enregistrée double cliquer sur lecteur cliquer sur l icône pour mettre en pause cliquer sur l icône pour accélérer revenir rapidement en arrière Comme illustré à la Figu...

Страница 128: ...ris Automatique manuelle Obturateur électronique AUTO 1 25 1 5 000 s Manuel 1 5 1 5 000 s AGC 100 150 200 300 400 600 800 1600 3200 6400 12800 25600 51200 102400 BLC OFF ON WDR OFF ON Jour et Nuit Auto Couleur N B Rotation Normal H miroir V miroir DNR OFF ON Distance de rayonnement IR 80m Angle champ IR Changement avec mise au point Contrôle IR La luminosité et l angle ont changé avec la scène Opé...

Страница 129: ...acer Image Luminosité contraste saturation netteté réglable par le client et Explorer IE Protocoles GB T28181 ONVIF Profil S Protocole de réseau IPv4 TCP UDP HTTP HTTPS SMTP FTP NTP DNS DDNS DHCP RTSP RTP RTCP SNMP Carte micro SD Max 64 Go pas fournie Poe Support Entrée d alarme 1 canal Sortie d alarme 1 canal support liaison d alarme Action d alarme Enregistrement vidéo sur micro SD transfert FTP...

Страница 130: ...é à Network High Speed Dome via IE après la mise à jour Solution Supprimer la cache du navigateur 3 Les images ne défilent pas TCP 80 Port Web 5050 Port de communication port de transmission des données audio vidéo données interphone port de transmission UDP 5050 Port de transmission des données audio vidéo Port Onvif 80 Port RTSP 554 Port courant RTSP 554 Port de recherche 10000 Port Telnet 23 Po...

Страница 131: ...er l administrateur du réseau pour obtenir des informations sur le sujet 5 La couleur des images n est pas normale vert ou autres couleurs Les images de Network High Speed Dome peuvent parfois ne pas être affichées correctement au vu des différences entre les cartes graphiques Les images sont vertes ou d autres couleurs Exécuter le programme Config exe ou C windows system32 Config exe pour régler ...

Страница 132: ...41 ...

Страница 133: ...42 4 FULL HD IP PTZ CAMERA ART IPPTZ110IRA Lees voor installatie de bedieningshandleiding zorgvuldig door ...

Страница 134: ...age gebruikersbeheer 17 Serial 18 Record registratie 19 Time zone tijdzone 21 Micro SD status 22 AV 23 Video channels video kanalen 23 Video parameters 24 Shot parameters 25 Netwerk 26 Ethernet 26 DDNS 27 Netport 28 Other protocol ander protocol 29 Alarm configuration alarmconfiguratie 30 Linkage koppeling 32 INPUT OUTPUT alarm 33 Motion beweging 34 Local Settings lokale instellingen 35 Local Loka...

Страница 135: ...n contact op met onze technische ondersteuning of uw leverancier De inhoud van deze handleiding wordt op onregelmatige basis bijgewerkt Wij behouden ons het recht voor om de inhoud van de handleiding zonder verdere kennisgeving aan te passen De standaard username gebruikersnaam voor dit apparaat is admin en het password wachtwoord is blanco Het standaard IP adres is 192 168 1 188 HTTP poort is 80 ...

Страница 136: ...ng alarmkoppeling micro SD card video opname momentopname FTP upload e mailnotificatie preset koppeling ONVIF Profile S protocol GB T28181 protocol 360 continue horizontale rotatie verticaal 0 90 255 presets Laag stroomverbruik MTTF tot 30 000 uur 1CH alarmingang 1CH alarmuitgang ingebouwde sleuf voor micro SD card audio ingang uitgang 100M Ethernet Beschermingsgraad IP66 ...

Страница 137: ...nden en de camera na 30 minuten opwarmen normaal zal functioneren Handelingen voor hardware installatie Ga na of LAN en WAN goed functioneren alvorens de high speed dome netwerkcamera te installeren Nadat is gecontroleerd of het hele netwerksysteem zich in goede conditie bevindt dienen de volgende handelingen te worden verricht met schone droge handen Open de doos om de inhoud te controleren Pak a...

Страница 138: ... aan Nadat de voeding is aangesloten zal de IP speed camera automatisch in werking treden Verbindingen Multifunctionele RJ45 kabel Analoge video uitgang MASSA Resetknop Voedingsingang 24 VDC RJ45 Alarmingang Alarmuitgang ...

Страница 139: ...past niveau en volg daarna de stappen voor het instellen van de IE browser ActiveX downloaden en installeren Gebruikers moeten ActiveX Control installeren als zij de high speed dome netwerkcamera voor de eerste keer via de IE browser openen ActiveX downloaden en installeren Voer het IP adres in standaard adres http 192 168 1 188 in Internet Explorer om de login pagina te openen gebruikers kunnen d...

Страница 140: ...beelding 3 2 Afbeelding 3 2 De interface User Account Control Gebruikersaccountbeheer verschijnt Klik op Yes om te installeren Zie afbeelding 3 3 Afbeelding 3 3 In de downloadinterface kunt u save opslaan selecteren om ActiveX in het standaard opslagbestand te bewaren zoals D TDDOWNLOAD Open daarna het bestand en installeer ActiveX Zie afbeelding 3 4 en 3 5 ...

Страница 141: ... 3 4 Afbeelding 3 5 Klik op Install installeren in de onderstaande interface zie Afbeelding 3 6 Afbeelding 3 6 Klik op Finish voltooien in de onderstaande interface om de installatie te voltooien zie Afbeelding 3 7 ...

Страница 142: ...http 192 168 1 188 van de High speed netwerkcamera en ga naar de login pagina voer de username gebruikersnaam is standaard admin en het password wachtwoord is standaard blanco in klik op login om naar de hoofdinterface te gaan zie Afbeelding 3 8 Afbeelding 3 8 Directe weergave Voor de directe weergave zie afbeelding 3 9 ...

Страница 143: ...pecificeerde map opgeslagen Het standaard opslagpad is C IPCamera gebruikers kunnen dit instellen via Setting Local Local setting Full screen volledig scherm Klik op voor een preview van het volledige scherm druk op ESC of op de rechter muisknop om de volledige scherm preview te verlaten Manual video handmatige video klik op om naar handmatige video te gaan en automatisch op te slaan in het gespec...

Страница 144: ...nation weinig licht klik op om te openen klik nogmaals op om te sluiten Zie Afbeelding 3 9 BLC klik op om te openen klik nogmaals op om te sluiten Zie Afbeelding 3 9 3DNR klik op om te openen klik nogmaals op om te sluiten Zie Afbeelding 3 9 Video formats videoformaten selecteer het videoformaat 50HZ voor PAL 60HZ voor NTSC Klik op om op te slaan Zie Afbeelding 3 9 Exposure compensation belichting...

Страница 145: ... in te stellen klik op om de limiet links in te stellen klik op om de limiet rechts in te stellen De partitie scan wordt automatisch opgeslagen Bij het instellen van de partitie scan moeten gebruikers eerst Small radian scan Kleine radiaalscan radiaal van minder dan 180 of Big radian scan Grote radiaalscan radiaal van meer dan 180 selecteren en daarna de limiet rechts links instellen Klik op om de...

Страница 146: ...de vertragingstijd in te stellen Selecteer de vooringestelde ID en klik op om deze te wissen Klik tenslotte op om op te slaan en klik op om de patroon scan op te roepen Zie Afbeelding 3 14 Afbeelding 3 14 Instelling van het systeem Systeem Basisinformatie Systeeminformatie Klik op Setting System Basic info Sysinfo IP Speed Dome Device Info interface Zie afbeelding 3 15 ...

Страница 147: ...OOT version weergave van het versienummer van de UBOOT van het systeem Kernel version weergave van het versienummer van de systeemkernel APP version weergave van de softwareversie van het product en de versiedatum van het systeem PTZ version weergave van het versiemodel van de IP speed dome camera OCX version Weergave van het OCX versienummer Nadat de instellingen zijn voltooid klik op om op te sl...

Страница 148: ...n herstellen Reboot Klik op om de IP speed dome te rebooten Parameters type Selecteer het parametertype dat u wilt instellen Parameter input parameteringang Selecteer het configuratiebestand dat u nodig heeft en klik op Parameter output parameteruitgang Selecteer het configuratiebestand dat u nodig heeft en klik op Nadat de instellingen zijn voltooid klik op om op te slaan ...

Страница 149: ...me Update interface Zie afbeelding 3 17 Afbeelding 3 17 System update Systeem online updaten Ga als volgt te werk 13 Klik op ga naar het gespecificeerde bestand en selecteer het upgrade pakket klik op of dubbelklik om het programmabestand uit te voeren Zie onderstaande afbeelding ...

Страница 150: ...Controleer na het inloggen of de softwareversie is bijgewerkt Opmerking nadat het systeem succesvol is bijgewerkt moet u de cameragegevens resetten in Sysoperate maak de cache van IE leeg en installeer ActiveX opnieuw alvorens in te loggen in het websysteem maak de IE cache leeg volgens onderstaande afbeelding Niet technici mogen de systeem upgrade niet uitvoeren Schakel de stroom niet uit tijdens...

Страница 151: ... exception operation information alarm uitzondering werking informatie Begin time End time begintijd eindtijd Stel de tijdsperiode in voor het doorzoeken van de log klik op om de log informatie weer te geven klik op om de betreffende log informatie te openen of te downloaden Nadat de instellingen zijn voltooid klik op om op te slaan ...

Страница 152: ...ser Gebruiker toevoegen Voor het toevoegen van nieuwe gebruikers en het selecteren van de autorisatielimiet Modify wijzigen Selecteer de toegevoegde gebruiker en wijzig het gebruikerswachtwoord Del User gebruiker wissen De toegevoegde gebruikers verwijderen Klik na het instellen op om op te slaan ...

Страница 153: ...ng 3 20 Serial setting seriële instelling Address Klik op om het adres van de IP speed dome camera te wijzigen Baud rate Klik op om de baudsnelheid te wijzigen Protocol Klik op om het protocol te selecteren of te wijzigen Klik na het instellen op om op te slaan ...

Страница 154: ...ruikers moeten de voeding uitschakelen bij het insteken of verwijderen van de micro SD card Disp strategy Als er te weinig opslagruimte is is het mogelijk om stop stop opname of cover overschrijven te selecteren File len bestandslengte Stel de bestandslengte in tussen 1 15 minuten Cur setting huidige instelling Stel de huidige video opnametijd in max 10 periodes dag Klik na het instellen op om op ...

Страница 155: ...ndtijd van de video opname in File type bestandstype Stel het bestandstype in dat u wilt uploaden zoals afbeelding of video gebruikers moeten de FTP parameters eerst instellen via Alarm conf Alarm Linkage FTP Settings en FTP upload inschakelen via het item Alarm conf Alarm conf function raadpleeg voor meer informatie de Alarm conf Klik na het instellen op om op te slaan ...

Страница 156: ...ce Selecteer zone service en klik op voor Auto connect to service Automatisch verbinden met de service om de tijdzone van de IP speed dome te synchroniseren met die van de NTP server Instelling zomertijd zie afbeelding 3 24 Start Klik op om de zomertijd te starten Begin time Stel het begin van de zomertijd in Eindtijd Stel het einde van de zomertijd in Offset time Stel de zomertijd compensatie in ...

Страница 157: ...ukt Micro SD format Geeft het formaat van de micro SD Card weer weergave van micro SD formaat is niet ondersteund Total used Totaal gebruikt Geeft de totale capaciteit en de verbruikte capaciteit van de micro SD Card weer Percent Geeft het percentage gebruikte en ongebruikte ruimte weer Format formattering Klik om de micro SD Card te formatteren ...

Страница 158: ...e video coderingskwaliteit van de apparaten keuze uit 1 1000 niveaus Profile Instellen van het video coderingsniveau keuze uit High Base Main GOP Stel de GOP waarde in tussen 1 50 Rate control CBR keuze uit Constante bitsnelheid VBR Variabele bitsnelheid CBR rate Instellen van constante bitsnelheidswaarde tussen 2000 6000 Kbps VBR max rate VBR min rate Instellen van variabele bitsnelheidswaarde Fo...

Страница 159: ...ime tijd Selecteer het formaat van de tijdsweergave op het scherm Name naam Voor het wijzigen van de naam van het videobeeld Klik erop om de naam van het videobeeld weer te geven Text tekst Er kunnen maximaal 5 tekststrings door de gebruiker worden gedefinieerd die op het scherm kunnen verschijnen Opmerking Gebruikers kunnen de strings met de muis naar de gewenste positie slepen Klik na het instel...

Страница 160: ...matisch handmatig selecteren klik op om de focus aan te passen en op om te zoomen AF sensitivity Stel de AF sensitivity AF gevoeligheid in tussen 1 255 AF Area Select AF gebied selecteren keuze tussen All region focus center focus hele gebied centrale focus AF search model Keuze tussen full view volledige weergave 1 5m 3m 6m infinity model oneindig Digital zoom Klik op om de digitale zoom in te sc...

Страница 161: ...et setting Stel het IP adres in standaard 192 168 1 188 het masker standaard 255 255 255 0 en de Gateway standaard 192 168 1 1 DHCP setting Als de router een DHCP functie heeft klik op om de DHCP schakelaar in te schakelen de IP speed dome krijgt automatisch het IP adres van de router Klik na het instellen op om op te slaan ...

Страница 162: ...n gebruikers moeten naar de router gaan om de WEB en RTSP poort handmatig te mappen Server Selecteer het DDNS servertype Device domain name domeinnaam apparaat Voer de geregistreerde domeinnaam in User name gebruikersnaam Voer de geregistreerde gebruikersnaam in Password wachtwoord Voer het geregistreerde wachtwoord in Klik na het instellen op om op te slaan ...

Страница 163: ...afbeelding 3 31 Afbeelding 3 31 WEB port HTTP toegangspoort is standaard 80 en kan door gebruiker worden aangepast FTP port Dit is het poortnummer van de geselecteerde FTP server RTSP port videogegevens decoderingspoort is standaard 554 ...

Страница 164: ...Other protocol ander protocol Ander protocol zie afbeelding 3 32 Afbeelding 3 32 Klik op om een ander protocol in te schakelen en selecteer het betreffende protocol Klik na de instelling op om op te slaan ...

Страница 165: ...P Speed Dome Alarm period interface Zie Afbeelding 3 33 Afbeelding 3 33 Add task Taak toevoegen Voeg nieuwe alarmperiode toe Del task Taak verwijderen Verwijder de gespecificeerde tijdsperiode Copy to Kopieer naar Kopieer de huidige alarmperiode naar een andere dag Klik na het instellen op om op te slaan ...

Страница 166: ... koppeling naar afbeelding Picture of video Record FTP upload Klik op om upload van alarm op FTP in te schakelen Email Klik op om versturing van alarm via e mail in te schakelen Record time opnametijd Stel de video opnametijd in Snap momentopname Stel het aantal momentopnames in en de frequentie Device alarm apparaatalarm Alarm van aangesloten apparaten instellen Klik na het instellen op om op te ...

Страница 167: ...wachtwoord send email verzendadres en receive email ontvangstadres De poort is 465 en het verzendadres is hetzelfde als het ontvangstadres klik op FTP setting FTP instelling Stel de FTP server in zoals het serveradres het IP adres van de pc van de gebruiker username password en het upload bestandspad gebruikers moeten hetzelfde pad in de computer invoeren de pc genereert niet automatisch een besta...

Страница 168: ...de ingangspoort van het op het alarm aangesloten apparaat in Preset voorinstelling Klik op om de preset koppeling in te schakelen en stel daarna het preset nummer in IO out IO uit Klik op om de uitgangspoort van het apparaatalarm in te schakelen en stel het IO uitgangsnummer in Klik na het instellen op om op te slaan ...

Страница 169: ... 37 Enable inschakelen Klik op om bewegingsdetectie in te schakelen er zijn maximaal 4 detecties mogelijk Sensitivity gevoeligheid Stel de gevoeligheid in op een schaal van 1 10 Clear all Alles wissen Verwijder alle bewegingsdetectie instellingen Klik na het instellen op om op te slaan ...

Страница 170: ...de video opnameduur tijd en het bestandsopslagpad in Prerecord setting instellingen vooropname Klik op om prerecord vooropname in te schakelen en stel de vooropnametijd in tussen 5 30s Play performance setting Afspeelprestaties instellen Stel de alarmvideoprestaties in keuze tussen normal real time fluency Klik na het instellen op om op te slaan ...

Страница 171: ... op micro SD card Voer de start en begintijd in selecteer het videotype apparaat of lokaal en klik op zoeken Het video opnamebestand verschijnt automatisch Video playback operation Video afspelen Selecteer de video opname en dubbelklik erop om deze af te spelen klik op om te pauzeren klik op om versneld af te spelen terug te gaan Zie afbeelding 3 39 File video playback videobestand afspelen Klik o...

Страница 172: ...dmatig Elektronische sluiter AUTO 1 25 1 5 000 s Handmatig 1 5 1 5 000 s AGC 100 150 200 300 400 600 800 1600 3200 6400 12800 25600 51200 102400 BLC tegenlichtcompensatie OFF ON WDR OFF ON Dag nacht Auto Kleur wit en zwart Rotatie Normaal Spiegel horiz Spiegel vertic DNR ruisonderdrukking OFF ON IR stralingsafstand 80m Kijkhoek van IR Verandert per focus IR regeling Helderheid en kijkhoek verander...

Страница 173: ...sbare karakters Beeld Helderheid Contrast Saturatie Scherpte instelbaar via client en IE webbrowser Protocol GB T28181 ONVIF Profile S Netwerkprotocol IPv4 TCP UDP HTTP HTTPS SMTP FTP NTP DNS DDNS DHCP RTSP RTP RTCP SNMP Micro SD card Max 64 GB not in equipment Poe Ondersteund Alarmingang 1 kanaal Alarmuitgang 1 kanaal alarmkoppeling ondersteund Alarmactie Micro SD card video opname FTP transmissi...

Страница 174: ...ot de High speed Dome netwerkcamera via IE na de upgrade Oplossing Maak de cache van de browser leeg 3 Geen vloeiende beelden Mogelijke oorzaak 1 De framesnelheid van de High speed dome netwerkcamera is te laag TCP 80 Webpoort 5050 Communicatiepoort audio video datatransmissiepoort talkback datatransmissiepoort UDP 5050 Audio video datatransmissiepoort Onvif poort 80 RTSP poort 554 RTSP streampoor...

Страница 175: ... de benodigde informatie 5 De kleur van de beelden is abnormaal groen of andere kleuren Soms kunnen de beelden van de High speed Dome netwerkcamera niet goed worden afgespeeld wegens het verschil in grafische kaarten De beelden lijken een groene of andere kleur te hebben In dat geval moet u het programma Config exe uitvoeren of C windows system32 Config exe om de volgende parameters van de weergav...

Страница 176: ...41 ...

Отзывы: