Installing The ATI-D-1PT – 5
Installing And Programming The ATI-D-1PT
IMI89–208
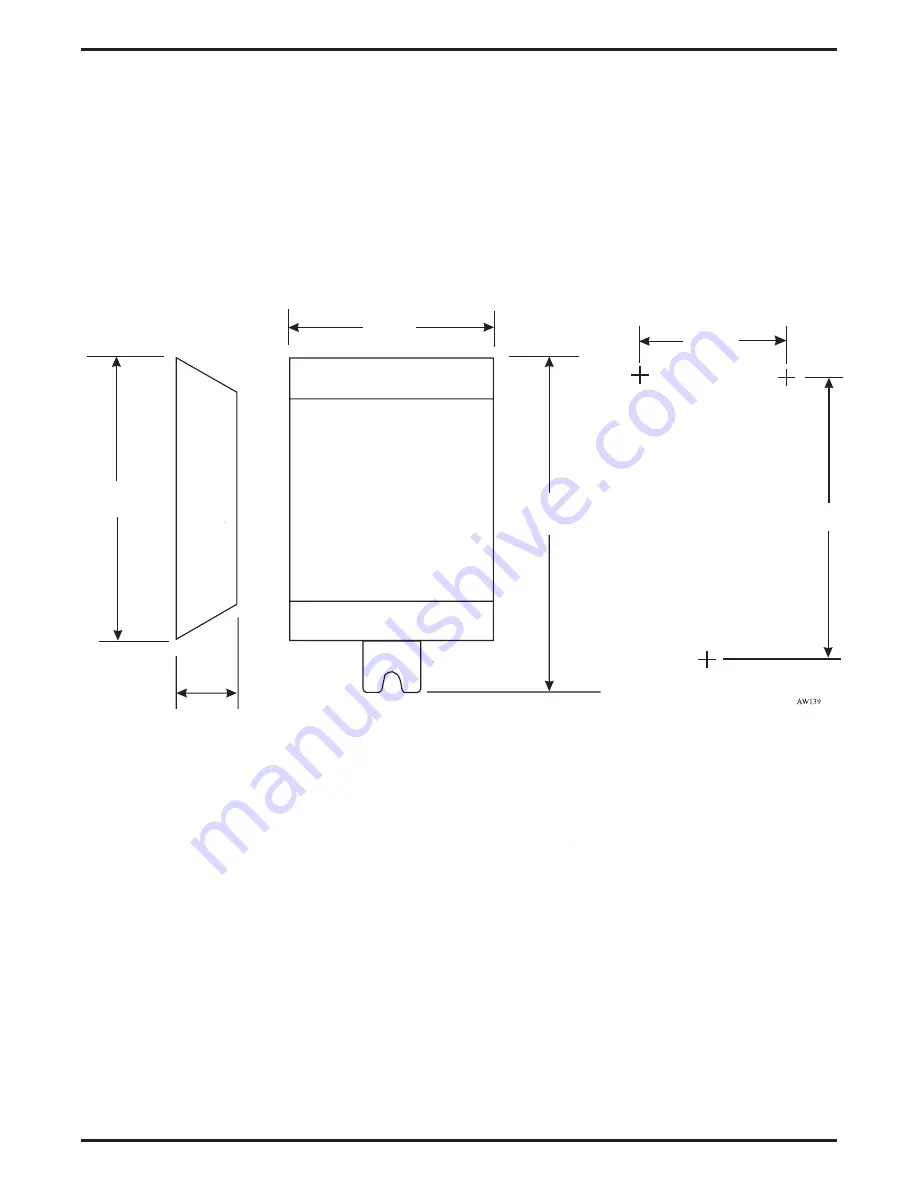
10 15/16
2 3/8
7 3/16
11 3/16
5 5/8
11
Outline Dimensions
(In Inches)
Spacing For
Mounting Hardware
ATI-D-1PT Dimensions
Страница 1: ...r connectors allow for quick hookup to the digital station port and the IST device s The ATI D 1PT supports a maximum ringer equivalence number REN of 2 0 allowing it to support more than one IST device if they are bridged Check the REN number of the IST equipment you connect so as not to exceed the capacity of the ATI D 1PT R This manual has been developed by Comdial Corporation the Company and i...
Страница 2: ...ony device Approximately 4000 feet with 26 AWG twisted pair cable and 300 ohm device load Approximately 500 feet if two IST devices are connected in parallel on same tip and ring pair Cable insulation resistance 30 000 ohms minimum ATI D to common equipment cable requirement 2 pair twisted cable 25 feet maximum length Cable terminations 623 type 4 conductor minijacks Dialing Industry standard DTMF...
Страница 3: ... plus 2 lbsx for packing material Industry Regulatory Standards FCC registered and listed for safety compliance as part of digital communications system FCC Part 15 class A certified FCC Part 68 certified UL 1459 certified Installing The ATI D 1PT 3 Installing And Programming The ATI D 1PT IMI89 208 ...
Страница 4: ...The Cabinet 1 Unpack and carefully inspect the ATI D 1PT for shipping damage Notify the shipper immediately of any damage found Verify that the package contains all parts and accessories needed for proper installation and operation 2 If you are using a backboard attach it securely to provide a stable mounting surface 3 Use the base of the ATI D 1PT as a template to measure and mark mounting hole l...
Страница 5: ...stalling The ATI D 1PT 5 Installing And Programming The ATI D 1PT IMI89 208 10 15 16 2 3 8 7 3 16 11 3 16 5 5 8 11 Outline Dimensions In Inches Spacing For Mounting Hardware In Inches ATI D 1PT Dimensions ...
Страница 6: ...insulated solid copper wire between this ground stud and an earth ground Checking The Installation Use a voltmeter to check for the presence of voltage on the ATI D 1PT IST jack 1 Be sure the wiring between the ATI D 1PT and the common equipment station ports is properly installed 2 Measure for DC voltage on the IST jack Measure between TIP leads and common equipment grounding stud Measure between...
Страница 7: ...ion PIN 6 No Connection 6 5 4 3 2 1 PIN Locations On Jacks Front View Earth Ground Optional 1 2 3 4 5 6 7 8 9 10 11 12 13 14 15 16 17 18 19 20 21 22 23 24 25 26 27 28 29 30 31 32 33 34 35 36 37 38 39 40 41 42 43 44 45 46 47 48 49 50 CLIP TERMINALS 50 26 1 25 Typical Station Connector Block Ferrite Collar ATI D 1PT Common Equipment Jack Line Jack Off Premise IST Jack OPX Long Loop Adapter On Premis...
Страница 8: ...from transient voltage spikes that can travel through the cable The telephone company offers basic protection against this condition but it is usually designed to protect only the central office circuits To help ensure that voltage surges do not damage the system you should install and properly ground gas discharge tubes or similar primary protection devices on the telephone line routed from the a...
Страница 9: ...rt With either prime line automatic or idle line preference the IST has outside line dial tone for call origination when its user lifts its handset You can enable outside line ringing at the IST station port that you have the idle line preference programmed for either prime line automatic or idle line preference Alternately you can enable the ringing line preference feature for the IST station por...
Страница 10: ...menu select the type of Prime Type no prime line line group or intercom 3 Click on the button beside the Prime Type drop down menu and select the line line group or intercom number to serve as your Prime Type 4 Click APPLY to add the changes to the database NOTE When making changes to the VMMI database off line you must save the database if you wish to have a back up copy If you are programming on...
Страница 11: ...PREFERENCE 5 Click APPLY Idle Line Priority If you assign Idle Line Preference to a Class Of Service use the Idle Line Priority feature to chose the order in which the system searches for an idle line You can place up to eight lines in this priority list To set Idle Line Priority 1 Go to STATIONS then STATION PROGRAMMING then GENERAL 2 Click on the IDLE LINE PRIORITY box The Idle Line Priority On ...
Страница 12: ...ibutes for Line__ heading states the correct line 6 From the Dialing Mode drop down list select TONE or PULSE 7 Click APPLY Pulse Interdigit Time and Pulse Dial Make Pulse Dial Break Pulse Dial Ratio The system defaults the Pulse Interdigit Time to 150 msec but you can change this to any value between 100 msec and 1 second Set the make break ratio for rotary dialing to match line requirements You ...
Страница 13: ... 2 Go to RINGING ASSIGNMENTS 3 Click on DIRECT RING 4 Highlight the lines for which you wish to set Direct Ringing and click ADD 5 Click OK then click APPLY Delayed Ringing Line ports you assign to Delayed Ringing will prevent a call from ringing for a short time after the call arrives Delayed Ringing sounds during day 1 and day 2 time periods night ringing mode and manual night transfer of ringin...
Страница 14: ...inging mode Refer to the paragraph below titled Day 1 Day 2 and Night Ringing Begin and End Times to set the beginning and ending times for this ringing 1 Go to STATIONS then STATION PROGRAMMING 2 Go to RINGING ASSIGNMENTS 3 Click on DAY 2 RING 4 Highlight the lines for which you wish to turn on Day 2 Ring and click ADD 5 Click OK then click APPLY Day 1 Day 2 And Night Ringing Begin And End Times ...
Страница 15: ...lick on NIGHT RING 4 Highlight the lines for which you wish to turn on Night Ring and click ADD 5 Click OK then click APPLY Ring No Answer Rings This procedure sets the number of rings that sound at a station port before the call rolls over to ring at another station Any system feature that requires a ring no answer value for example Call Forwarding uses the setting that you program here The syste...
Страница 16: ...ing differently for intercom calls and outside calls or to ring the same way for both types of calls NOTE Do not enable distinctive ringing for voice mail ports 1 Go to STATIONS then CLASS OF SERVICE 2 Go to PAGE 2 3 Select the COS Class of Service group for which you wish to set IST Distinctive Ringing 4 If you want outside calls and intercom calls to ring differently make sure the IST Distinctiv...
Страница 17: ...This page remains blank intentionally ...
Страница 18: ...Charlottesville Virginia 22901 2829 R World Wide Web http www comdial com ...