background image

Need Help?

Schedule Video Call

[email protected]

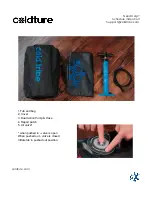
1.Tub and bag
2. Cover
3. Dual Action Pump & Hose
4. Repair patch
5. Air valve*

* when pushed in - valve is open
When pushed out - valve is closed
Inflate tub in pushed out position.

coldture.com

Содержание 220631MiV1

Страница 1: ...Need Help Schedule Video Call Support coldtribe com Coldture Instruction Manual for the Ice Mini Systems Tubs Ver 220631MiV1 Performance Favors the Cold coldture com...

Страница 2: ...Contents Warnings 3 Chiller Tub Overview 3 Tub Assembly 6 Chiller Assembly 6 Filling the Tub 8 Chiller Start Sequence and Testing 9 Troubleshooting Chiller Start 9 Operating Chiller Controls 10 Wifi...

Страница 3: ...ADVANCE BEFORE TAKING A BATH AND DON T FORGET TO TAKE THE PLUG OUT OR TURN OFF THE MAIN SWITCH WHEN TAKING A BATH ALTHOUGH THIS MACHINE HAS PASSED MANY SAFETY TESTS WE NEVER RECOMMEND KEEPING THE MAC...

Страница 4: ...W1 7 4 Rubber washer RW2 4 5 Metal washer MW1 4 6 Metal washer MW2 2 7 3 4 Fitting 2 8 Screen Housing 1 9 Screen 2 10 Double male fitting DMF 1 11 Screw 1 SW1 4 12 Screw 2 SW2 2 13 Filter casing cover...

Страница 5: ...e Video Call Support coldtribe com 1 Tub and bag 2 Cover 3 Dual Action Pump Hose 4 Repair patch 5 Air valve when pushed in valve is open When pushed out valve is closed Inflate tub in pushed out posit...

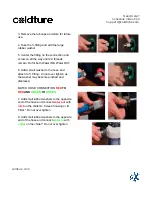
Страница 6: ...f the valve is in the down position then air will not be contained inside the tub please double check its position 4 Attach the hose to the pump inflate side 5 Connect the hose to the tub by locking t...

Страница 7: ...ST SETUP 1 Screw in screen into Red Inlet 2 Screw over top of screen the screen housing OR 2 CARTRIDGE FILTER FINE FILTRATION 1 Take small rubber washer and put it between the double male fitting and...

Страница 8: ...6 Add a small washer to the hose and attach to fitting do not over tighten as the washer may become pinched and displaced MATCH HOSE CONNECTION RED TO RED AND GREEN TO GREEN 7 Add small rubber washers...

Страница 9: ...ing 3 Once water fills above the min mark you may begin the next steps of turning on the chiller Chiller Start Sequence and Testing 1 Start by testing the safety shut off plug by plugging it into a po...

Страница 10: ...between every connection 2 Ensure clear filter housing is tightly screwed on 3 Disconnect hoses connect to check if washers are in place Over tightening causes washer to be misplaced resulting in air...

Страница 11: ...t for clock time its on 24hr setting 5 Arrows set temperature and lock screen by pressing both up and down arrows 6 Wifi activation Hold the clock for 10 secs until the wifi icon appears Wifi Connecti...

Страница 12: ...inking 7 Setup wifi connection on the app by selecting a 2 4GHz network and providing a password 8 Select EZ Mode and following instructions on app 9 Device should be added and APP Control Maintenance...

Страница 13: ...hiller 6 Monitor so water does not go below water out level Turn off the chiller 7 Once water is below water out level remove hose that is connected to inlet from the tub and put it inside the tub to...

Страница 14: ...r pressure nosal in a up and down motion clearing the pleats of any debris 5 Put the filter back in the housing and screw tightly back in place Ensure all rubber seals are in place 6 Ensure you open t...

Страница 15: ...e side over top ensuring edge lines up with the bottom of the other side 4 Use your body weight to push out the air while folding sides down 5 Push the air valve once again to lock in the up position...

Отзывы: