background image

Getting Started with In-Sight 1010


24


Appendix D: Troubleshooting 

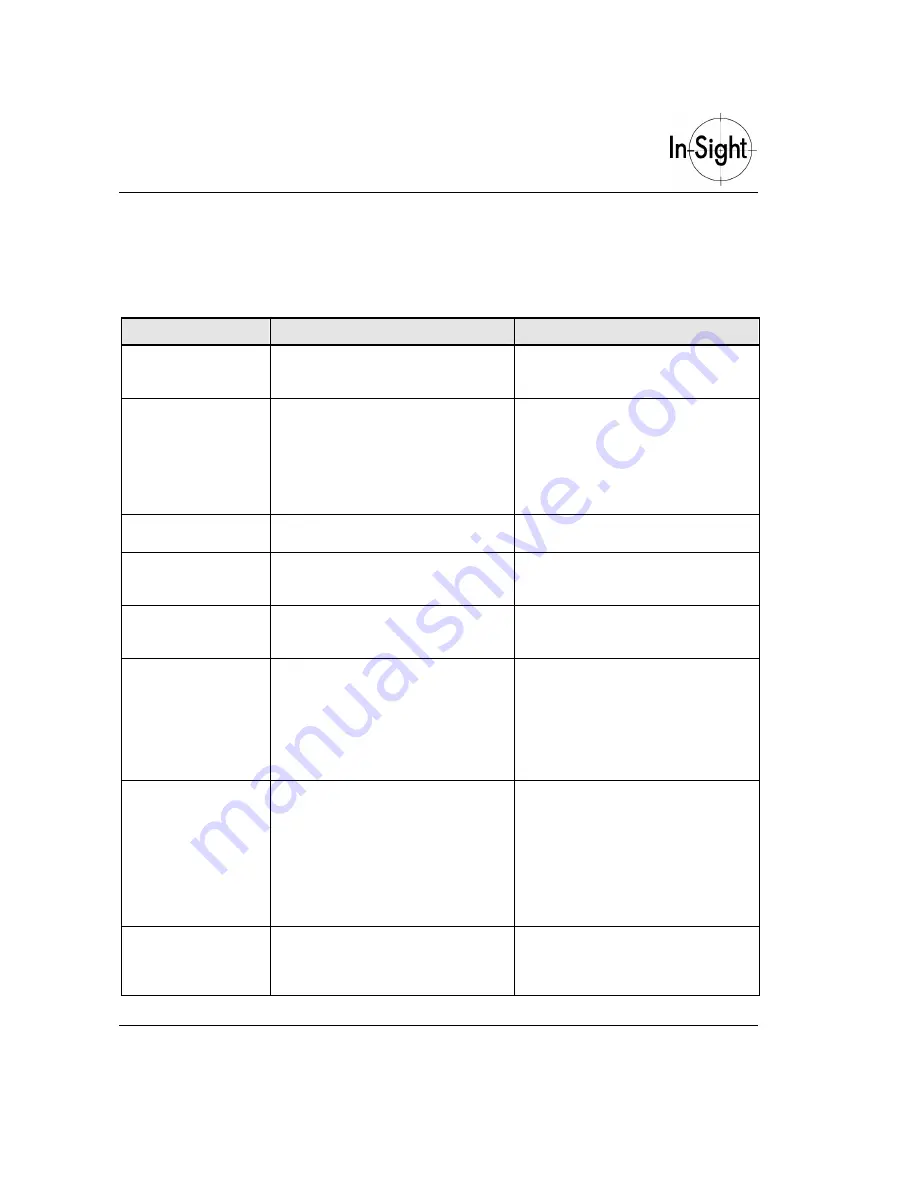
Table D-1. Troubleshooting Guide 

Symptom 

Likely cause 

Possible solutions 

The spreadsheet is 
visible instead of the 
operator display. 

Custom View is not selected. 

Press F6 on the keyboard (B on the 
control pad). 

The image is too 
dark. 

Insufficient external lighting. 
 
 
Lens aperture is closed. 
 
The camera is not acquiring images. 

Ensure external lighting is used and 
mounted appropriately. 
 
Adjust lens aperture ring. 
 
Use Live mode on the System menu 
to check camera operation. 

The image is too 
bright. 

Lens aperture is too large. 

Adjust lens aperture ring. 

The image is not in 
focus. 

The combination of camera height, 
lens type, extension tubes, and lens 
focus ring has not been set correctly. 

Refer to

 Appendix A: Lens Selection 

Chart 

for assistance. 

The 2D code is not 
being read reliably. 

The standard method of reading 2D 
codes may be insufficient for this 
image. 

Use a 2D model: See 

Chapter 2: 2D 

Setup – Using the 2D Model


The 2D code is not 
being read reliably 
using the model. 

The 2D model may be insufficient for 
reading this code. 
 
 
The positioning of the four corners on 
the code may not be accurate. 

Use an image filter as well as a 2D 
model: See 

Chapter 3: Image 

Filtering.


Ensure the cross is at the center of 
the corner cells. Use the zoom feature 
(F2) to assist this procedure. 

The barcode is not 
being read reliably. 

The barcode type may not be 
selected correctly (i.e. Code39, Code 
128 etc.). 
 
The region may not be positioned 
correctly. 

Select the appropriate code type from 
the ReadBarCode property sheet. 
 
 
Ensure the barcode is within the 
region and the region is aligned to the 
barcode angle. The code will be read 
more reliably if the region is sized and 
oriented tightly around the barcode. 

The inspections are 

not

 triggered by 

proximity sensor. 

The trigger mode may still be in 
continuous mode. 

Set the trigger mode to 

External

 in the 

AcquireImage


property sheet (Press 

Enter

 on the 

Image

 cell when in off-

line mode). 

Содержание In-Sight 1010

Страница 1: ...G G G GETTING ETTING ETTING ETTING S S S STARTED TARTED TARTED TARTED WITH WITH WITH WITH I I I IN N N N S S S SIGHT IGHT IGHT IGHT 1010 1010 1010 1010...

Страница 2: ...iability of its software on equipment that is not supplied by Cognex Corporation Cognex Corporation makes no warranties either express or implied regarding the described software its merchantability o...

Страница 3: ...5 495 537 5 548 326 5 583 954 5 602 937 5 640 200 5 717 785 5 742 037 5 751 853 5 768 443 5 796 868 5 818 443 5 825 483 5 825 913 5 845 007 5 859 466 5 872 870 5 909 504 The following are registered t...

Страница 4: ...In Sight 1000 Complies With 73 23 EEC Low Voltage Directive 89 336 EEC Electromagnetic Compatibility Directive Compliance Standards EN 60950 1992 Electrical Safety A1 1993 A2 1993 A3 1995 EN 55022 RF...

Страница 5: ...s 5 Positioning your In Sight 1010 5 Acquiring a Working Image 6 Working with the In Sight 1010 6 Saving your job 7 Automatically Load Your Job on Startup 7 Communications 7 Digital Input 8 Digital Ou...

Страница 6: ...19 Figure C 3 Training a Model Region 20 Figure C 4 ModelDMCode Property Sheet 21 Figure C 5 2D Code Numbering Added 21 Figure C 6 NeighborFilter property sheet 22 Figure C 7 Filtered Image of 2D Code...

Страница 7: ...ing capability allows the system to share real time information with other In Sight units as well as other third party devices and host computers within the plant and beyond This manual is designed to...

Страница 8: ...e vision processor and other components They also contain specifications mechanical drawings and other hardware details Installing the In Sight 1000 Cognex P N 590 6346 English Cognex 590 6346F French...

Страница 9: ...twork Once you have completed the system installation described in Installing the In Sight 1000 proceed to the next section Loading the Jobs from the CD Loading the Jobs from the CD 1 Place the In Sig...

Страница 10: ...ctionality Arrow keys Left click and drag The cursor keys are used for moving around menu options and defining image regions Enter Left click or double left click Used in the same way as Enter on a re...

Страница 11: ...Select Load Table 1 2 Job Descriptions Job name Description 2Dcode One 2D code Barcode One barcode 2DcodeX2 Two 2D codes BarcodeX2 Two barcodes 2Dcode_ Barcode One 2D code and one barcode BarcodeX2_2D...

Страница 12: ...ayed in green A 2D matrix will have a green square around the matrix Barcodes have no graphics A 2D matrix will display a grade of A through F Click on this cell for more detailed verification data Wh...

Страница 13: ...and press Enter to open the ReadBarcode property sheet Refer to the ReadBarcode topic in the In Sight Guide and Reference for more information Image filtering can be selected by enabling the checkbox...

Страница 14: ...cations then lower this value Adjust the focus ring of the lens to sharpen the image of your code If this is not possible adjust the height of the camera or the amount of extension spacers Working wit...

Страница 15: ...r a description of the various jobs or click New if you will be entering a new file name 5 Select Save Automatically Load Your Job on Startup 1 Select Esc to access the System Menu 2 Ensure the Online...

Страница 16: ...ipt of this signal read the Pass Fail status signal 6 Serial Receive Orange 5 No functionality 7 Serial Transmit White Brown 7 The code read is transmitted via this pin 8 Ground Brown 14 15 16 0V supp...

Страница 17: ...ud rate 9600 8 data bits 1 stop bit No parity No Handshaking When reading one code the output stream will be ASCII data CR When reading two codes the output stream will be code1 ASCII data delimiter c...

Страница 18: ...be read using the default In Sight 1010 configuration A typical example of such a code is a direct marked part using dot peen technology as shown in Figure 2 1 If when you load your job No Read is con...

Страница 19: ...the L location feature 6 Press F3 to select the bottom left corner Right click on the mouse 7 Use the cursor keys to position the cross at the apex of the L locator on the 2D matrix See Figure 1 3 for...

Страница 20: ...mn Theta can be specified in the ReadDMCode property sheet see the In Sight Guide and Reference for more help on the ReadDMCode property sheet The property sheet is accessed from the cell to the right...

Страница 21: ...w images can be improved using filtering are shown in Figure 3 1 If the software is unable to read a code follow the instructions in Table 3 1 for 2D codes and Table 3 2 for barcodes Filter Kernel Row...

Страница 22: ...ress Enter to finish The larger the region is the longer the processing time Ensure this region is larger than the 2D code region 5 Press Enter to open the NeighborFilter property sheet See the In Sig...

Страница 23: ...s Enter to finish The larger the region is the longer the processing time Ensure this region is larger than the barcode region 5 Press Enter to open the NeighborFilter property sheet See the In Sight...

Страница 24: ...rizontal Distances from object to front of lens mm extension tube length mm 12 mm lens 16 mm lens 25 mm lens 15 75 7 20 100 5 25 75 2 5 135 2 30 94 1 5 165 1 35 112 1 190 40 90 0 5 128 1 210 45 100 0...

Страница 25: ...vents bright spots in the image Code on a curved metal surface Even Illumination Dome Light CLM 7248 Provides very even diffused illumination preventing light stripes in the image Laser etched codes L...

Страница 26: ...orial bmp image file These should be loaded onto your In Sight 1010 before reading this tutorial Figure C 1 is an image of a dot peen 2D matrix code on a metal surface Although this is a very degraded...

Страница 27: ...light at very low level The light cannot enter and reflect from the pits because of the light s low angle so the pits appear black Light is reflected readily off the metal surface which appears light...

Страница 28: ...del checkbox 2 Highlight the cell containing the structure to the right of the checkbox 3 Press F2 on the keyboard to access the graphics routine 4 Press F3 twice to select the top left hand corner cr...

Страница 29: ...ucture and press Enter This will open the ModelDMCode property sheet see Figure C 4 where you can select the format and color of the code Figure C 5 shows a code with a 16 row and 16 column format Fig...

Страница 30: ...act on white pixels in general the opposite effect happens to black pixels For example an Erode filter erodes white areas and dilates black ones To apply an image filter 1 Check the Apply Filtering c...

Страница 31: ...this tutorial consider the following questions Is your code an AIM standard Data Matrix ECC 200 symbol Have you optimized your image Consider alternative lighting solutions Have you positioned the mo...

Страница 32: ...be insufficient for this image Use a 2D model See Chapter 2 2D Setup Using the 2D Model The 2D code is not being read reliably using the model The 2D model may be insufficient for reading this code T...

Страница 33: ...es appear blurred The production line is too fast for the current exposure setting Set a shorter exposure time in the AcquireImage property sheet You may need to increase your lighting intensity level...

Страница 34: ......

Страница 35: ......

Страница 36: ...www cognex com insight P N 590 6372...

Отзывы: