background image

10  DataMan 9500 Quick Reference Guide

DataMan 9500 Quick Reference Guide   11

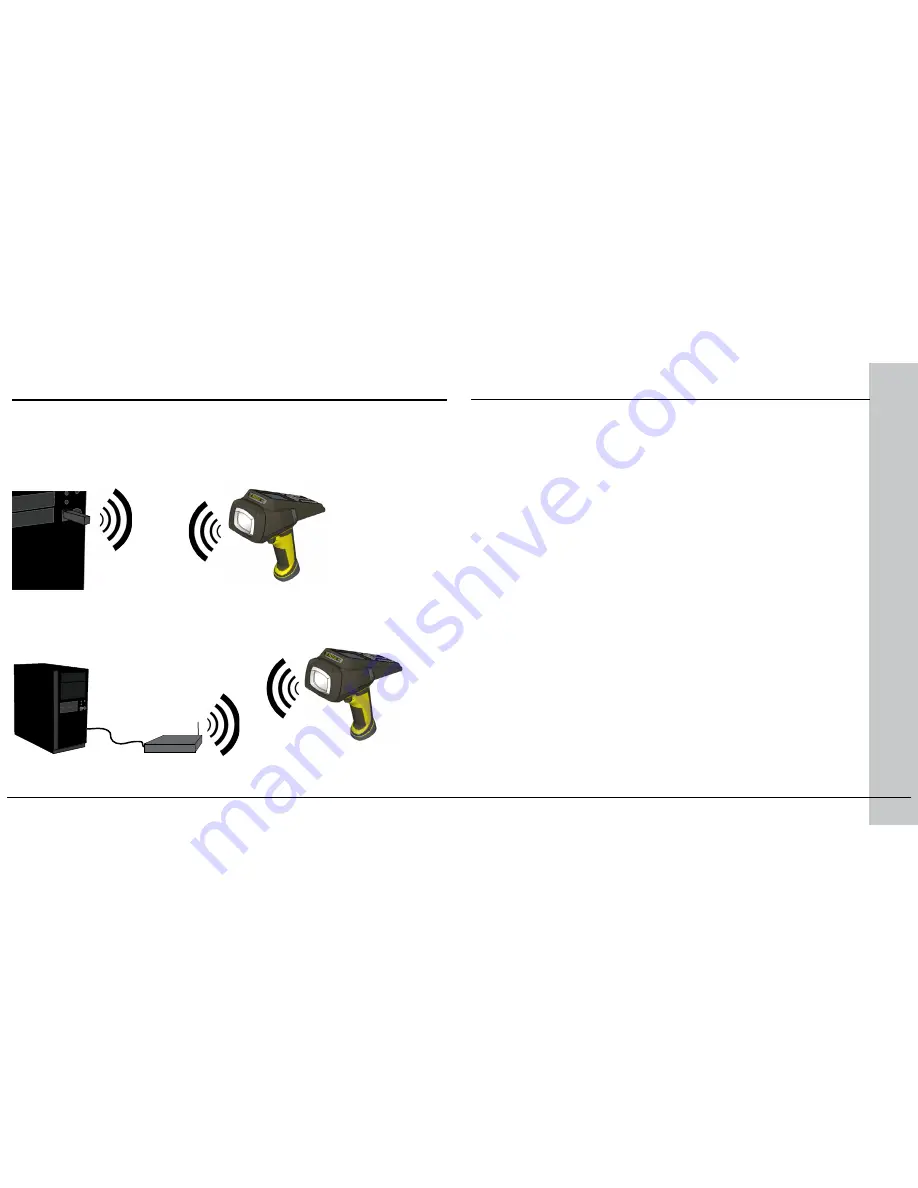
DataMan 9500 Wireless Communication

The DataMan 9500 device supports two types of wireless communication: ad 

hoc and access point. 
By default, the device is configured to connect to an 

ad hoc network

, that 

is, it communicates with your PC through a wireless network adapter (for 

example, a wireless USB stick). 

Access point

 communication means that the DataMan 9500 connects to a 

wireless router, which in turn is connected to a PC through Ethernet. Wireless 

communication is established between the reader and the wireless access point 

(the router).

Ad-Hoc Wireless Communication

Connect your DataMan 9500 to your PC using the following steps:
1.  Press the 

Power

 button on the device. The Shutdown menu appears.

2.  Click the 

Device info...

 button. The Cognex Device Configuration 

menu appears.

3.  In the Wi-Fi group box, check the 

SSID

 of the device. You have to 

remember the SSID to know which device to connect to.

4.  On your PC, find the adapter settings options through Control 

Panel ―› Network and Internet (only on Windows 7)―› Network 

Connections. 

5.  Right-click the Wireless Network Connection (your wireless device).
6.  Click 

Properties

.

7.  Click the TCP/IPv4 line in the list that appears. 
8.  Click 

Properties

 at the bottom.

9.  In the window that appears, choose the 

Use the following IP 

address

 option.

10. Set the IP address to 

192.168.99.1

11. Click the PC icon on your Windows Desktop toolbar. Your device will     

be listed under Wireless Network Connection.

12. Click your device based on its SSID. 
13. Click the 

Connect

 button that appears.

When you hear a short beep on your device, wireless communication is 

established.

Содержание DataMan 9500

Страница 1: ...COGNEX DataMan 9500 Quick Reference Guide...

Страница 2: ...een Setup Tool Lite Overview Read Results Inventory Demo Application 3 DataMan 9500 PC Software Install DataMan 9500 Software Troubleshooting a Wireless Connection Start the PC Setup Tool Use the Setu...

Страница 3: ...ork environment s needs The DataMan 9500 reader includes the following features an embedded color LCD and full function keyboard an embedded Setup Tool Lite which allows you to view acquired and decod...

Страница 4: ...6 7 8 9 0 abc def ghi jkl mno pqrs tuv wxyz UltraLight Color LCD Indicator Light Trigger press and hold to read WinCE desktop Keypad spare battery charger green battery status indicator spare battery...

Страница 5: ...ange settings on the code reader portion of your device install the Setup Tool to your PC 4 Connect to your device on your PC using wireless communication 5 Make the necessary settings using the Setup...

Страница 6: ...tton on the device The Shutdown menu appears 2 Click the Device info button The Cognex Device Configuration menu appears 3 In the Wi Fi group box check the SSID of the device You have to remember the...

Страница 7: ...settings do not persist through the device rebooting For the changes to be saved do a Registry Backup described in the section Backing Up your DataMan 9500 of this document Your device automatically...

Страница 8: ...is button to that option User Idle Timeout the time after which the screen is dimmed System Idle Timeout the time after which the screen becomes black Suspend Timeout the time after which the device g...

Страница 9: ...device For more information on how to write your own application see the DataMan 9500 Integration Guide available through the DataMan 9500 Developer Toolset Installer Besides Cognex applications the...

Страница 10: ...ing to different target light and surface conditions using four different lighting setups Load Save Configurations save settings or open your previously saved settings Liquid Lens Setup make focus set...

Страница 11: ...or Inventory purposes in an imaginary warehouse The application shows the following features Reading product ID codes displaying them on the handheld screen together with the image seen Matching produ...

Страница 12: ...Install the DataMan Demonstrator through the DM9500 Developer Toolset installer Inventory Demo Application Overview Continued For more information on how to use the Inventory Demo and the DataMan Demo...

Страница 13: ...DM9500 with the last 6 characters of MAC address printed on back of the reader Troubleshooting a Wireless Connection Based on your network configuration the Setup Tool may not be able to communicate w...

Страница 14: ...y scanning the appropriate reader configuration code from the Reader Configuration Codes document available through the Windows Start menu Trigger button Read history Quick Setup Configure your reader...

Страница 15: ...e Load a saved device configuration cdc file with runtime parameters plus device specific information for a particular DataMan device Backup Device Create a device configuration cdc file for a specifi...

Страница 16: ...ent available through the Windows Start menu 2 Open a text editor on your DataMan 9500 for example Microsoft WordPad and place your cursor into an empty document 3 See that scanned codes appear as new...

Страница 17: ...release the button or until the device can successfully read a code Trigger Types The DataMan 9500 trigger mode determines when the reader attempts to read a code Use the Setup Tool or the appropriat...

Страница 18: ...u come back within the wireless range While you are still within the wireless range the reader occasionally blinks blue to indicate that the wireless connection is established status indicator blinks...

Страница 19: ...t the reader is correctly placed into the slot Charging starts when the device is turned on If you previously powered off your device it automatically turns on if you place it on the base station for...

Страница 20: ...ps Changing Batteries 1 Twist the reader s end cap and take it off The battery should not be disposed of along with municipal waste Use the appropriate separate take back systems for bat tery disposal...

Страница 21: ...sizes and focus positions Select a focus position that allows you to read the desired code sizes at the desired working distance If your application has a consistent reading range set the focus range...

Страница 22: ...2 2 in 100 mm in 0 0 3 200 300 6 9 12 400 500 600 15 18 21 154 mm 6 06 in 33 mm 1 29 in 396 mm 15 5 in 2 9 in 0 10 mil 210 mm 8 2 in 0 20 mil 374 mm 14 7 in 0 0 0 18 mil 500 mm 19 6 in 13 mil 409 mm 1...

Страница 23: ...on LASER LIGHT DO NOT STARE INTO BEAM CLASS 2 LASER PRODUCT FAILURE TO FOLLOW THESE INSTRUCTIONS MAY CAUSE SERIOUS INJURY CAUTION Use of controls or adjustments or performance of procedures other than...

Страница 24: ...ions 1 this device may not cause harmful interference and 2 this device must accept any interference received including interference that may cause undesired operation Canadian Compliance This Class A...

Страница 25: ...2006 95 EC skond kif inhu likabbli Kopji ta dawn id dikjarazjonijiet huma a essibbli ming and ir rappre entant locali tieg ek Este equipo cumple com las condi os vigorantes de la EU diretivas 1999 5...

Страница 26: ...icipal waste and invites you to use the appropriate separate take back systems for product disposal If you need more information on the collection reuse and recycling systems please con tact your loca...

Страница 27: ...e without the written permission of Cognex Corporation The hardware and portions of the software described in this document may be covered by one or more of the U S patents listed on the Cognex web si...

Отзывы: