12
STATIONARY LAMPS/TAKEDOWN LIGHTS - A stationary reflector assembly used for ArrowStik
®
flashing, takedown, and/or
work light applications. These are located in the lower section of the light bar. Lamps in these units are bayonet type and the units
are mounted with two screws.
STOP/TURN/TAIL LIGHTS - Located in the upper section of the light bar facing rear, one on the driver side, one on the passenger
side, these lights provide stop, turn and tail signals to following traffic when connected to the vehicle lighting system. Lamps used are
an 1157 bayonet type.
D.O.T. LIGHTS - A set of three marker lights as required by the Department of Transportation for truck application. Lamps are
wedge base '194' type.
OSCILASER
TM
- This is a highly effective warning light that features a constant 35 watt halogen signal that covers every area within
it's field of illumination at least once per second. It has an up and down as well as a side to side signal. Maintenance for these units
is much the same as a typical rotator. The lamps used are bayonet type. This unit is located in the upper center section and/or in
the center position in the outboard sections of the light bar.
TACTICAL TAKEDOWN
TM
LIGHTS - A Flashing or steady burn takedown light that moves at a 15 degree angle when activated.
Available in front and rear corners of lightbar.
Maintenance
Lens Cleaning
Use plain water and a soft cloth, or Code 3
®
lens polish and a very soft paper towel or facial tissue. Because plastic scratches
easily, cleaning is recommended only when necessary (about every six months). Do not subject the lenses to car washes that use
brushes, as these will scratch the lenses.
Lens Removal
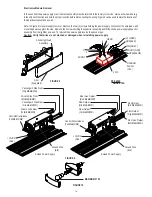
First, disengage the lens clips
(4 per lens) as shown in
Figure 6
. Finally, insert a screwdriver into the inside edge or corner of the lens, and twist the screwdriver
to lift the lens.
Changing Rotating Reflector Lamps
WARNING!
Lamps are extremely hot! Allow to cool completely before attempting to remove. Gloves and eye
protection should be worn when handling halogen lamps as they are pressurized and accidental
breakage can result in flying glass.
!
Figure 6
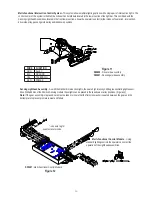
Remove the lens as outlined above. Next, inspect the lamp and compare to
Figure 7
to determine lamp type. It may be necessary
to remove any rotating or cylindrical filters to make access easier. Note: Make sure lamp is cool before attempting to change it. Also,
when installing a new lamp, be sure not to touch the glass with fingers. If contact is made, clean the glass with a soft cloth after
inspection.
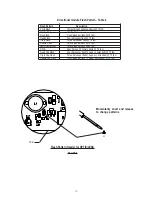
H-1: Style. First grasp lamp at base and turn until retaining clip tab is accessible. Using a blade screwdriver, remove retaining clip
and pull lamp straight up. Replace with new lamp. Insure that the power lead and retaining clip is fully seated. (See figure 7)
Twist to Lift
Lens
Pry Up to
Remove Lens
Clip
ALLEY LIGHTS - Located in the mid section of the light bar at each end, to provide light to the side of the vehicle. The lamps used
are a bayonet type. The mounting bracket and reflector are adjustable to allow aiming the unit.
HIGH SPEED ROTATOR - A rotator that produces twice as many flashes as a conventional assembly. Maintenance is the same
as for a typical rotator.
Multi-Functional Control Module - Using standard lighting controls the operator can select the operation of the Intersection
Lighthead assemblies.
Содержание CODE 360
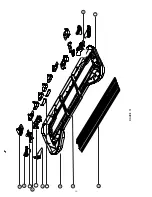
Страница 17: ...1 7 CODE 360 EXPLODED VIEW 6 9 10 11 13 7 8 4 5 3 1 2...
Страница 18: ...1 8 2 3 2 4 FIGURE 13 12 15 16 18 17 14 20 21 22 19...
Страница 23: ...2 3 NOTES...


