background image

EN

G

LI

S

H

4

6. 

Do not overload the product.


-

The work will be performed better and more safely if the product is not overloaded

.

7. 

Wear suitable clothing.


-

Do not wear loose-fitting clothing or jewellery; they could be caught in moving parts.


-

Wear non-slip footwear when working outdoors.


-

Wear a hairnet or similar if you have long hair.

8. 

Use personal protective equipment.


-

Wear eye protection.


-

Wear a respirator or dust mask if the operation will generate a great deal of dust.

9. 

Make sure that the mains lead is not damaged.


-

Do not pull or tug the mains lead when unplugging the product, grip and pull the plug 
itself. Keep the mains lead away from heat, oil and sharp edges.

10. 

Take good care of the product.


-

Make sure that the product is clean and free from contaminants.


-

Follow all guidelines concerning care, maintenance and storage.


-

Check the product’s mains lead regularly. If the mains lead is damaged in any way, it must 
be replaced by a qualified electrician.


-

Inspect any extension leads regularly. Replace cables if they are damaged in any way.


-

Keep the handles dry, clean and free of oil and grease.

11. 

Always disconnect the product from the mains.


-

Disconnect the product from the mains whenever it is not in use, before service and 
maintenance and whenever switching accessories.

12. 

Avoid unintentional starting.


-

Make sure that the power switch is set to OFF before connecting the product to the mains.

13. 

Use the right kind of extension lead.


-

If you use the product outdoors, only use extension cables, which are clearly labelled as 
designed for outdoor use.

14. 

Remain attentive.


-

Pay attention to what you are doing. Use your common sense and never operate 
the product when tired, sick or under the influence of medicine, alcohol or narcotics.

15. 

Check that the product is undamaged.


-

Before using the product, make sure that it functions normally as described in this 
instruction manual.


-

Make sure that any moving parts are intact, properly fitted and rotate freely.


-

Damaged safety devices must be replaced by authorised service personnel unless 
otherwise specified in this instruction manual.


-

Damaged switches must be replaced by a qualified electrician.


-

Never use the product if it cannot be switched on and off using its power switch.

Содержание 41-9001

Страница 1: ...ation L s hela bruksanvisningen noggrant och f rs kra dig om att du har f rst tt den innan du anv nder utrustningen Spara bruksanvisningen f r framtida bruk Viktig informasjon Les disse anvisningene n...

Страница 2: ......

Страница 3: ...mperatures under 10 C Safety Ensure that you have read and understood all the safety guidelines all the explanations as to how the compressor works all the instructions as to how to use it in a safe m...

Страница 4: ...they are damaged in any way Keep the handles dry clean and free of oil and grease 11 Always disconnect the product from the mains Disconnect the product from the mains whenever it is not in use befor...

Страница 5: ...the compressor Make sure that the mains lead does not come into contact with heat oil or sharp edges Never move the compressor around by pulling the mains lead or air hoses The compressor must only be...

Страница 6: ...ressor on an easily accessible dry firm and level surface Do not place the compressor on the very edge of a surface Make sure that the compressor is sufficiently ventilated Place it at least 1 m from...

Страница 7: ...he motor driving the compressor At the same moment the air in the compressor is released This occurs to reduce the pressure in the compressor so that it can restart when the pressure drops to below th...

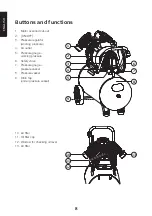
Страница 8: ...ut out 2 ON OFF 3 Pressure regulator working pressure 4 Air outlet 5 Pressure gauge working pressure 6 Safety valve 7 Pressure gauge pressure vessel 8 Pressure vessel 9 Drain tap under pressure vessel...

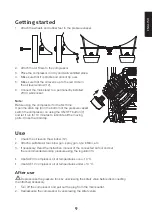
Страница 9: ...ate all the moving parts Close the drain tap Use 1 Check the oil level in the window 12 2 Attach a suitable air tool blow gun spray gun tyre inflator etc 3 If necessary Read the instruction manual of...

Страница 10: ...or blocked Regularly check that the ventilation port in the oil filler cap 11 is open Regularly check that all bolts holding the compressor and pressure vessel together are tight Make it a habit to op...

Страница 11: ...ssure 10 bar Noise emission data LpA 70 3 dB A KpA 1 75 dB A LwA 90 6 dB A KwA 1 75 dB A Cylinder displacement 360 l min Pressure vessel 50 l Size L W H 76 40 65 5 cm Weight 47 kg Troubleshooting guid...

Страница 12: ...isningar alla f rklaringar om hur kompressorn fungerar alla instruktioner f r hur den p ett s kert s tt anv nds alla instruktioner som r r sk tsel underh ll och f rvaring 1 H ll arbetsutrymmet rent Be...

Страница 13: ...n olja och fett 11 Koppla alltid bort produkten fr n eln tet Koppla bort produkten fr n eln tet n r det inte anv nds f re service och underh ll och n r du byter tillbeh r 12 Undvik oavsiktlig start F...

Страница 14: ...ln inte kommer i kontakt med v rme olja eller vassa kanter Dra inte kompressorn i n tkabeln eller i anslutna slangar Flytta kompressorn endast genom att anv nda handtaget Se till att anslutna verktyg...

Страница 15: ...dom Placera kompressorn p en l tt tkomlig plan torr och stabil yta Placera inte kompressorn p ytans ytterkant Se till att kompressorn f r tillr cklig ventilation Placera den p minst 1 m avst nd fr n k...

Страница 16: ...i tanken och sl pper ut luft om tryckstr mbrytaren inte skulle sl ifr n S h r fungerar s kerhetsventilen S kerhetsventilen r en enkel men mycket viktig del av kompressorn Om max till tet lufttryck i...

Страница 17: ...Motorskydd 2 ON OFF 3 Reglerventil justering av arbetstryck 4 Luftutlopp 5 Tryckm tare arbetstryck 6 S kerhetsventil 7 Tryckm tare tank 8 Trycktank 9 Dr neringskran under trycktanken 10 Luftfilter 11...

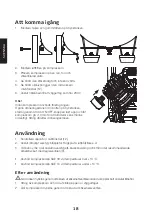
Страница 18: ...g d refter dr neringskranen Anv ndning 1 Kontrollera oljeniv n i niv f nstret 12 2 Anslut l mpligt verktyg bl spistol f rgspruta luftp fyllare e d 3 Vid behov l s i det anslutna verktygets bruksanvisn...

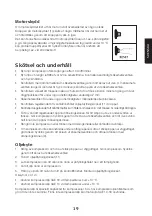
Страница 19: ...oljep fyllningslocket 11 r ppet Kontrollera regelbundet att alla f stbultar som h ller kompressorn mot tanken r ordentligt tdragna Ta f r vana att regelbundet ppna dr neringskranen f r att sl ppa ut...

Страница 20: ...ssorn Ventilationsh len i oljep fyllningslocket r igensatta Avfallshantering Denna symbol inneb r att produkten inte f r kastas tillsammans med annat hush llsavfall Detta g ller inom hela EU F r att f...

Страница 21: ...du har lest og forst tt alle sikkerhetsanvisninger alle forklaringer om hvordan kompressoren virker alle instruksjoner for hvordan den p en sikker m te skal brukes alle instruksjoner om vedlikehold og...

Страница 22: ...or olje fett 11 Koble alltid produktet fra str mnettet Produktet m kobles fra str mnettet n r det ikke er i bruk f r service og vedlikehold og ved skifte av tilbeh r 12 Unng u nsket oppstart P se at s...

Страница 23: ...g t m trykktanken for luft n r kompressoren skal flyttes til annen plass P se at str mledningen ikke kommer i kontakt med varme olje eller skarpe kanter Trekk ikke kompressoren etter ledningen eller t...

Страница 24: ...for skade p eiendom gjenstander Plasser kompressoren p en lett tilgjengelig plan t rr og stabil flate Ikke plasser kompressoren p flatens ytterkant S rg for at kompressoren nok ventilasjon Plasser de...

Страница 25: ...rykket i tanken og slipper ut luft hvis trykkst mbryteren ikke sl r fra Slik fungerer sikkerhetsventilen Sikkerhetsventilen er en enkel men en sv rt viktig del av kompressoren Dersom maks tillatt luft...

Страница 26: ...er 1 Motorvern 2 ON OFF 3 Ventil justering av arbeidstrykk 4 Luftutl p 5 Trykkm ler arbeidstrykk 6 Sikkerhetsventil 7 Trykkm ler tank 8 Trykktank 9 Dreneringskran under trykktanken 10 Luftfilter 11 Ol...

Страница 27: ...kal bli godt smurt Lukk deretter dreneringskranen Bruk 1 Kontroller oljeniv et i niv vinduet 12 2 nsket verkt y kobles til Bl sepistol malingsspr yte etc 3 Dersom det er n dvendig Se i bruksanvisninge...

Страница 28: ...ssig at ventilasjonshullet i oljelokket 11 er pent Kontroller regelmessig at alle festeskruer som holder kompressoren til tanken er trukket til Dreneringskranen skal pnes regelmessig for slippe ut eve...

Страница 29: ...n knappen 1 Er str mkabelen skadet Kraftige vibrasjoner eller unormal lyd Kontroller at alle festeskruer som holder kompressoren til tanken er trukket til Kontroller vrige fester og tilkoblinger Kompr...

Страница 30: ...n l mp tiloissa Turvallisuus Varmista ett olet lukenut ja ymm rt nyt seuraavat tekstit kaikki turvallisuusohjeet kaiken kompressorin toimintaa kuvaavan aineiston kaikki laitteen turvallista k ytt kuva...

Страница 31: ...at vahingoittuneet Pid kahvat puhtaina ja kuivina Varmista ett kahvoissa ei ole ljy tai rasvaa 11 Kytke laite aina pois s hk verkosta Kytke laite pois s hk verkosta kun laitetta ei k ytet sek ennen hu...

Страница 32: ...istorasiasta ja tyhjenn paines ili ilmasta ennen kompressorin siirt mist Varmista ett virtajohto ei joudu kosketuksiin kuumien pintojen ljyn tai ter vien reunojen kanssa l ved kompressoria virtajohdos...

Страница 33: ...alle ja vakaalle alustalle helposti saavutettavaan paikkaan l sijoita kompressoria reunalle josta se voi pudota Varmista ett kompressorin ilmanvaihto on riitt v Sijoita laite v hint n 1 metrin et isyy...

Страница 34: ...li n painetta ja p st ilmaa ulos jos painekytkin ei toimi N in turvaventtiili toimii Turvaventtiili on yksinkertainen mutta eritt in t rke osa kompressoria Jos s ili n suurin sallittu ilmanpaine ylitt...

Страница 35: ...iminnot 1 Moottorisuoja 2 ON OFF 3 S t venttiili ty paineen s t 4 L ht ilma aukko 5 Painemittari ty paine 6 Turvaventtiili 7 Painemittari s ili 8 Paines ili 9 Tyhjennyshana paines ili n alla 10 Ilmans...

Страница 36: ...kaikki osat tulee voideltua kunnolla Sulje tyhjennyshana K ytt 1 Tarkista ljym r tarkistusikkunasta 12 2 Liit haluamasi ty kalu kuten puhalluspistooli maaliruisku tai ilmant ytt laite 3 Lue tarvittae...

Страница 37: ...ti ett ljynt ytt aukon kannen 11 tuuletusaukko ei ole peitossa tai tukossa Varmista s nn llisesti ett kiinnityspultit jotka pit v t kompressorin s ili t vasten ovat kunnolla kiristetyt Poista s nn lli...

Страница 38: ...ei suodatin ole tukossa Kompressori kuluttaa liikaa ljy Kompressorissa on liikaa ljy ljynt ytt aukon kannen tuuletusrei t ovat tukossa Kierr tt minen T m symboli tarkoittaa ett laitetta ei saa laittaa...

Страница 39: ......

Страница 40: ...desenter tlf 23 21 40 00 e post kundesenter clasohlson no Internett www clasohlson no Post Clas Ohlson AS Postboks 485 Sentrum 0105 OSLO Suomi Asiakaspalvelu puh 020 111 2222 s hk posti asiakaspalvelu...

Отзывы: