background image


15

After Sales Support

1300 663 907


Model Number 


HE150242

[email protected]

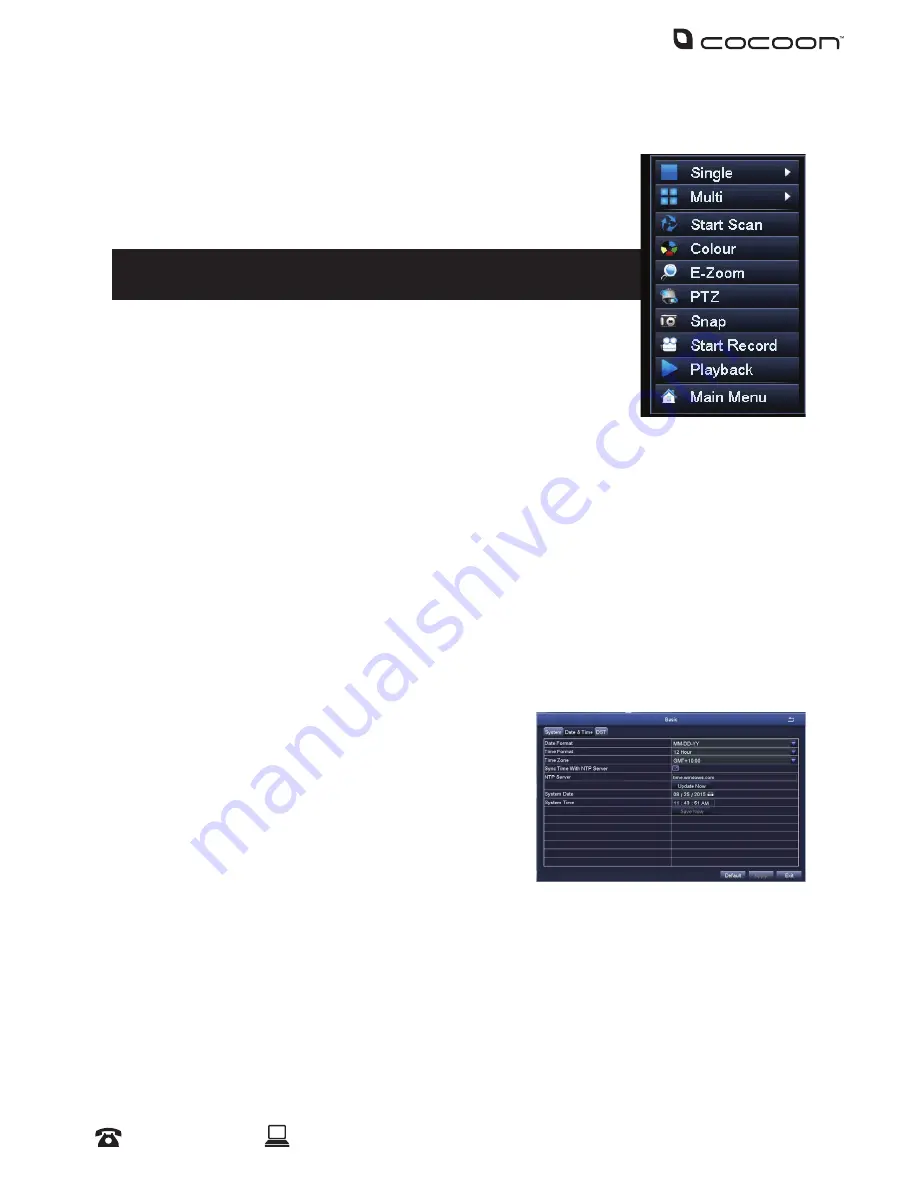
3.7 Quick Popup Menu

Right-clicking the mouse whilst on the viewing screen will show the pop-
up menu for quick access to basic functions. 
1.  Single – Switch to single view mode. Select the camera to view
2.  Multi – Switch to split screen mode

Tip: Alternatively, use the mouse and double click with LMB on the 

image to switch between the two modes

3.  Stop/Start Scan – Automatically changes the single camera view at a 

selected interval. See 4.4.2 Live for more details

4.  Colour – Adjust the colour settings of the selected camera
5.  E-Zoom - Click and drag to draw a box in the bottom left window to 

zoom-in on the selection, right-click to return to full screen mode

6.  PTZ - access PTZ (Pan Tilt Zoom) controls via shortcut. Must have PTZ camera (not included) 

installed and connected

7.  Snap – Take a photo of the selected camera (A camera icon will show up indicating a photo 

has been taken)

8.  Start/Stop Record – Start and Stop recording all channels (default settings) (A green square 

will show up indicating the camera is recording)

9.  Playback – Enter playback mode to view recently recorded footage
10.  Main Menu – Access the main menu to configure DVR settings

3.8 Setting the Date and Time

Ensure your recordings are capturing the correct date and 
time. Access the menu and make changes as necessary.
1.  Right Click - Main Menu > Enter Username and 

Password > Setup > Basic > Date & Time

2.  Change the current date and time by clicking on the 

date and time boxes and following the on screen 
prompts

IMPORTANT NOTE: 

Always click ‘Apply’ after making any changes in the menu. If you do not click 

‘Apply’, your changes will not be saved. Changing some settings will also require a system reboot.

Operation

.

Содержание HE150242

Страница 1: ... INSTRUCTION MANUAL Model Number HE150242 4 CAMERA HOME SECURITY SYSTEM WITH DVR ...

Страница 2: ... ...

Страница 3: ...one or email We can be reached on Phone 1300 663 907 Mon Fri 8 30am 6 00pm EST Email customercare winplus com au Web www winplus com au Important Getting the most out of your 4 Camera Home Security System with DVR Read the manual It will help you get set up with ease Visit www winplus com au We ve got additional support videos and guides Call After Sales Support 1300 663 907 Or email customercare ...

Страница 4: ...nder the Competition and Consumer Act 2010 and similar state and territory laws Our goods come with guarantees that cannot be excluded under the Australian ConsumerLaw You are entitled to a replacement or refund for a major failure and for compensation for any other reasonably foreseeable loss or damage You are also entitled to have the goods repaired or replaced if the goods fail to be of accepta...

Страница 5: ...t can impair electronic components Cleaning the DVR Unit Unplug all equipment from the wall outlet before cleaning Do not use liquid aerosol cleaners Use a damp soft cloth for cleaning Lightning Unplug all equipment during lightning storms to prevent damage Unplug the DVR unit if it will not be used for long periods of time Modifications Attachments Never add any attachments and or equipment witho...

Страница 6: ... 2 1 Installation Location 11 2 2 DVR Unit Connections 11 Using the DVR 13 3 1 Mouse 13 3 2 Powering on the DVR unit 13 3 3 Setup Wizard 13 3 4 Main Screen 13 3 5 Logging in and setting Admin password 14 3 6 Navigating the DVR Menus 14 3 7 Quick Popup Menu 15 3 8 Setting the Date and Time 15 DVR Menu 16 4 1 Main Menu 16 4 2 Setup 17 4 2 1 Basic 17 4 2 2 Live 18 Live 18 4 2 3 Record 19 4 2 4 Schedu...

Страница 7: ... 5 2 Logging into a 365SECU Account 30 5 3 Adding your Compact DVR 30 5 4 Viewing your Compact DVR 31 6 1 Installing the iVSS Software 32 6 3 Viewing your Compact DVR 33 6 4 iVSS Additional Features 33 6 4 1 Taking a Picture 33 6 4 2 Recording Video 33 6 4 3 Local Config 33 6 4 4 Remote Config 34 7 1 Internet Explorer ActiveX Settings 34 7 2 Additional Windows Settings 35 7 3 Logging into the DVR ...

Страница 8: ...er Cable 4 x Mounting Accessories for Cameras 1 x Instruction Manual 1 x Getting Started Guide 1 x Software CD 1 x Warranty Card 4 x CCTV Stickers Image Sensor 1 3 Colour CMOS Sensor Video Resolution 720 x 488 Video System PAL Infrared IRs 24 Day Night mode Smart IR Cut Filter Night Vision Distance Max 24m Scan Frequency 50Hz Minimum Illumination 0 Lux IR On Backlight Compensation Auto Electronic ...

Страница 9: ...ution 1920 x 1080 Display Resolution 960 576 each camera Display Speed 25fps each camera Record Resolution 960 x 576 720 x 576 480 x 288 Record Speed Selectable from 1 to 25 fps each channel Recording Modes Continuous Manual Motion Detection Playback Channels 1 4 channel split screen Network LAN DHCP Dynamic IP DDNS and P2P HDD Interface 1 x SATA HDD up to 2TB Multiplex Operation Live display Reco...

Страница 10: ...ights when powered on 2 VGA Output using a VGA cable 3 Video Audio Input Output 1 HDMI Port 2 LAN Ethernet connection to modem router required for remote viewing over internet or mobile 3 USB Ports x2 For mouse and flash drive backup firmware updates 4 RS485 For use with PTZ cameras Cable and PTZ camera not included 5 5V Socket Connect 5V Power Adaptor 1 1 2 2 3 3 4 5 ...

Страница 11: ...ce your cameras and test all connections BEFORE permanently installing cables and cameras Cameras should be placed covertly indoors where you do not want to see them every day Outdoor cameras can be placed in plain sight to act as a deterrent to would be intruders 2 2 DVR Unit Connections 1 Connect each of the camera BNC extension cables to the video and power connectors taking note of the labelli...

Страница 12: ...cable 7 Connect the other power adaptor to the DVR unit labelled DC5V and plug the other end into a mains outlet 8 Switch the outlet on The DVR unit will begin the boot sequence NOTE Both the DVR unit and cameras operate always on To turn the cameras or DVR unit off switch off the power adaptors at the power outlet Tips Test all connections are working before permanently installing DVR unit and ca...

Страница 13: ... connected to the DVR unit it will proceed through the boot sequence 3 3 Setup Wizard On the start up screen the Cocoon DVR System will run a setup wizard to assist in setting up some key features of the unit This includes Time Date Record Schedule Maintenance Settings HDD Overwrite You can enable or disable the setup wizard to be shown on start up screen See pg 14 for details 3 4 Main Screen Once...

Страница 14: ...rd field 4 Input your password again in the Confirm Password field 5 Press Ok Your new password has now been set NOTE The Admin account cannot be removed Please ensure that a secure password is set Keep your password safe at all times If you wish you may use the space provided below to write your password then keep this manual in a secure location User Name Admin Password ________________ User Nam...

Страница 15: ...m controls via shortcut Must have PTZ camera not included installed and connected 7 Snap Take a photo of the selected camera A camera icon will show up indicating a photo has been taken 8 Start Stop Record Start and Stop recording all channels default settings A green square will show up indicating the camera is recording 9 Playback Enter playback mode to view recently recorded footage 10 Main Men...

Страница 16: ...our Username and Password NOTE If you have not set a password leave the field blank and click Log In In the Main Menu you can manage all DVR unit settings such as Display Recording Networking etc Main Menu Sub Menu Setup Basic Live Record Schedule Alarm Network Users PTZ Advanced Search Backup Information System Event Log Network Online Users Disk Management Logoff Shutdown DVR Menu ...

Страница 17: ... not click Apply your changes will not be saved 4 2 1 Basic System Set the default system settings by selecting an option on the right hand side of the menu Max Online Users Limit the amount of simultaneous viewers of the DVR Video Output Change your default output from 1280x1024 to match your display Date Time Change the current date and time by clicking on the date and time boxes and following t...

Страница 18: ...mode is used cameras can be re ordered for when Start Stop Scan is used Video Blind Mask Area Setting Mask areas of the camera that you don t want recorded Useful for hiding personal information from recordings To activate select Setting then use the mouse to draw a rectangle over the area you want masked To remove the masks select Default from the Live menu Default Reset the displayed settings to...

Страница 19: ...amera quality Max Bitrate Higher bit rates use more hard drive space Stamp Camera Name Toggle the display of the camera name for each channel Time Stamp Toggle the display of the time stamp for each channel Position Use the mouse to drag the camera name and time stamp to any position on the live image Right click mouse to exit back to Record page Recycle Record If ticked When the hard drive is ful...

Страница 20: ...ay is shown on the top left corner d Select Add then use the dropdown menu to set a start and end time e Once set press the tick button to add the time to the schedule f To copy the schedule between days use the dropdown menu at the top right corner to select a day then press Copy g Press Ok when complete h To copy the schedule between cameras use the dropdown menu at the bottom of the schedule sc...

Страница 21: ...ment Hold on to LMB and drag mouse across screen to adjust selection Tip Removing blue grid boxes disables the area monitored for movement This is handy for cameras facing main roads with cars driving past when monitoring your front porch Right click for pop up bar to adjust motion sensitivity reseting grid to default and saving settings Schedule Linked to Motion Record from the Schedule submenu S...

Страница 22: ...ng required Network Configure your network settings here HTTP Port Default value is 80 Server Port Default value is 5000 Mobile Port Default value is 5001 Obtain an IP Address Automatically To obtain the IP function automatically IP Address To set the IP address of the device Subnet Mask To set the subnet mask of the device Gateway To set the default gateway of the DVR Preferred DNS Server This ad...

Страница 23: ... if your server uses SSL Send Address Email address notifications sent from Password Email Password Receive Address Email address the alerts will be send to Test Check whether the entered SMTP information is valid or not DDNS Some internet providers operate using DDNS or Dynamic DNS IP addresses As opposed to a fixed Static IP a DDNS IP is dynamic and constantly changing This type of IP address is...

Страница 24: ...ile management except for being able to shut down the DVR For more specific settings such as being able to shutdown the DVR select the Authority tab and configure access control for each camera and feature d Optional Bind the user to a specific MAC address by enabling Binding PC MAC Address and entering the MAC address below e Press OK to add new user Deleting a user Whilst logged into your DVR s ...

Страница 25: ...a Baud Rate Select the baud rate which the PTZ camera operates Please check the PTZ camera specs or manual for this information Protocol Select the required protocol for the PTZ camera Simulative Cruise Also known as patrol mode Select to enable disable this feature Advanced Configure pre set camera orientations cruise lines and track settings Preset Press the Setting button to set a position for ...

Страница 26: ...e date to search then press Search b Light blue bars indicate found recordings Using the mouse select a start time on the display c Press the play button to commence playback Event Search Search for motion events that the DVR has detected a On the right hand side select the date to search then press Search b A list of detected motion recordings will be shown Double click on an entry to commence pl...

Страница 27: ...up Files can now be highlight and deleted using the Delete button 4 5 Information 4 5 1 System Displays system information of the DVR If you are wanting to setup the DVR to be viewed on a smartphone three QR codes allow easy set up for mobile monitoring For more information refer to pg 30 for mobile setup app for DVR 4 5 2 Event Search for motion and video loss logs that have occurred on the DVR a...

Страница 28: ...a list of current users viewing the DVR Press the Refresh button to update the generated list of viewers 4 6 Disk Management Check the free space available on your 500GB internal HDD You can also check space available on an inserted USB flash drive 4 7 Logoff In order to change between users select the Logoff button then press OK to confirm 4 8 Shutdown In order to safely shut down the DVR select ...

Страница 29: ...mobile network must support mobile data at 3G recommended speeds It is the user s responsibility to ensure their mobile coverage is suitable for use with the DVR unit Winplus Australasia is not responsible for any additional data charges that may be incurred If possible Winplus suggests connecting your mobile or tablet via Wi Fi before viewing remotely With peer to peer P2P networking it s now eve...

Страница 30: ...ive fields To remember your password for quick access press the tick icon c Press the Login button to login 5 3 Adding your Compact DVR Adding your DVR is simple with P2P connectivity Ensure an ethernet cable is plugged into the back of the DVR in the RJ45 port a On the DVR Main Menu navigate to Information System You will notice a Device ID QR code on the bottom right hand side b On the 365SECU M...

Страница 31: ...rtphone are connected to the internet b On the 365SECU Main Menu select Live view c Select the alias that you have chosen for the DVR you wish to view d Select All camera to view all four cameras Tip Double tap on the desired camera for full screen view For advanced guides and video walkthroughs please visit www winplus com au Networking Mobile ...

Страница 32: ...ate to the CD Directory c Double click the iVSS folder then double click the Win7 Win8 or WinXP folder matching your operating system d Double click and install the iVSS software Follow the on screen instructions e Open the iVSS software NOTE If you are having trouble opening the software try right clicking the iVSS icon then selecting Properties Within the Compatibility tab tick Run this program ...

Страница 33: ...listed If the DVR icon is solid the DVR is online c Right click on the DVR and select Open to open the view of all four cameras d You can now view your cameras in the main viewing screen 6 4 iVSS Additional Features 6 4 1 Taking a Picture While viewing the camera feed highlight a channel by clicking on it with your computer s mouse The channel will have an orange box surrounding it Press the camer...

Страница 34: ...sponsibility to ensure their mobile coverage is suitable for use with the DVR unit Winplus Australasia is not responsible for any additional data charges that may be incurred If possible Winplus suggests connecting your mobile or tablet via Wi Fi before viewing remotely 7 1 Internet Explorer ActiveX Settings If you are receiving an ActiveX installation error Internet Explorer s security settings a...

Страница 35: ... DVR website a Click the settings icon in the upper right corner of the browser window b Click Compatibility View settings c Enter the IP Address for the DVR and then click Add to add it to the list of trusted addresses d Click close to exit once the IP address has been added to the list 7 3 Logging into the DVR unit over Internet Explorer a 1 Enter your DVR unit s IP Address into IE address bar F...

Страница 36: ...ing My night vision image is very bright and I can t see anything when aimed out a window The infrared light is bouncing off the window and reflecting back into the camera Either place the camera on the other side of the window or make sure the camera face is flush with the glass surface Motion Detection settings keep recording all night long Night vision uses infrared light to see an image at nig...

Страница 37: ...TB in size If you are unfamiliar with hard drives and changing computer components we strongly suggest you consult a professional Any damage or modifications to the internal components may void your warranty Always ensure there is no power to the DVR unit when opening the casing How long will my DVR record Depending on your recording settings resolution and number of cameras you can record for up ...

Страница 38: ...he connectors used by the DVR and cameras are camera connectors They are quick turn and attach or release connectors Night Vision The cameras are equipped with infrared LEDs which emit light the human eye cannot see This allows vision in low light or night vision PTZ Control Some higher end cameras are equipped with PTZ or Pan Tilt Zoom functionality When connected to the DVR the DVR can be used t...

Страница 39: ...repair You should also be aware that rather than repairing goods we may replace them with refurbished goods of the same type or use refurbished parts in the repair process Please be assured though refurbished parts or replacements are only used where they meet ALDI s stringent quality specifications If at any time you feel your repair is being handled unsatisfactorily you may escalate your complai...

Страница 40: ... ...

Отзывы: