Cobra GPS100 Скачать руководство пользователя страница 12

2.4

N AV D ATA PA G E

2.4

N AV D ATA PA G E

Waypoints: Creating New

Waypoints: GoTo

18

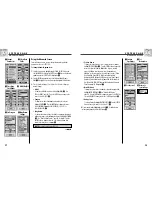
“GoTo” a Selected Waypoint

To make the map show the navigational path to a selected waypoint:

1.

From the Nav Data Page, highlight using the ZOOM IN/OUT button and
select WAYPOINTS by pressing the ENTER button 

. Highlight and select

SELECT 

2.

Highlight and select the waypoint you want to navigate or “GoTo” 

.

The waypoint information screen for that waypoint appears with four
selections: GoTo, Edit, Delete and Preview 

.

3.

Highlight and select GOTO to navigate to your selected waypoint 

.

This will bring up the Map page with the GoTo path between your current
position and the selected “GoTo” waypoint 

.

NOTE:

You can Preview the selected waypoint’s location on the map by

selecting PREVIEW in the waypoint information screen. Selecting OK in the
Preview screen will return you to the waypoint information screen.

While in the Gauges Page, a navigation or “GoTo” is illustrated by a flag and
hiker icon in the bottom right hand corner of the screen. Also, your selected
GoTo waypoint and distance to that waypoint are shown above 
the compass 

.

17

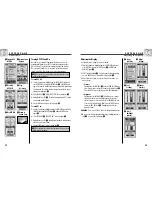
Creating a New Waypoint

To mark your current location as a new waypoint:

Waypoint shortcut:

To mark a new waypoint using current location,

press and hold the ENTER button for 2 seconds. A confirmation window 
will pop up. 

1.

From the Nav Data Page, highlight using the ZOOM IN/OUT button and 
select WAYPOINTS by pressing the ENTER button 


Highlight and

select NEW 

2.

Highlight and select MARK CURRENT 

. The waypoint information screen

appears 

. A default name (a 3-digit number) and symbol (a flag) will

be assigned. You can either accept the default name and symbol or rename
and change the symbol of the waypoint (see "Editing Text", page 29).

3.

When you have finished editing your new waypoint, select SAVE 

to

return to the main Nav Data page 

. To return to the main Nav Data

Page without saving the new waypoint, press the PAGE button 

.

To enter any location as a new waypoint manually:

1.

From the Nav Data Page, highlight using the ZOOM IN/OUT button 
and select WAYPOINTS by pressing the ENTER button 


Highlight and 

select NEW 

2.

Highlight and select MANUAL 

. The waypoint information screen

appears 

. A default name (a 3-digit number) and symbol (a flag)

will be assigned. You can either accept the default name and symbol or
rename and change the symbol of the waypoint (see "Editing Text,"
page 29). The Location field will blink.

3.

Enter the location (latitude and longitude) of your new waypoint,(see
"Editing Text," page 29).

4.

Highlight Elevation, the field will blink. Enter the location's elevation
(see "Editing Text," page 29).

NOTE:

ELEVATION does not need to be entered to save your new waypoint.

5.

When you have finished editing your new waypoint, select SAVE 

to

return to the main Nav Data page 

. To return to the main Nav Data

Page without saving the new waypoint, press the Page button 

.


New
Waypoint


Nav Data
Page

Information
Screen

Current or
Manual

Information
Screen

Return to Nav
Data Page

Selecting Stored
Waypoint

Nav Data
Page

Select
Waypoint

“GoTo” on
Map Page

“GoTo” on
Gauges Page

Waypoint
Information

Содержание GPS100

Страница 1: ...com for updates or questions Customer Support In this user s manual you should find all the information you need to operate your GPS 100 If you require further assistance after reading through this manual Cobra Electronics offers the following customer support services In the USA Automated Help Desk is available in English 24 hours a day 7 days a week at 773 889 3087 Customer Service Operators are...

Страница 2: ...ed time of arrival at your destination Stores up to 500 navigational waypoints Lets you program and store a navigational route using up to 50 waypoints Displays the route to your destination and your progress along that route Automatically tracks your travel and shows you how to return along the same track up to 10 separate tracks can be stored Up to 100 map datums to choose from Display screen ca...

Страница 3: ...Main Pages 8 2 1 Map Page 9 10 2 2 Gauges Page 11 12 2 3 Trip Meter Page 13 14 2 4 Nav Data Page 15 30 Waypoints 15 18 Tracks 19 20 Route 21 25 Delete Options 26 28 Editing Text 29 Sort or Search 30 2 5 System Page 31 38 Alert 39 GPS General Information 40 42 Specifications 43 Maintenance and Service 44 Index 45 46 Accessories 47 Declaration of Conformity 47 Warranty 47 Order Form 48 1 2 3 4 5 6 7...

Страница 4: ...ee dimensional position latitude longitude and altitude People think of GPS as having three segments the control space and user segments What follows is a little information about each segment Control Segment The Control Segment of GPS consists of the Master Control Station Monitor Stations and Ground Antennas The one master control station located at Falcon Air Force Base in Colorado Springs Colo...

Страница 5: ...tellite is the radio transmitter which generates the signal Each of the 24 satellites transmits its own unique code in the signal User Segment You and your Cobra GPS receiver are a part of the user segment along with many other private individuals and military personnel and their GPS receivers Military GPS equipment has been integrated into fighters bombers tankers helicopters ships submarines tan...

Страница 6: ... menu of selections using the ZOOM IN OUT button allows you to scroll through the selections displayed A side scroll bar next to a menu indicates that more selections can be viewed by scrolling beyond the bottom or top of the list that is currently visible continued 6 1 B A S I C O P E R AT I O N ZOOM IN OUT Button PAGE Button POWER Button 5 1 B A S I C O P E R AT I O N The ENTER Button Pressing a...

Страница 7: ...igating to the next one Trip Meter Along with the navigational features the trip meter in your GPS 100 keeps accurate time allowing it to precisely calculate your speed of travel average speed throughout your trip and estimated time of arrival ETA if you have chosen a destination 8 2 T H E F I V E M A I N PA G E S Waypoint Track Route Trip Meter The Five Main Pages In the following sections of thi...

Страница 8: ... the map currently in use see Highlight and select from the following for display at the bottom of the page Accuracy Average Speed Bearing Date Destination Elevation ETA Location Maximum Speed Odometer Power Speed Time Trip Odometer Trip Time see For more information about the optional data selections see Data Descriptions page 4 continued Map Page North Up Select Options Orient Map Display Set Da...

Страница 9: ...t of course This display also shows how many feet or meters off course you are currently Right of Course Left of Course On Course continued See Using the Nav Data Page page 15 to learn about this feature Using the Gauges Page Set Data Option Highlight and select SET DATA to choose information about your current position or navigation that you want displayed at the bottom of the Gauges page You may...

Страница 10: ...ext with 5 data fields displayed or highlight and select LRG 3 FIELD for larger text with 3 data fields displayed NOTE The lower two fields from 5 field screen will be hidden when switching to 3 field continued Font Size 13 Using the Trip Meter Page 14 LRG 3 FIELD Option Data Options Stopping Nav Restore Defaults Yes No Set Data Option Highlight and select SET DATA to choose the fields you want di...

Страница 11: ...cess any waypoint on the list Highlight and select GOTO to return to the Map page to navigate to the selected waypoint see GoTo a Selected Waypoint page 18 Highlight and select EDIT to change the name symbol location coordinates or elevation of the selected waypoint Highlight and select DELETE to delete the selected waypoint Highlight and select PREVIEW to view a graphic representation of the sele...

Страница 12: ...ton Highlight and select NEW 2 Highlight and select MARK CURRENT The waypoint information screen appears A default name a 3 digit number and symbol a flag will be assigned You can either accept the default name and symbol or rename and change the symbol of the waypoint see Editing Text page 29 3 When you have finished editing your new waypoint select SAVE to return to the main Nav Data page To ret...

Страница 13: ... see Editing Text page 29 Highlight and select CLEAR to clear the log of all travel that has been recorded The unit automatically restarts recording your travel Select Option Highlight and select any stored track for navigation renaming or deletion Highlight and select NAVIGATE and then FORWARD or REVERSE to display the map page showing you the direction to travel to follow on the selected track H...

Страница 14: ...ER button to display the Route screen Use the ZOOM IN OUT button to scroll through the menu sections then press the ENTER button to go to the highlighted option Use the ZOOM IN OUT button again to highlight your choice then press the ENTER button to select it Press the PAGE button to return to the main page Navigate Option Highlight and select NAVIGATE to make your GPS 100 guide you along a route ...

Страница 15: ... route select DONE to return to the main Nav Data page Nav Data Page Access Edit Menu Highlight Waypoint Return To Nav Data Page Routes Inserting a Waypoint Edit Route List Highlight Insert Creating a New Route continued 5 Select the highlighted waypoint to add it to to your route The New Route list appears with the added waypoint displayed Use the ZOOM IN OUT button to highlight the next blank fi...

Страница 16: ...d the entire route will be deleted Highlight and select DELETE NO to cancel the delete function All Option Highlight and select ALL if you wish to delete all waypoints tracks and the route you currently have stored Highlight and select DELETE ALL NAV DATA YES and the data will be deleted Highlight and select DELETE ALL NAV DATA NO to cancel the delete function Access Delete Options Delete Routes D...

Страница 17: ...ack Confirm Deletion View Revised Tracks List Return to Nav Data Page Delete a Waypoint Access Delete Menu Deleting Individual Waypoints To delete selected waypoints one at a time 1 From the Nav Data page highlight using the ZOOM IN OUT button and select DELETE OPTIONS by pressing the ENTER button The Delete Options menu appears 2 Highlight and select WAYPOINTS The Delete menu appears 3 Highlight ...

Страница 18: ...xt Character Appears Accept New Character Clear a Character Highlight Down Character Waypoints List Sort Menu Search Symbols List Choosing Your Letter Sort Option 1 From any screen with the SORT option highlight and select SORT 2 Choose from the following choices Alphabetically by name a The list of waypoints and 4 options will be presented NAME SYMBOL NEAREST MOST RECENT Highlight and select NAME...

Страница 19: ...tures Turning GPS mode off preserves battery power Display Options To adjust the display Contrast and Backlight settings highlight and select DISPLAY see Adjusting the Display page 34 Highlight and select CONTRAST to increase or decrease the display contrast Highlight and select BACKLIGHT to designate the duration of time the backlight will stay lit Settings Option Highlight and Select SETTINGS to...

Страница 20: ...u can turn GPS navigation off allowing you to use the non navigational features of your GPS 100 while preserving battery power When you turn GPS off the unit stops searching for signals from satellites When you turn GPS back on to receive signals the unit must re acquire signals from at least three satellites before it can begin navigation NOTE The unit must be outside with a clear view of the sky...

Страница 21: ...AVE To exit this function without saving changes press the PAGE button Daylight Savings Language Options Measurement Sound On Off Setting Screen Return to System Page Change Settings Select Data Field Using the Settings Screen From the Settings screen you can change the various settings listed below To change settings 1 From the System page highlight using the ZOOM IN OUT button and select SETTING...

Страница 22: ...rientation Using the Advanced Screen From the Advanced screen you can change the advanced operational parameters used by your GPS 100 To change advanced parameters 1 From the System page highlight using the ZOOM IN OUT button and select ADVANCED by pressing the ENTER button A menu of advanced parameters appears SELECT will be highlighted 2 Press the ENTER button and the title of the first data fie...

Страница 23: ...l see this message when you are within 500 feet 150 m of your destination Select OK or the PAGE button to clear the message CAN T CREATE WAYPOINT WAYPOINT LIST FULL You will see this message if you try to save a waypoint when the list is full you can save a maximum of 500 waypoints Select OK or the PAGE button to clear the message You will continue to see the message when trying to save a waypoint...

Страница 24: ...called inclination and declination Grid North refers to the direction in which the straight lines on a map are actually aligned which may be slightly different from True North because the rounded surface of the earth can not be accurately depicted on the flat surface of a map G E N E R A L I N F O R M AT I O N Sources of Interference Errors GPS receivers have the potential for position errors due ...

Страница 25: ...w of the sky Make sure you have not accidentally turned GPS off see page 33 Customer Service In the U S A you can receive technical assistance with your unit through one of our customer support services Automated Help Desk is available in English 24 hours a day 7 days a week at 773 889 3087 Customer Service Operators are available in English and Spanish at 773 889 3087 Monday to Friday 8 00 a m to...

Страница 26: ...31 36 Location 4 9 12 14 Location Screen 31 33 Log Option Tracks 19 Lost Satellites 8 39 41 Low Battery 32 39 M Maintenance 44 Map Data Option 9 Map Datum 31 37 42 Map defaults 10 Map detail Option 10 Map Display 9 Map Orientation 9 Map Page 8 9 10 Max Speed 4 9 12 14 N Nav Data Page 8 15 30 Navigate Option Waypoints 16 18 GoTo 16 18 Track 19 20 Route 21 25 Navigation 1 7 New Option Route 21 22 23...

Страница 27: ...arts thereof will be free of defects in workmanship and materials for period of one 1 year from the date of first consumer purchase This warranty may be enforced by the first consumer purchaser provided that the product is utilized within the U S A Cobra will without charge repair or replace at its option defective GPS 100 products or component parts upon delivery to the Cobra Factory Service Depa...

Страница 28: ...y Alert Traffic Warning Systems Accessories HighGear Accessories For more information or to order any of our products please visit our website www cobra com Nothing comes close to a Cobra Printed in China Part No 480 036 P 2003 Cobra Electronics Corporation 6500 West Cortland Street Chicago IL 60707 USA ...

Отзывы: