background image

Advanced Features

microTalk
Professional
Range

microTalk Professional Range

microTalk Professional Range

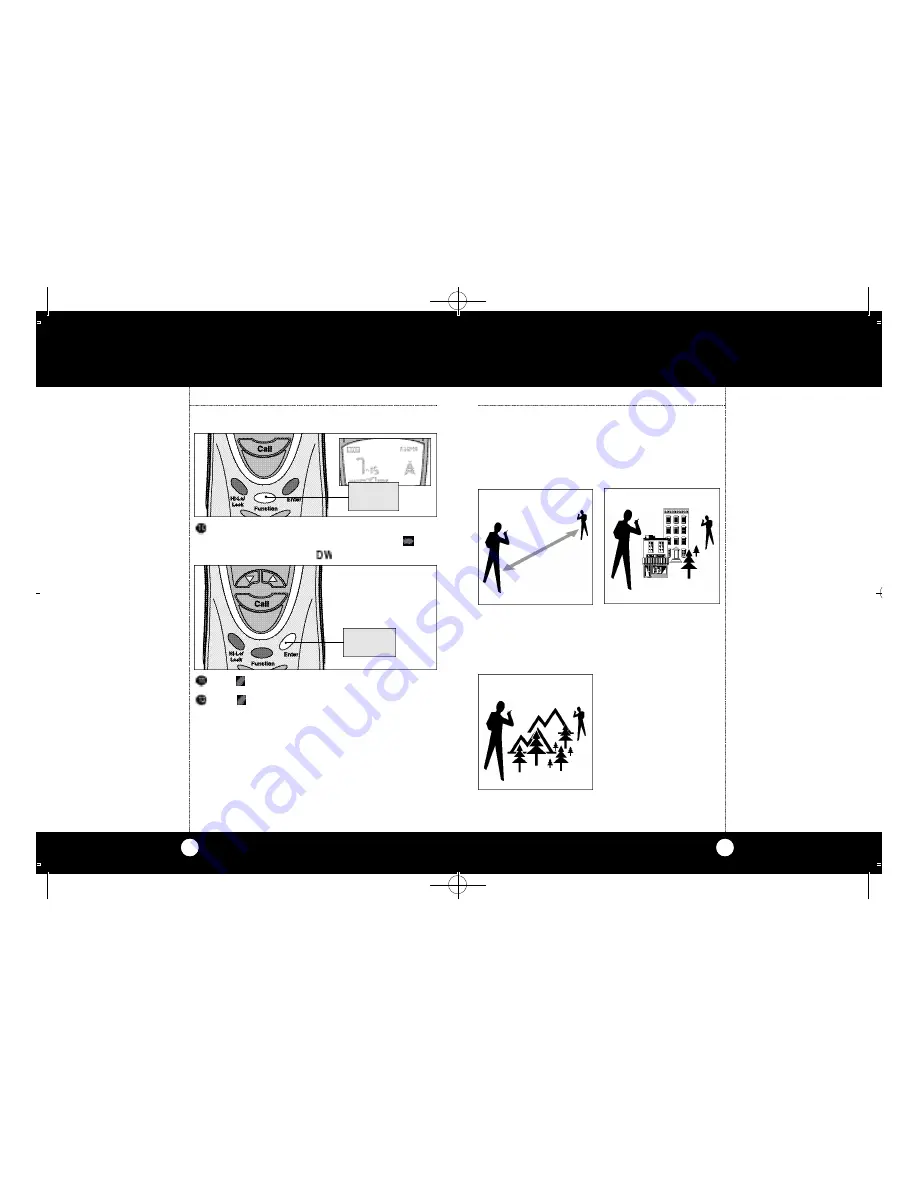
Your micro Talk Pro fessional Radio has a range up to
5 miles in GMRS. This effective range can be short-
ened under some conditions.

Under flat, o pen co n d i-
tions you will ex pe ri-
e n ce the micro Ta l k
Pro fe s s i o n a l’s 
maximum ra n g e.

Range can be re d u ce d
by buildings and fo l i a g e
in the path of the signal.

Range will be furt h e r
re d u ced by dense
foliage and hilly te rra i n .

Note

To achieve maximum
range the auto squelch
can be ove r ri d d e n .
Re fer to Maximum Ra n g e
Extender section on 
page 14.

37

36

Dual Watch Function

To enter Dual Watch when the second channel
and CTCSS are already stored, press the
Function Button until

icon flashes.

Pre s s

Enter Bu t to n . Dual watch will be g i n .

Pre s s

E nter or PTT Bu t ton to exit Dual Watc h

Mod e.

PRESS 

Dual Watch
Function

PRESS AND

RELEASE

Cobra PR 2000 manual M(4217)A  12/4/00  4:18 PM  Page 36

Содержание 2-Way Radio

Страница 1: ...y Installation 2 Turning On 3 LCD Display 4 Auto Battery Power Saver 5 Hi Lo Power 5 Select Main Channel 1 7 6 Select CTCSS Subchannel 00 38 7 Battery Low 9 Talking To Another Party 10 Talk Confirmation Tone 11 Listening For Another Party 11 Calling Another Party 12 Auto Squelch 14 Maximum Range Extender 14 External Microphone Speaker Jack 15 Advanced Features 16 Listening to Weather Channels 16 P...

Страница 2: ...ll Batteries Note Whenever the unit is on you can receive communications Turning On Your microTalk Professional Antenna Turning On Your microtalk Professional Turn the Volume control clockwise to switch power on Set volume to desired level Turn the Volume control counter clockwise to turn power off The radio is equipped with a SMA female anten na connector and a matching UHF antenna Place top of u...

Страница 3: ... mode High Low Power Switch When in close proximity to other party or during clear weather conditions you can switch from High to Low Power to extend battery life The icon will flash Auto Battery Power Saver High Low Power Switch Illuminating the Display Illuminating the Display Press and release MON Button to illuminate display for ten seconds PRESS AND RELEASE POWER SAVER Press Release the lock ...

Страница 4: ...channel and the same CTCSS code Turn on the microTalk Professional An audible tone will indicate the unit is on and then the LCD will self test for 3 seconds and then go to Operational Mode continued Select main channel by pressing the Channel button up or down Note Units must be on same channel and subchannels to communicate Note Press and hold Channel up or down Buttons for fast channel advance ...

Страница 5: ... subchannel is displayed press and release Enter Button If key audible tone is on an audible tone will confirm your selection Battery Low When in normal use the icon may begin flashing This is a warning to you that your batteries are getting low Replace alkaline batteries as soon as possible Battery Low Note When battery capacity is at the 1 4 level it is recommended that you replace alkaline batt...

Страница 6: ...ease the PTT Button the person you are talking to will hear a tone indi cating that it s ok to talk See Talk Confirmation Tone section on page 11 Press and hold PTT Button The icon will appear Release PTT Button and listen for response Hold mic about 2 inches from mouth Speak in a normal voice Talking to Another Party PRESS AND HOLD RELEASE FOR RESPONSE 10 Talk Confirmation Tone Your listener will...

Страница 7: ...udible tone will indicate the unit is on The LCD will self test for 3 seconds and then to operational mode TURN KNOB CLOCKWISE PRESS UP OR DOWN Press and release Call Button The indicator icon will flash and the icon will remain on for 3 seconds The unit you are calling will hear a 2 second ring tone Your microTalk Professional is always in the standby mode when the PTT Button is not depressed Not...

Страница 8: ...Professional is equipped with Auto Squelch which automatically shuts off weak trans missions and unwanted noise due to terrain con ditions or if you have reached your range limit Maximum Range Extender Auto squelch can be temporarily removed to allow all signals to enter Maximum Range Extender Press and hold Button to allow all signals to enter Auto Monitor Auto Monitor When the signal you want to...

Страница 9: ...Function Button until weather icon appears The last weather channel tuned will be displayed Press Channel Button up or down to select the appropriate channels for your area Listening to Weather Channels Advanced Features Advanced Features PRESS AND RELEASE PRESS AND RELEASE PRESS AND RELEASE To exit weather reception press the Enter Button The radio will go to the last channel and CTCSS sub channe...

Страница 10: ...mation Tone Lock Key Advanced Features Turning Weather Alert ON or OFF Turning Weather Alert ON or OFF Press Function Button until icon flashes Push Channel Button to switch between ON or OFF Then press Enter to lock in selection The radio will double beep to confirm The icon will flash to show it is enabled PRESS AND RELEASE PRESS AND RELEASE Weather Alert Weather Alert A tone alert will be autom...

Страница 11: ...on on page 24 PRESS AND RELEASE PRESS AND RELEASE Press and release Function Button until icon and a memory location flashes Select memory location you wish to change by pressing Channel Button up or down Programming Memory Locations Your microTalk Professional has 10 memory 0 9 locations for storing your most frequently used channels Turn on microTalk Professional An audible tone will indicate th...

Страница 12: ...ycle through the different functions Programming Memory Locations Press the Function button to set the main channel in memory and move to subchannel selection The subchannel begins flashing The icon will remain flashing Select desired subchannel you wish to store 00 38 by pushing Channel Button up or down PRESS AND RELEASE PRESS AND RELEASE Programming Memory Locations Note Pressand holdthe Up Dow...

Страница 13: ...ational Mode Press and release Enter button Using Memory Locations continued Using Memory Locations PRESS AND HOLD PRESS AND RELEASE Select desired memory location you wish to recall 0 9 by pushing the Channel button Press and release Function Button until icon and a memory location flashes Memory Channel Recall Talk To recall a channel in memory PRESS AND RELEASE PRESS AND RELEASE Using Memory Lo...

Страница 14: ...hat channel or Press Channel button to rescan the main channel or Proceed to subchannel scan on next page Scan Function continued Scan Function PRESS Scan Function Turn on microTalk Professional An audible tone will indicate the unit is on and then the LCD will go through a 3 second self test and then go to Operational Mode Press and release Function button until icon and Main Channel flashes PRES...

Страница 15: ... and release Function Button and subchannel and scan icon will flash To scan subchannels Press and release Channel button and subchannel scanning begins and stops when an incoming transmission is detected Your microTalk Professional will pick it up for 10 seconds Within 10 seconds you can Press and hold Talk Button and talk Your radio will return to operational mode on that channel or To exit the ...

Страница 16: ...ote Whenpressingthe radiobut ton the user will now hear an audible tone Press Channel button to begin the scan mode The radio will stop at the first memory location for 1 2 second If no signal is detected it will move on If a signal is detected it will stay at that loca tion for 10 seconds If you want to stay at that location for more than 10 seconds press and release the PTT button Memory Scan Fu...

Страница 17: ...d accidental operation To engage the Lock Function PRESS AND RELEASE Note Call Button MON Button and PTT Button do not lock and are fully operational while the unit is locked The unit cannot lock while in Function Mode Lock Function Press Channel Button up or down to turn on or off To set option Press Enter Button This will immediately enter new setting and return to operational mode Press Functio...

Страница 18: ...nction Dual Watch allows you to simultane ously monitor any two preselected Family Radio Service channels Turn on your microTalk Professional 2 way radio An audible tone will indicate the unit is on The LCD will go through a 3 second self test and then go to operational mode Select first channel and CTCSS code which you desire to Dual Watch please see page 6 Press and release Function Button until...

Страница 19: ...ings and foliage in the path of the signal Range will be further reduced by dense foliage and hilly terrain Note To achieve maximum range the auto squelch can be overridden Refer to Maximum Range Extender section on page 14 37 36 Dual Watch Function To enter Dual Watch when the second channel and CTCSS are already stored press the Function Button until icon flashes Press Enter Button Dual watch wi...

Страница 20: ...roTalk Professional 2 Way Radio Can Make Your Life Easier and Safer As you become familiar with your microTalk Professional Radio you will find many of your own uses for the unit Some suggestions include Talking with fellow hikers Keeping track of the kids in a shopping mall Talking to a neighbor or a friend Communicating between basement and first second or third floor microTalk Professional 2 Wa...

Страница 21: ... Hz 05 79 7 Hz 25 156 7 Hz 06 82 5 Hz 26 162 2 Hz 07 85 4 Hz 27 167 9 Hz 08 88 5 Hz 28 173 8 Hz 09 91 5 Hz 29 179 9 Hz 10 94 8 Hz 30 186 2 Hz 11 97 4 Hz 31 192 8 Hz 12 100 0 Hz 32 203 5 Hz 13 103 5 Hz 33 210 7 Hz 14 107 2 Hz 34 218 1 Hz 15 110 9 Hz 35 225 7 Hz 16 114 8 Hz 36 233 6 Hz 17 118 8 Hz 37 241 8 Hz 18 123 0 Hz 38 250 3 Hz 19 127 3 Hz 20 131 8 Hz CTCSS CTCSS Channel Frequency Channel Frequ...

Страница 22: ...Z DB 10 2500 HZ DB 4 6 AUDIO DISTORTION 3 7 HUM and NOISE DB 40 8 TRANSIENT FREQ BEHAVIOR a TX ON mS 30 b TX OFF mS 5 D POWER SUPPLY 1 BATTERY LIFE 1 1 18 RATIO HR 20 2 BATTERY 6 x AA V 42 Caring for Your Professional Radio Never place the unit in water or in a moist place Avoid exposure to extreme temperatures Caring for Your microTalk Professional Radio The microTalk Professional 2 Way Radio wil...

Страница 23: ...cts or component parts upon deliv ery to the COBRA factory Service Department accompa nied by proof of the date of first consumer purchase such as a duplicated copy of a sales receipt You must pay any initial shipping charges required to ship the product for warranty service but the return charges will be at Cobra s expense if the product is repaired or replaced under warranty Exclusions This limi...

Страница 24: ...ease print clearly Name Address No P O Box City State Zip Telephone Credit Card No Exp Date Customer Signature Circle One Visa MasterCard Discover Allow 4 to 6 weeks for delivery Offer valid in Continental U S only For credit card orders fill out order form and fax to 1 773 622 2269 or call 1 773 889 3087 Press 1 from the main menu 8 00 am 6 00 pm M F CST Make check or money order no stamps payabl...

Страница 25: ...ts also includes Citizens Band Radios High Gear Accessories Radar Detectors SafetyAlert Traffic Warning Systems Family Radio Service FRS 2 Way Radios Nothing comes close to a Cobra Cobra PR 2000 manual M 4217 A 12 4 00 4 19 PM Page 48 ...

Страница 26: ...1 For Warranty Repair include some form of proof of purchase such as a mechanical reproduction or carbon or a sales receipt If you send the original receipt it cannot be returned 2 Send the entire product 3 Enclose a description of what is happening with the unit Include a typed or clearly print name and address of where the unit is to be returned 4 Pack unit securely to prevent damage in transit ...

Страница 27: ...ms please call the FCC Hotline at 1 800 418 FORM You need form 574 If you have any questions regarding the license application you can contact the FCC direct at 1 888 CALL FCC FCC Warnings Replacement or substitution of transistors regular diodes or other parts of a unique nature with parts other than those recommended by Cobra may cause a violation of the technical regulations of part 95 of the F...

Страница 28: ... a week E mail questions to productinfo cobraelectronics com Cobra on theWorld Wide Web Frequently Asked Questions FAQ can be found on line at www cobraelectronics com This device complies with part 15 of the FCC rules Operation is subject to the condition that this device does not cause harmful interference Controls and Indicators A2 3 10 10 11 11 14 12 7 9 1 1 2 2 4 5 16 13 3 6 6 8 15 1 Detachab...

Страница 29: ...es To maintain compliance with the FCC s RF exposure guidelines hold the transceiver at least 2 inches 5 centimeters from your face and speak in a normal voice with the antenna pointed up and away If you wear the transceiver on your body using the supplied belt clip do not transmit with this device in the body worn configuration Unauthorized antennas modifica tions or attachments could damage the ...

Отзывы: