background image


19

Take a Video 

 
Rotate dial mode to select “

Normal

” mode of the DV. (The arrow points at “

” position). 


Setup the parameter 


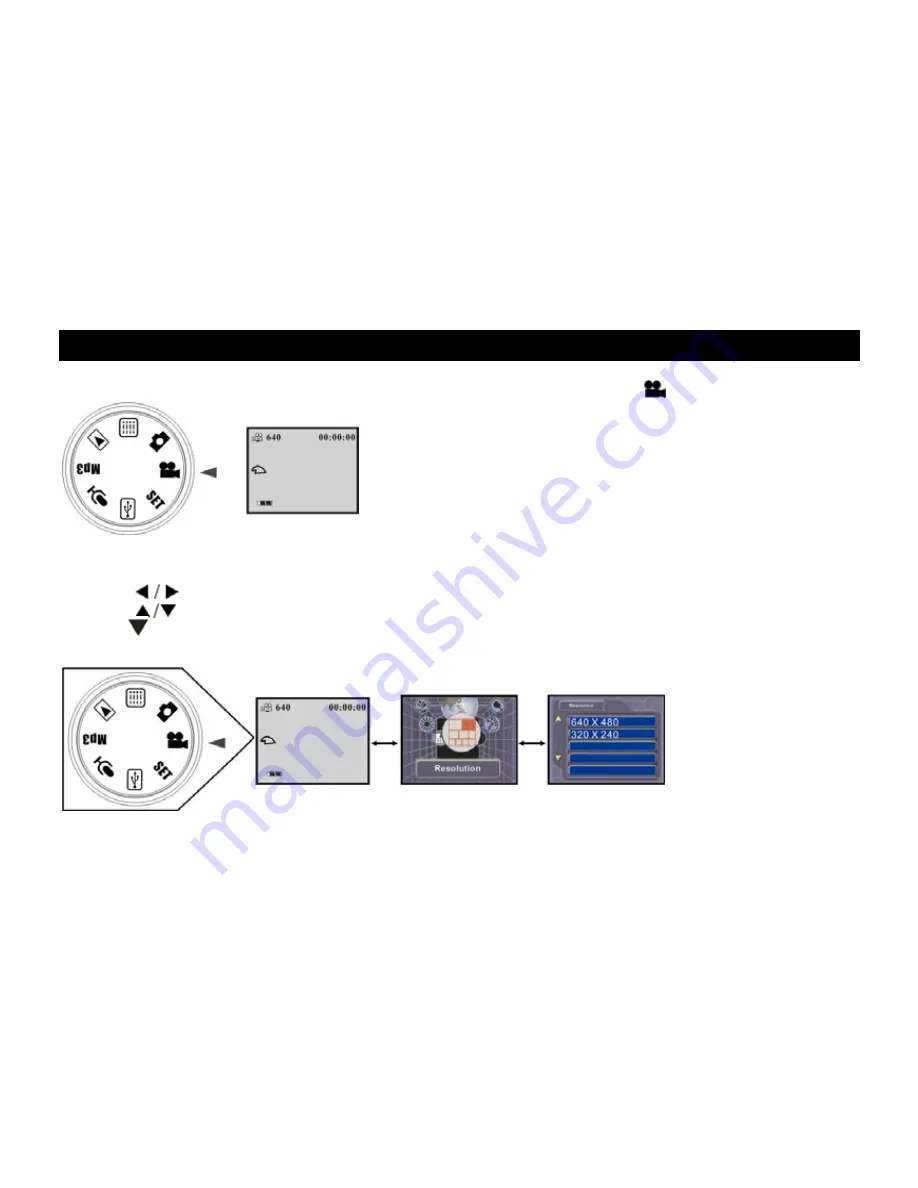
Set Resolution 

1. In VIDEO mode, Press 

M

 button, the LCD will show as below. 

2. Press 

  button to select 

“Resolution”

 and press 

button. 

3. Press


button to select 

“640 X 480”

 or “

320 X 240

”and then press

 M 

button to confirm. 

4. Press

button to exit the menu and return to the normal mode. 


Содержание DV500

Страница 1: ...www cobradigital com...

Страница 2: ...r 5 Preparation 6 Battery Installation 6 Charging the Lithium Battery 7 Inserting an optional Memory Card 7 How to use the LCD monitor 8 Power on off your Digital Video 9 The Mode Dial Menus 10 OSD in...

Страница 3: ...31 Still images playback 31 Display on TV 32 Playing audio file 32 Software Installation 35 Downloading 36 Copy Mp3 files from PC to your DV 38 Video impression Application 39 Web Cam 46 Video Confer...

Страница 4: ...Features Effective resolution 2592 x 1944 Mega Pixels interpolated up to 10M pixels 9 in 1 Digital Video Digital Still Camera MP3 MP4 AUDIO REC WEB CAM MEDIA PLAYER MASS STORAGE CARD READER 2 0 LTPS...

Страница 5: ...5 Getting to know Your Camcorder...

Страница 6: ...sert the battery in the camcorder 1 Slide the battery bolt to open battery door 2 Load the lithium battery correctly as the polarity and marked on the battery cover 3 Close battery door Notes If you d...

Страница 7: ...ry is charging 4 When the battery is fully charged disconnect the PC from the camcorder Notes When the battery is fully charged the indicator will turn off Inserting an optional Memory Card You can in...

Страница 8: ...8 How to use the LCD monitor 1 Open the LCD monitor 2 Rotate the LCD screen carefully per your request...

Страница 9: ...of screen when you rotate the LCD 3 When the LCD keeps same direction with digital lens the image shown on LCD will be adjusted automatically Power on off your Digital Video Press the POWER button to...

Страница 10: ...10 The Mode Dial Menus...

Страница 11: ...re Mode Single shoot Sequence 2 Resolution 10M 3648x2736 7M 3072x2304 5M 2592 X1944 3M 2048 X1536 1M 1280 X 960 3 Photo Quality Normal quality Fine Super quality 4 Number of video audio files Taken 5...

Страница 12: ...12 6 Battery level Full Medium Low 7 Self Timer 10s self timer 20s self timer 8 White Balance AWB Auto Daylight Tungsten Fluoresce Cloudy 9 Flash Mode Force On Auto Force Off Red Eye Reductions...

Страница 13: ...mode 2 Press button to select Frequency and then press M button 3 Press button to set the frequency and press M button to confirm Date Time Set 1 Rotate dial mode to select SET mode 2 Press button to...

Страница 14: ...mode 2 Press button to select Beep and then press M button 3 Press button to select On or Off and press M to confirm Note The BEEP SOUND function works in CAMERA PLAYER M REC and M PLAY modes When be...

Страница 15: ...erting SD MMC card If you select Yes either all files in flash memory or external card will be deleted depending on your selection of media 2 Formatting will erased all files even if the files are loc...

Страница 16: ...mode to select SET mode 2 Press button to select Default Setting and then press M button 3 Press button to select Yes or No and press M to confirm Language Select 1 Rotate dial mode to select SET mode...

Страница 17: ...ress M button 3 Press button to select the time that power auto off 60Sec 2min or None and press M button to confirm TV Mode 1 Rotate dial mode to select SET mode 2 Press button to select TV Mode and...

Страница 18: ...Display and then press M button 3 Press button to select On or Off and press M button to confirm Version 1 Rotate dial mode to select SET mode 2 Press button to select Version 3 Press M button to che...

Страница 19: ...Setup the parameter Set Resolution 1 In VIDEO mode Press M button the LCD will show as below 2 Press button to select Resolution and press M button 3 Press button to select 640 X 480 or 320 X 240 and...

Страница 20: ...or 15fps and then press M button to confirm 4 Press button to exit the menu and return to the normal mode Set Audio 1 In mode Press M button the LCD will show as below 2 Press button to select Audio...

Страница 21: ...21 White Balance Please refer to the operation white balance in mode Take a Video 1 Press the POWER button to start the DV 2 Rotate the LCD monitor to best angle The scope of rotation is 0 o 270 o...

Страница 22: ...g you can press T button to zoom in up to 4x and W to zoom out Notes 1 The video clips will be saved as MPEG 4 format 2 The shooting time varies depending on the available space of memory card 4 Use t...

Страница 23: ...te dial mode to select Normal mode of the camera The arrow points at position Simply take a Photo 1 Press the POWER button to start the DV 2 Rotate the LCD monitor to select best angle The scope of ro...

Страница 24: ...uring taking photo 2 When the DV is fully loaded with photos if you press Shutter Button again No Space will be shown on LCD monitor 4 Use the LCD monitor to find the things for which you desire to ta...

Страница 25: ...available 4 Repeatedly press button to select the icon shown on LCD IGBT function is ready Meanwhile you can also set flash function as the following operation 1 In CAMERA mode Press M button 2 Press...

Страница 26: ...s below 1 In CAMERA mode Press M button 2 Press button to select Capture Mode and press M button 3 Press button to select the mode of capturing and then press M button to confirm 4 Press button to exi...

Страница 27: ...2 0 per your request 4 Press M button to confirm 5 Press button to exit the menu and return to the normal mode White Balance 1 In CAMERA mode Press M button the LCD will show as below 2 Press button t...

Страница 28: ...ct Quality and press M button 3 Press button to select Super Fine or Normal per you request and then press M button 4 Press button to exit the menu and return to the normal mode Note The resolution an...

Страница 29: ...ou can set some others function excluding the above Scenery Color Please refer to the above operation Recording audio files 1 Press POWER button to start digital video 2 Rotate dial mode to make the a...

Страница 30: ...deo 2 Rotate dial mode to make the arrow point at Mp3 position 3 Press button to select the Mp3 file that you want to play and press button to adjust the volume 4 Press Shutter button to start press S...

Страница 31: ...arrow points at position 3 Press button to select the clip that you want to play 4 Press Shutter button to play the video clip Press Shutter button again to pause playing and then press this button to...

Страница 32: ...utton to select scope of rotation Press M button to save the picture after rotation Press button to exit the rotation mode if you don t want to rotate the picture now Display on TV The photos and vide...

Страница 33: ...ct to Delete Current and then press M button 4 Press the button select to Yes and then press M button the current file is deleted If you select Delete All all files exclude the locked files in memory...

Страница 34: ...e Notes At step 3 if you select Unlock Current or Unlock All the relative protection will be canceled Crop the Photo 1 In PLAYBACK mode press M button 2 Press button to select Crop and press M button...

Страница 35: ...on your screen NOTE Do not connect the DV to your computer during installing software Please check the Install DirectX which support playing video files If your computer can t install automatically p...

Страница 36: ...to your PC Connect the DV to computer with the USB cable 1 Double click the icon My Computer 2 Double click the icon MASS STORAGE 3 Double click DCIM icon 4 Double click 100NVTIM icon 5 You can now c...

Страница 37: ...37...

Страница 38: ...38 Copy Mp3 files from PC to your DV 1 Double click the icon My Computer 2 Double click the icon MASS STORAGE 3 Double click MP3 icon You can now copy and paste mp3 files to it...

Страница 39: ...oftware is a tool for producing custom movies and slide shows using your own video clips picture and sound tracks There are 6 steps to achieve producing wonderful movies 1 Media 1 On the main interfac...

Страница 40: ...ss Storage and then connect DV to PC with USB cable The flash memory will be used as a movable hard disk on your computer and you can select files from it Select files from memory card You can also se...

Страница 41: ...eo projects and not slide shows It lets you adjust the brightness and contrast of still images and videos on the Storyboard You can also set the display time for still images and trim audio and video...

Страница 42: ...42 3 Effects Here you may add special effects that occur as one component on the Storyboard changes to the other You may either add these transitions manually or apply a theme to your entire project...

Страница 43: ...xt to any video or still image on the Storyboard Text can appear stationary or move about the screen in various ways This step is only available for video projects Meantime you can set the font size c...

Страница 44: ...ect Here you may record audio tracks and add them to the Storyboard You can include as many audio tracks as you like with two playing back simultaneously at any given time Because your videos may alre...

Страница 45: ...step everything on the Storyboard will be combined into your video or slide show Options here will vary depending on the type of project you make Video projects will have more save options tabs than s...

Страница 46: ...transmission or hold online videoconference 1 Connect the camera to your computer with USB cable correctly 2 Select My Computer Local Disk c Program Files NetMeeting and then run the videoconference s...

Страница 47: ...ct PC mode and then press button to select PC Camera 2 Run and sign in the MSN software on your computer 3 Connect the camera to your computer with USB cable correctly 5 Select the person who you want...

Страница 48: ...48 6 Press Next to continue 7 You can select speaker and adjust speaker volume and then press Next to continue...

Страница 49: ...49 8 You can select Microphone and adjust Microphone volume and then press Next to continue 9 Press Finish to finish setting Now you can chat with your friends with webcam...

Страница 50: ...ith USB cable directly 1 Power on your printer 2 Power on your DV 3 Rotate your DV to mode to select a photo you want to print 4 Press M button and then to select Print on LCD 5 Connect DV to your pri...

Страница 51: ...et to STBY for more than 60s or120s without using it The battery pack is fully exhausted Battery pack The battery pack is quickly exhausted The atmospheric temperature is too low The battery pack has...

Страница 52: ...s incorrect The set is wrong Please re set Date Time Downloading Clips still image mp3 can t be downloaded from DV to PC There may not install the drive of DV in your PC Please install drive before do...

Страница 53: ...A 320 240 pixels QVGA LCD Display 2 0 TFT 270degree eddy Internal Memory Internal DDR 16MB 32M NAND flash memory External Memory SD MMC card for optional SD cards Lens f 7 45mm F3 0 Zoom 4X Digital Zo...

Страница 54: ...0M Fine quality about 423pcs 1M 165pcs 3M 102pcs 5M 72pcs 7M 51pcs 10M Super quality about 338pcs 1M 131pcs 3M 82pcs 5M 58pcs 7M 41pcs 10M 2 Video clips AVI format about 00 05 05 hours 30fps VGA 00 10...

Отзывы: