background image

2.

2. operatiNg yoUr Daymark 9700

oVerVieW

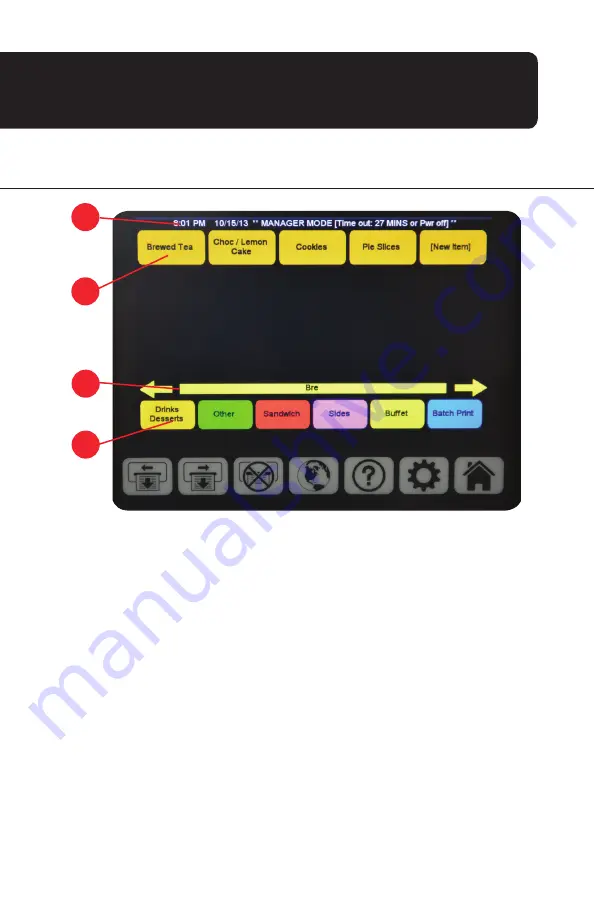
1.  Time and Date Display: The time shown in this bar will be used to generate expiry  

and shelf life for labels. This display also shows when the terminal will time out and 

log out the current user. It is important that this time display is verified and accurate.

2.  Item Buttons: Individual menu items are shown as an item button on the home screen.

Once selected you can print or modify a label for that item. The [New Item] button 

allows you to add a new item in that category.

3.  Slider Bar: Arrow keys allow you to navigate between multiple screens of item buttons 

within a category.

4.  Item Category Buttons: Category buttons represent a pre-determined list of items. Items 

within the category will be an identical color to the category button. Category names 

are not editable on the touch screen and are pre-configured and sized.

3.

4.

2.

1.

10.

2. operatiNg yoUr Daymark 9700

Содержание DayMark 9700

Страница 1: ...2938 3064...

Страница 2: ...oftware and equipment made by other manufacturers and referred to in this publication do not affect the applicability of information in this publication Copyright 2013 CMC Group Inc All rights reserve...

Страница 3: ...tructions 8 Printer Housing Cleaning Instructions 9 CHAPTER 2 OPERATING YOUR DayMark 9700 10 Overview 10 Function Button Guide 11 Help Button Guide 12 Search Function Guide 13 14 Setup Button Guide 15...

Страница 4: ...Micro SD Card Update Instructions 50 TFTP Updating 51 Network Settings Information 51 CHAPTER 5 SELECT YOUR LABEL 52 Label Adhesives 52 Label Formats 53 54 55 CHAPTER 6 CREATING YOUR SYSTEM 56 Column...

Страница 5: ...formation via phone and email techsupport daymarksafety com Telephone Technical Support DayMark technical support is also available at 877 620 8878 To help us serve you faster please have the followin...

Страница 6: ...access to a standard electrical outlet Please ensure that there is space in front of the terminal as the touch screen rotates upward This allows access to replace DayMark and DayMark approved labels...

Страница 7: ...nter portion of display area Arranges menu items and categories as well as supplies navigation for terminal software 3 Function Buttons Permanent buttons containing main menu functions 4 Access Door S...

Страница 8: ...pull and lift upward 2 The display will end in a horizontal orientation when completely open Print Mechanism Replacement 3 The lower terminal door should then be pulled forward and down with both han...

Страница 9: ...yMark 9700 5 4 Slide the printer mechanism carefully out of the terminal 5 Replacement printer mechanism plugs directly into the unit Loading Labels INTO TERMINAL 1 Grasp the sides of the display then...

Страница 10: ...ather than the web gap between labels leaving three or four labels in front of printer mechanism 6 3 DayMark and DayMark approved labels can then be placed into the label roll bucket The label stock s...

Страница 11: ...nter will automatically align to the next label 7 Grasp sides of display and rotate downward until it latches 8 Pressing the left printer feed button or right printer feed button on the front of the d...

Страница 12: ...alcohol Use an alcohol swab alcohol pen or soft rag slightly damp with alcohol 3 2 Grab blue plastic lock and slide left until the metal top opens 2 1 Grasp the front terminal door with both hands and...

Страница 13: ...rials to deterio rate Never clean the printer with water or any flammable liquid alcohol benzene thinner etc either applied directly or with a cloth If you accidentally spill liquid on the printer swi...

Страница 14: ...s are shown as an item button on the home screen Once selected you can print or modify a label for that item The New Item button allows you to add a new item in that category 3 Slider Bar Arrow keys a...

Страница 15: ...Within this menu there is contact information for DayMark Tech support as well as several help topics with instructional walk throughs This menu allows the user to access system preferences like set...

Страница 16: ...shown below Arrow keys on either side of the graphic allow you to navigate through the steps The red X in the upper right hand corner will close the graphic steps and return you to the main help scree...

Страница 17: ...the steps to follow to use the search function and examples of the results Search Function GUIDE 1 From the HELP screen select the SEARCH button from the bottom left side of the screen This will brin...

Страница 18: ...of the 9700 screen 5 4 Once the filter value is entered select a category group to display only the products in that group that equal the entered value In this example it was sauce 4 3 Press the DONE...

Страница 19: ...can be corrected in this menu 2 Set Display Preferences Screen brightness screen saver settings and label button size can be adjusted in this menu 3 Save Load Update Backup This menu is used to acces...

Страница 20: ...e and Time 2 Operating Your DayMark 9700 16 2 Arrow Keys For the date and time functions use the arrow keys on the touch screen to set the day month year hour and minute Also on this screen there is a...

Страница 21: ...t will come pre configured with screen saver display options 3 Screen Saver Selection Your unit can display one of three options during screen saver mode Use the arrow keys to select between logo slid...

Страница 22: ...misaligned 1 Set Display Preferences This function allows you to set configuration settings for the touch screen display All changes take effect immediately 3 You will be prompted to touch three poin...

Страница 23: ...brating from Start Screen 1 Touch the screen and turn on the power at the same time 2 You will see a red box with a black dot in the middle 3 You will be prompted to touch three points at corners of t...

Страница 24: ...or backup purposes This file can also be edited on your computer 2 Load Data File Use this function to load a previously saved or edited MenuData xml file from a USB stick 3 Update System Use a previo...

Страница 25: ...prior to use of system functions Toggle using arrow keys 2 Label Print Warning At This setting controls the number of labels that may be requested before a warning pop up will display Use arrow keys...

Страница 26: ...r press the CANCEL key to revert to the original field contents and return to the previous screen Special characters are available as pop ups beyond their root letter To access special characters hold...

Страница 27: ...ows you to set print options for specific label categories 1 1 Layout Type Select the layout type using the PREV and NEXT buttons 2 Arrow Button Use the arrow key to select which printer these labels...

Страница 28: ...acon Strips Opened 6 12 13 3 19 PM Discard 6 21 13 3 19 PM User Manager DTDM Bacon Strips Opened 6 12 13 3 19 PM Discard 6 21 13 3 19 PM User Manager Layout Type Description DayMark Item 2 2x 2 DOW Us...

Страница 29: ...1000 Blank ID IT115693 2 2 x 2 DTTK 1000 Blank ID IT115697 2 2 x 2 DTMM 1000 Blank IT115741 2 2 x 2 DTDK 1000 Blank IT115736 Layout Type Description DayMark Item 2 2 x 2 Blank Use By 2 2 x 2 DTDM 1000...

Страница 30: ...n Strips Opened Discard 6 12 13 3 19 PM 6 21 13 3 19 PM User Manager Layout Type Description DayMark Item 2 2 x 1 Blank Use By 2 2 x 1 DTDM 2000 Blank ID IT115691 2 2 x 1 DTTK 2000 Blank ID IT115695 2...

Страница 31: ...8g Protein 2g Vitamin A 0 Vitamin C 0 Calcium 0 Iron 2 CELERY RAW ONIONS RAW MARGARINE POULTRY SEASONING PEPPER BLACK GARLIC GRANULATED SOUP BASE CHICKEN WATER Nutrition Facts Buns Serving Size 1 piec...

Страница 32: ...item from the category bar along the bottom of the screen 2 There may be several pages of items within a given category Use the arrow keys to navigate between groups of items You can also tap along t...

Страница 33: ...tant If the expiry appears incorrect you can alter the current settings of the machine using the Adjust Date and Time button on the SETUP menu Note The above error messages will be generated in the ca...

Страница 34: ...ings 5 Pressing the CANCEL button will exit the menu and not save any changes Note Adding the shelf life values on this screen to the current system date and time will produce the expiration date and...

Страница 35: ...print on the label as the item name 4 Expire1 Message This is the text that will appear above the Expire1 date and time 5 Expire1 Days Hours Minutes These are the values that will represent the first...

Страница 36: ...ity to maintain the correct hold discard times The REPAN REPRINT button is an optional button in the print screen used to change the prep time of the next label s printed for times when re pan or re p...

Страница 37: ...to personalize the batch name 4 Batch Print Creating and Editing Batch printing on the 9700 allows you to group items together from various categories and print them all at once Each item can be set...

Страница 38: ...items to add to the Batch The selected item will now be listed in the batch list Continue the previous steps until your batch list is complete 6 Once the batch list is complete you may set each item...

Страница 39: ...Mark Menu Editor spreadsheet makes use of various custom macros to assist the user in building their MenuData file and formatting for use on the 9700 printer meNU eDitor maiN meNU 3 Daymark meNU eDito...

Страница 40: ...ge This field is used for the entering an Alternate language for Categories It is not required and It will auto fill with the infor mation entered in the Category column so it may be identical to the...

Страница 41: ...L button will cancel this operation and return to the previous menu Menu Data Update USB Instructions Flash Drive 1GB Minimum Make sure the flash drive is durable and can withstand the pressure the ac...

Страница 42: ...ve the existing Micro SD Card located in the middle port Use caution as the SD Card port is spring loaded 4 Copy new menudata file to Micro SD Card 5 Install the Micro SD Card gold contacts facing fro...

Страница 43: ...Local Area Network LAN Intranet Wide Area Network WAN Internet Files are updated at a central location Files are uploaded onto the TFTP server that lives on the corporate intranet If a new version exi...

Страница 44: ...ences button 5 1 Turn off the 9700 and plug in the Ethernet cable TFTP Updating Process 2 Turn on the machine and select the SETTINGS button 3 Enter password 40 5 Select the Menu Update via TFTP butto...

Страница 45: ...an live on a single TFTP server provided they are named according to the Brand PID Example MU97042 xml or LT97033 xml The user can choose to update the MenuData file the Layouts file or the Batch The...

Страница 46: ...settings saved when the DONE button is clicked Power should be cycled if the mode is switched 10 The Host Name and Mac Address are displayed on the bottom area of the screen These parameters are set f...

Страница 47: ...to be set to the IP Address of the TFTP server containing the files for download In the example below the IP Address is set to 162 209 2 54 This parameter is changed by clicking on the field Once the...

Страница 48: ...u reached by pressing the MODIFY button allows you to delete alter or add field values as well as shelf life parameters 2 If the system is configured with an Administrative Password the user is prompt...

Страница 49: ...n the label as the item name 4 Expire1 Message This is the text that will appear above the Expire1 date and time 5 Expire1 Days Hours Minutes These are the values that will represent the first date an...

Страница 50: ...batch name Batch Print Creating and Editing Batch printing on the 9700 allows you to group items together from various categories and print them all at once Each item can be set to print by a defined...

Страница 51: ...to add to the batch The selected item will now be listed in the batch list Continue the previous steps until your batch list is complete 5 Once the batch list is complete you may set each item s defa...

Страница 52: ...in the ROOT directory on the USB drive meaning they are not to be inside any folder structure on the USB drive 3 Plug in the USB drive to the side of the 9700 4 Press the SETTINGS button and enter the...

Страница 53: ...he machine will boot up and bring you to the HOME screen In the case of a BACKUP operation you will be prompted to insert a clean USB stick into the device s USB port as shown above For both BACKUP an...

Страница 54: ...ll the Micro SD Card gold contacts facing front of the unit Be sure to insert the SD Card into the card port and not into the gap between the printer and the port Inserted correctly into the card port...

Страница 55: ...e network parameters on the 9700 the manager needs to follow the steps listed below The NETWORK SETTINGS screen provides for two modes of network configuration Dynamic Host Configuration Protocol DHCP...

Страница 56: ...reducing labor and time used removing adhesive residue from contain ers Detach Tab technology allows for 3 levels of adhesion to fit your application 40 to 160 F 40 to 71 C 10 F 12 C Description Worki...

Страница 57: ...ed Discard 6 12 13 3 04 AM 6 21 13 3 04 AM User Manager FRIDAY DTMM Bacon Strips Opened Discard 6 12 13 3 04 AM 6 21 13 3 04 AM User Manager WEDNESDAY DTMM FRIDAY VIERNES Bacon Strips Product Opened 6...

Страница 58: ...ard 6 12 13 3 19 PM 6 21 13 3 19 PM User Manager DTMM Bacon Strips Opened 6 12 13 3 19 PM Discard 6 21 13 3 19 PM User Manager Label Formats 54 DTDM Bacon Strips Opened Discard 6 12 13 3 19 PM 6 21 13...

Страница 59: ...RAW MARGARINE POULTRY SEASONING PEPPER BLACK GARLIC GRANULATED SOUP BASE CHICKEN WATER Nutrition Facts 2 2 x 4 0 Blank Nutrition Buns Serving Size 1 piece Servings Per Container about 7 Amount Per Ser...

Страница 60: ...de Caption_Alt1 Category_Alt1 Columns C D are what displays in the alternative language mode Any color selected in Excel can be used colUmN DescriptioNs Print Message 1 Column E is what prints on the...

Страница 61: ...ints above the Expire1 date and time on the label 3 Days Hours Minutes Columns These columns determine what date and time will print on the label Data entered as all zeros will print the current date...

Страница 62: ...NUtritioNal iNFormatioN Nutritional Label Each column relates to a section on the nutritional label The machine fits 18 metrics comfortably on a 2 2x3 or 2 2x4 label 58 6 creatiNg yoUr system...

Страница 63: ...tion should only be used when printing two different layouts Each item can be set to disable multiple print buttons Printer1always the left most print button and Printer2 is the next to the right etc...

Страница 64: ...to run excluding the MenuData file 3 TFTP Folder This folder contains information that will allow the unit to utilize TFPT updates 4 Batch xml Stores data pertaining to the batch print function 5 Men...

Страница 65: ...m 4 Layouts Folder Contains the layouts file that dictates all label formats 5 Prompts Folder Contains the English and Spanish translations for all system prompts and text 6 Screen Folder Contains Vis...

Страница 66: ...lock battery backed to generate prep and discard by date and time Touch screen and terminal capable of multi languages for all areas of the world AOW Self Diagnostics Firmware updates available throug...

Страница 67: ...acteristics Printing method Thermal monochrome Resolution 8 dots mm 203 DPI Print zone 2 inches 51mm using 2 2 inch 56mm wide label 1 inch 25mm using 1 2 inch 30mm wide label Print speed 4 inches per...

Страница 68: ...cing will be quoted separately CONSUMABLES Use of any labels in the equipment other than those supplied by DayMark shall void the warranty EXCEPT FOR THE WARRANTIES REFERRED TO ABOVE TRANSACT AND DayM...

Страница 69: ...the date of shipment from TRANSACT for Printrex Brand printers other than the 980 PRINTREX CONSUMABLES WARRANTY TRANSACT warrants that the thermal print head will be free from defects for Expected Li...

Страница 70: ...nt or alteration in the opinion of TRANSACT interferes with the normal and satisfactory operation or maintenance of the printer TRANSACT may refuse to repair such products This includes any printers w...

Страница 71: ...ECIAL INCIDEN TAL OR CONSEQUENTIAL DAMAGES OR LOSSES ARISING FROM THE USE OF THIS PRODUCT This Limited Warranty applies to TRANSACT printers sold in the continental United States The warranty for prin...

Страница 72: ...DayMark Safety Systems 12830 S Dixie Hwy Bowling Green OH 43402 877 620 8878 DayMarklabels com...

Отзывы: