BODY AND TRIM
Tilt Bed
Page 4-6 2001 Pioneer 900 Gasoline Vehicle Maintenance and Service Manual
4
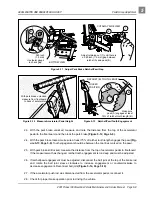
Front Fender Extension Removal, Continued:
3. Using a screwdriver covered with a cloth, gently pry the twelve plastic barrels (10) away from the front
body panel (16) and remove the fender extensions (9) from the front body (Figure 4-2, Page 4-6).
FRONT FENDER EXTENSION INSTALLATION
NOTE: If the front fender extrusion is being installed on a new front body, six 1/4 inch holes must be drilled in
each front fender flange. Drill the first hole one inch above the bottom of the flange as shown (Figure
4-2, Page 4-6). Use the remaining mounting holes in fender extension as a guide to transfer drill the
remaining holes.
1. Press the plastic barrels (10) through the fender extension (10) and into the front body panel (16).
2. Install the front body. See Front Body Installation on page 4-4.
3. Install the brush guard. See Brush Guard Installation on page 4-4.
TILT BED
Read WARNING and CAUTION on page 4-1.
NOTE: Tilt bed removal and installation will be easier with a helper.
TILT BED REMOVAL
1. Raise bed and ensure that the prop rod (17) is secured in the prop rod track (18). Hold bed securely in
an upright position. Remove cotter pin (23) and flat washer (22) from top end of prop rod where prop
rod attaches to bed. Remove prop rod (17) from bed and place prop rod between prop rod track (18)
and rear body panel. Lower bed onto vehicle frame (Figure 4-3, Page 4-7).
Figure 4-2 Front Fender Extension
1 INCH
TYPICAL 2
PLACES
TYPICAL 12
PLACES
15
16
16
9
10
Содержание Pioneer 900
Страница 1: ......
Страница 2: ......
Страница 22: ...3...
Страница 88: ...7...
Страница 92: ...8...
Страница 100: ...9...
Страница 108: ...10...
Страница 188: ...12...
Страница 268: ...14...
Страница 272: ...15...
Страница 316: ...16...
Страница 332: ...17...
Страница 341: ......
Страница 342: ......
Страница 343: ......


