background image

5_

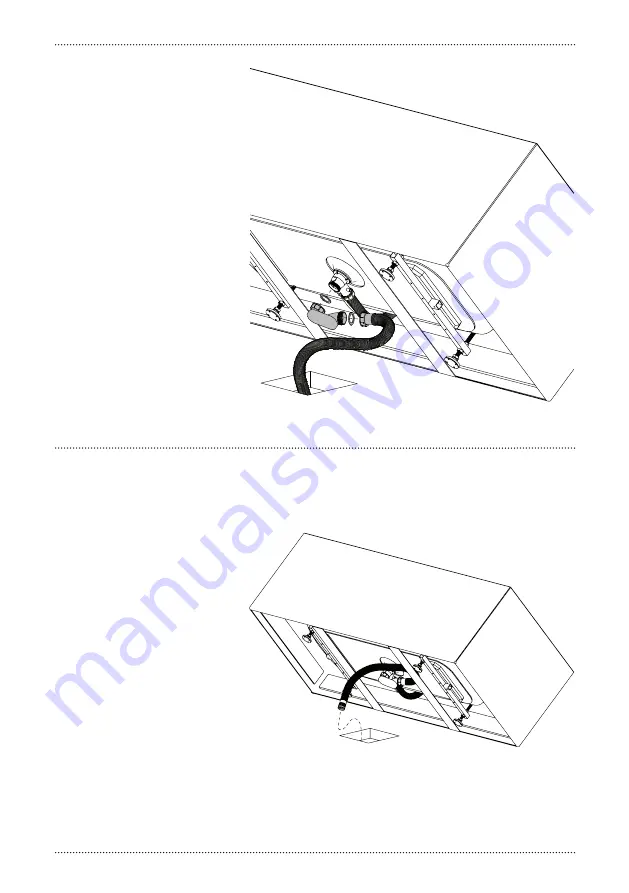
Bevestig de sifon (inbegrepen) 
op de afvoer. Gebruik de explo-
sietekening op p. 7 om alles 
correct te installeren.

Install the trap (included) on 
the drain. Use the exploded 
view on p. 7 to assemble the 
trap correctly.
 
Fixer le siphon (inclus) sur la 
bonde. Employer la vue éclatée 
sur p. 7 pour assembler le 
siphon correctement.

Befestigen Sie den Siphon (im 
Lieferumfang enthalten) am 
Ablauf. Verwenden Sie die Ex-
plosionzeichnung über S. 7, um 
die Siphon richtig zusammen-
zubauen.

6_

Sluit de sifon aan op de afvoer-
leiding.

Install the trap to the waste 
pipe.

Fixer le siphon à la décharge 
d’eau. 

Befestigen Sie den Siphon an 
der Abflussleitung.

Содержание InBe IB/05.40100

Страница 1: ...tructies Installation Instructions Notice de montage Montageanweisungen Dimensions in mm for reference only 14 11 2011 rev_01 www clou nl InBe_freestanding bathtub IB 05 40105 IB 05 40205 b a t h f i...

Страница 2: ...ge dient uitgevoerd te worden door 2 personen waarvan minstens n vak kundig opgeleid persoon Alle maten zijn in mm Before starting with the mounting check whether the delivery is complete At the same...

Страница 3: ...Toutes les mesures affich es sont en mm Vor Beginn der Montage berpr fen Sie bitte ob die Liefe rung vollst ndig ist bzw ob durch den Transport Sch den entstanden sind Diese berpr fung muss direkt am...

Страница 4: ...u nl Gebrauchsanweisungen Wartungsanweisungen finden Sie auf unsere Homepage www clou nl Tijdens de installatie moet men voorkomen dat het opper vlak van het product beschadigd raakt door harde voorwe...

Страница 5: ...70 495 90 1280 595 620 493 80 1780 800 950 510 40...

Страница 6: ...verflow pop up system IB 05 40100 IB 05 40105 IB 05 40200 IB 05 40205 Part 1 2 3 4 5 6 7 8 overflow pop up system conincal O ring drain drain nut drain cap overflow plate overflow handle M5x10 bolt 6...

Страница 7: ...InBe_bathtub trap IB 05 40100 IB 05 40105 IB 05 40200 IB 05 40205 CL 05 60010 CL 05 60020 Part 1 2 3 trap O ring flexible tube 2 1 3 2...

Страница 8: ...Bade wanne 2_ Voorzie op deze plek een uit sparing in de vloer 250 x 250 mm breed en 60 mm diep Make at this position a cut away in the floor 250 x 250 mm wide 60 mm deep Faire cette position un coup...

Страница 9: ...en Sie das durch muttern A und B zu justieren f r alle 4 F e 4_ Bevestig de overloop en afvoer inbegrepen in het bad Gebruik de explosietekening op p 6 om alles correct te instal leren Mount the overf...

Страница 10: ...Fixer le siphon inclus sur la bonde Employer la vue clat e sur p 7 pour assembler le siphon correctement Befestigen Sie den Siphon im Lieferumfang enthalten am Ablauf Verwenden Sie die Ex plosionzeich...

Страница 11: ...cher avec du mastic sili cone sur les pieds berpr fen Sie ob der Abfluss und die Siphon richtig ange bracht sind Fixieren Sie dann die Badewanne zum Fu boden mit Silikone auf die F e 8_ Installeer de...

Страница 12: ...Clou bv Thermiekstraat 1 NL 6361 HB Nuth T 31 0 45 524 56 56 F 31 0 45 524 60 00 info clou nl www clou nl b a t h f i n d i n g s...

Отзывы: