background image

Clickfree C6 Easy Imaging 


Using EASY Fix to Recover from a Hardware Failure 

Copyright © 2011  Storage Appliance Corporation. 

15 


The Repair button appears at the bottom of the window only if a full backup for this 
computer exists on your C6. 

D

OING AN EMERGENCY BACKUP

/

 RECOVERY


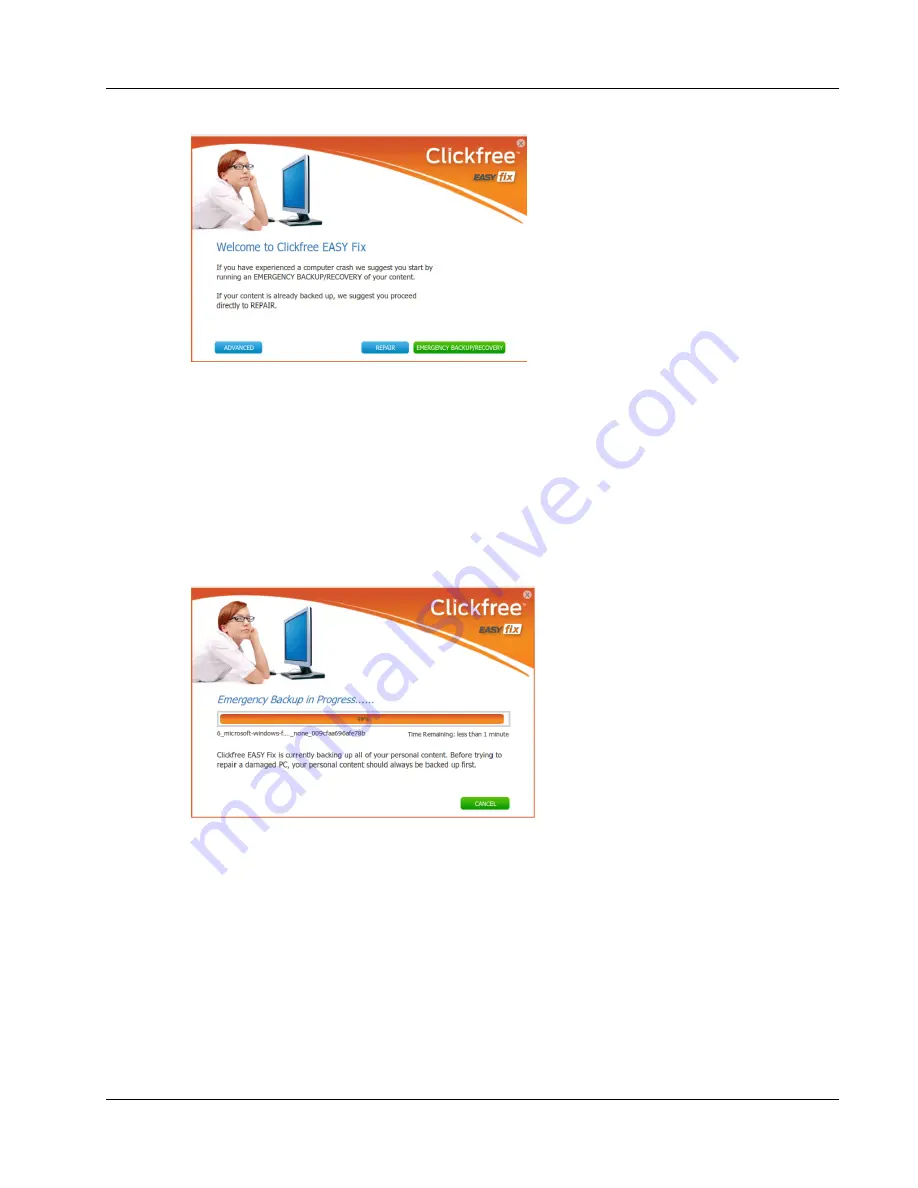
Unless you have very recently done a normal backup onto the C6, we suggest that you 
perform an 

Emergency Backup/Recovery

 before performing a Repair or Re-Image to 

ensure that you have a current copy of all personal content on the computer.  


Unlike a regular backup, the Emergency Backup/Recovery only backs up content, not 
Windows operating system files or software applications. By default this includes all 
content on your computer; if you wish to exclude some folders, click 

Advanced

 instead 

and then click 

Settings

 to choose the folders to exclude. 

This emergency backup/recovery cannot be selected for Re-Image or Repair, but can be 
used during a normal content Restore (as described on page 10). 

After the emergency backup/recovery  is complete: 

Содержание C6 Easy Imaging

Страница 1: ...C Total Computer C6 Easy Imaging Total Computer Backup User Guide ...

Страница 2: ... about the completeness accuracy reliability or suitability of the information or related products Any reliance you place on such information is therefore strictly at your own risk In no event will we be liable for any loss or damage including without limitation indirect or consequential loss or damage or any loss or damage whatsoever arising from loss of data or profits arising out of or in conne...

Страница 3: ...store Change how Clickfree restores content 11 How do I find files that were restored 12 My program cannot find the restored files what should I do 12 VIEWING BACKED UP FILES 13 Browsing or searching for files 13 USING EASY FIX TO RECOVER FROM A HARDWARE FAILURE 14 Rebooting your computer from the C6 14 Doing an emergency backup recovery 15 Repairing your computer 16 Re Imaging your computer 17 AD...

Страница 4: ...1 Storage Appliance Corporation 4 Do my files need password protection 22 How do I enable password protection 22 Can I change or remove the password 22 What if I forget my password 22 How do I back up onto CDs or DVDs EASY Archiver 23 How do I import music EASY Music 23 ...

Страница 5: ... hard drive See details in Re Imaging your computer on page 17 Clickfree EASY Fix is NOT designed to transfer your Windows Operating System and Software Applications system files from one computer to another Instead it is designed to help restore your system files from a backup to the same computer in case of OS software problems or a hard drive failure When using the Re image option in Clickfree ...

Страница 6: ... 10 only restores your content If you need to restore your operating system and software applications you must use the EASY Fix function see page 14 WHAT GETS BACKED UP When it runs automatically Clickfree backs up everything on your computer Photos including common graphic formats such as JPEG and RAW Music including CD audio MP3 MIDI Video e g AVI MPEG Shockwave Flash Emails including Microsoft ...

Страница 7: ...old computer to your new one EASY Imaging full computer imaging because the C6 backs up your Windows operating system and software applications you can easily recover from a hardware crash EASY Viewer conveniently view backed up photos in thumbnail and expanded view View all other files as easily as if it is on the original computer EASY Music easily import music from your iPod iPhone iPad to your...

Страница 8: ... to a wall outlet or power bar and the other end to the C6 3 Connect one end of the USB cable to the C6 and the other end to a USB port on your computer 4 When Clickfree starts to run a Welcome window appears and shows the number of seconds left before the backup starts automatically The Viewer and Restore Transfer buttons appear at the bottom of the window after at least one backup exists on your...

Страница 9: ...window When you see the Backup Summary window after the backup is complete simply click Close You re done 6 Disconnect the C6 and keep it in a safe place Repeat these steps for each computer you want to back up Set up an automatic backup schedule so you don t have to worry about a thing See How to schedule automatic backups on page 19 ...

Страница 10: ...s it in the same folders on your computer that it was backed up from If you are restoring over files of the same name Clickfree overwrites these files on the computer with the ones on the C6 Alternatively you can restore your files to a different location on your computer so they don t overwrite any existing files RESTORE LET CLICKFREE DECIDE WHAT TO RESTORE AND TO WHERE 1 Connect the C6 to your c...

Страница 11: ...s for that category on the selected backup When a category is selected or deselected all of the file types that make up that category are also selected or deselected To restore individual files within a category click the category name and then select the files to be restored To locate particular files to be restored click Explorer View and select the files to be restored 4 When you are finished s...

Страница 12: ...n to open Windows Explorer to the folder where your content was restored You can now use Explorer to move the files to a more convenient folder MY PROGRAM CANNOT FIND THE RESTORED FILES WHAT SHOULD I DO Some programs expect to find their files in a particular folder If you restore files to a folder other than the original location your program may not be able to find them If your program displays ...

Страница 13: ...normally uses for files of this type To view photos click the Photos tab and navigate through the folders to see the images To search for a file on the backup click a category on the Backup Summary tab other than Photos or click the Search Files tab o Select the File Type select a category or Any if you want all categories to be searched o Enter all or part of the File Name or leave blank to retri...

Страница 14: ...ter to boot from the C6 REBOOTING YOUR COMPUTER FROM THE C6 1 Connect the C6 to your computer then restart your computer Look for a message at startup that indicates the key to press to change the Boot device order Usually the startup screen is black and white and the message will have the keyword Boot F9 F12 or Esc are common keys but each computer will be different To get more help on how to sta...

Страница 15: ...rming a Repair or Re Image to ensure that you have a current copy of all personal content on the computer Unlike a regular backup the Emergency Backup Recovery only backs up content not Windows operating system files or software applications By default this includes all content on your computer if you wish to exclude some folders click Advanced instead and then click Settings to choose the folders...

Страница 16: ...puter to the system files in the most recent backup on the C6 System files from the backup will be copied back to the computer Any personal content files that are on the backup but not on the computer will be restored to the computer 1 Reboot your computer from the C6 as described on page 14 If you re not sure how recently your computer was backed up follow the instructions in Doing an emergency b...

Страница 17: ...e how recently your computer was backed up follow the instructions emergency backup recovery to back up your content once more before you continue see page 15 on the EASY Fix Welcome screen The date of the latest backup is f you want to re image from an older backup select the backup dates to be Start Re Image Note that you cannot select an emergency backup EVERYTHING on your computer s internal h...

Страница 18: ...process When you see the Re Complete screen click Close Clickfree and unplug the C6 Your computer will restart as normal and load Windows If you did an Emergency Backup it may contain newer content th during the Re Image process you should restore the content Emergency Backup using the normal Content Restore as described on page Recover from a Hardware Failure 18 process When you see the Re Image ...

Страница 19: ...uter is shown 4 Choose the appropriate interval and time to start the backup 5 Indicate if the scheduled backup should wake the computer from sleep If this is not selected the backup will run the next time the computer is active Note Although a scheduled backup will wake your computer from sleep mode it will not run if the computer is hibernating 6 Click OK At the set time interval a backup is sta...

Страница 20: ...ry settings 1 Connect the C6 to your computer and wait for the Welcome window to appear 2 Before the countdown gets to zero click Options The Manage Settings and PCs window is displayed 3 In the left side of the window click on the computer that you want to change settings for then click Backup Settings 4 Choose the folder s you want Clickfree to exclude To exclude a folder and all folders below i...

Страница 21: ...rompted to confirm that you want to remove it Once you have removed a computer from Clickfree there is no way to recover that computer s content from the C6 Clickfree may take several minutes to erase the data depending on the amount of content backed up on the C6 RESETTING THE C6 Master Reset is used to remove all backed up content from all computers that have been backed up on your C6 and to app...

Страница 22: ...word fields Clickfree imposes no restrictions on the password and treats upper case and lower case letters as identical But you should pick a password that would be difficult for anyone else to discover and that you will be able to remember if you forget your password there is no way to recover any backed up content from the C6 4 Optionally set a hint that can be used to help you remember your pas...

Страница 23: ...r the Welcome window to appear 2 Before the countdown gets to zero click Options 3 Click the EASY Archiver tab then click Launch EASY Archiver 4 The Clickfree DVD backup program starts up Follow the instructions Clickfree tells you to label the disk with a number and date If you have more than one computer to back up you should also write the computer s name seen on the Backup Summary window on th...

Страница 24: ...e playlist selecting or clearing any given playlist may result in a change in the selection status of other playlists You can use the controls at the bottom left of the window to play any title from your iPod through your computer s sound system If the title will not play in Windows Media Player the appropriate program opens to play it 8 If you do not want to import the music to iTunes clear the A...

Отзывы: