


Disassembly
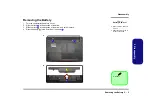
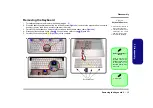
Removing the Hard Disk Drive 2 - 7
2.Disassembly
3.
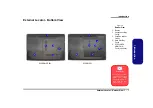
Remove the hard disk bay cover
.
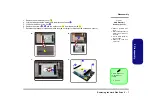
4.
Grip the tab and slide the hard disk in the direction of arrow
.
5.
Lift the hard disk out of the bay
.
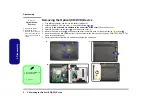
6.
Remove the screws
-
and the mylar cover
from the hard disk
.
7.
Reverse the process to install a new hard disk (do not forget to replace all the screws and covers).
6
3
4
5
6
9
10
11
4
b.
c.
e.
5
3
11
10
d.
6
7
8
9
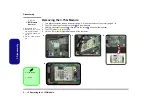
3. HDD Bay Cover
10. Mylar Cover
11. HDD
•
4 Screws
Figure 3
HDD Assembly
Removal (cont’d.)
b. Remove the HDD bay
cover.
c. Grip the tab and slide the
HDD in the direction of
the arrow.
d. Lift the HDD assembly
out of the bay.
e. Remove the screw and
mylar cover.
Содержание W240BU
Страница 1: ...W241BU W241BUQ W240BU W245BUQ W248BUQ W249BUQ ...
Страница 2: ......
Страница 3: ...Preface I Preface Notebook Computer W241BU W241BUQ W240BU W245BUQ W248BUQ W249BUQ Service Manual ...
Страница 24: ...Introduction 1 12 Mainboard Overview Bottom Connectors 1 Introduction ...
Страница 38: ...Disassembly 2 14 2 Disassembly ...
Страница 42: ...Part Lists A 4 Top W245BUQ A Part Lists Top W245BUQ 灰色 非耐落 非耐落 黑色 頭徑 頭厚 號 度 黑色 Figure A 2 Top W245BUQ ...
Страница 46: ...Part Lists A 8 Bottom W248BUQ W249BU C A Part Lists Bottom W248BUQ W249BU C Figure A 6 Bottom W248BUQ W249BU C ...
Страница 48: ...Part Lists A 10 LCD W245BUQ A Part Lists LCD W245BUQ 華力 今皓 泰林 中性 電鑄薄膜鍍亮鉻 字體連結 銘板 銅箔接地 Figure A 8 LCD W245BUQ ...
Страница 49: ...Part Lists LCD W248BUQ C A 11 A Part Lists LCD W248BUQ C 華力 非耐落 無鉛 精乘 設變 Figure A 9 LCD W248BUQ C ...
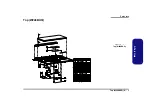
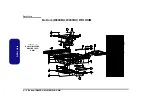
Страница 52: ...Part Lists A 14 HDD A Part Lists HDD 無鉛 無鉛 Figure A 12 SATA DVD SUPER MULTI W248BUQ ...
Страница 79: ...Schematic Diagrams USB 3 0 VL800 B 27 B Schematic Diagrams USB 3 0 VL800 Sheet 26 of 41 USB 3 0 VL800 ...
Страница 97: ...www s manuals com ...