background image

83

Fr
anç

a

is

Communication

LAN Ethernet 10/100/1000Mb Base-TX 
intégré

Caméra PC 1,0M HD

(

Option d’usine - Modèle B Seulement

Module M.2


4G

Modules M.2 LAN sans fil/Bluetooth:

(

Option d’usine

) Bluetooth et LAN sans fil 

(

802.11ac

) Intel® Dual Band Wireless-AC 

9560

(

Option d’usine

) Bluetooth et LAN sans fil 

(

802.11ac

) Intel® Dual Band Wireless-AC 

9462

(

Option d’usine

) Bluetooth et LAN sans fil 

(

802.11ax

) Intel® Dual Band Intel® Wi-Fi 6 

AX200

(

Option d’usins


- Design I Seulement

Bluetooth et LAN sans fil (

802.11ax

) Intel® 

Dual Band Intel® Wi-Fi 6 AX201

(

Option d’usins


- Design II Seulement

Bluetooth et LAN sans fil (

802.11ac

) Intel® 

Dual Band Wireless-AC 9260

Logements M.2

Logement 1 pour module combo 

Bluetooth 

et LAN sans fil

Logement 2 pour


lecteur 

SSD SATA

(

Option d’usine - Modèle B Seulement

Logement 3 pour module 

4G

Interface

Un port USB 3.1 Gen 2 Type-C*


*La quantité maximale de courant fournie 
par les ports USB Type-C est 500mA (USB 
2.0)/1500mA (USB 3.1).

Un port USB 3.1 Gen 2 Type-A

Un port de sortie HDMI

Une prise audio 2-en-1 (casque et 
microphone)

Une prise d’entrée en DC

Une prise réseau RJ-45

Modèle A

Un port USB 2.0

Modèle B

Deux ports USB 2.0

Mise en marche

Adaptateur AC/DC pleine bande 

Entrée AC: 100-240V, 50-60Hz 

Sortie DC: 19V, 2,1A (

40W

)

Batterie lithium-ion polymère intégrée, 
36WH

Caractéristiques

Technologie Intel® Optane™ 

Spécifications environnementales

Température

En fonction : 5

°

C- 35

°

Eteint : -20

°

C - 60

°

C

Humidité relative

En fonction : 20% - 80%

Eteint : 10% - 90%

Dimensions physiques & poids

Modèle A

294,9 (l) x 219,5 (p) x 18,95 (h) mm

1,3Kg

 (Barebone avec batterie 36WH)

Modèle B

360,4 (l) x 239,3 (p) x 19,7 (h) mm

1,6Kg

 (Barebone avec batterie 36WH)

NL40nNL50CU.book  Page 83  Wednesday, October 9, 2019  10:45 AM

Содержание NL40CU

Страница 1: ...NL40nNL50CU book Page 1 Wednesday October 9 2019 10 45 AM ...

Страница 2: ...NL40nNL50CU book Page 2 Wednesday October 9 2019 10 45 AM ...

Страница 3: ... Tastatur Modell B 39 Systemübersicht Ansicht von vorne links und rechts Modell A 41 Systemübersicht Ansicht von vorne links und rechts Modell B 42 Systemübersicht Ansicht von unten und hinten 43 Control Center 44 Mehrfarbige LED Tastatur 46 Start Menü Kontextmenü Taskleiste Systemsteuerung und Einstellungen von Windows 10 47 Grafikfunktionen 48 Audiofunktionen 49 Energieoptionen 49 Installation d...

Страница 4: ... energía 105 Instalación de controladores 106 Módulo LAN Wireless Opción 107 Módulo Bluetooth Opción 107 TPM Opción 108 Solución de problemas 109 Especificaciones 110 Sommario Informazioni su questa guida rapida 113 Guida di avvio rapido 116 Configurazione Intel Optane 117 Descrizione del sistema Vista anteriore con pannello LCD aperto Modello A 119 Descrizione del sistema Vista anteriore con pann...

Страница 5: ...tall portions of the system refer to the expanded User s Manual The Device Drivers Utilities User s Manual disc does not contain an operating system Regulatory and Safety Information Please pay careful attention to the full regulatory notices and safety information contained in the expanded User s Man ual on the Device Drivers Utilities User s Manual disc October 2019 Trademarks Intel is a tradema...

Страница 6: ...eat or smoke coming from your com puter Safety Information Only use an AC DC adapter approved for use with this computer Use only the power cord and batteries indicated in this manual Do not dispose of batteries in a fire They may explode Check with local codes for possible special disposal instructions Do not continue to use a battery that has been dropped or that appears damaged e g bent or twis...

Страница 7: ...sed batteries for extended periods If you are working in areas of low temperature use the AC DC adapter to power the computer Battery Disposal Caution The product that you have purchased contains a recharge able battery The battery is recyclable At the end of its use ful life under various state and local laws it may be illegal to dispose of this battery into the municipal waste stream Check with ...

Страница 8: ...pport the base of the computer Note Never lift the computer by the lid LCD 6 Press the power button on the left side of the computer to turn it on note that the lid LCD must be open for the power button to function System Software Your computer may already come with system software pre installed Where this is not the case or where you are re con figuring your computer for a different system you wi...

Страница 9: ...ss Esc to exit the menu and go to the Main menu 5 Select OffBoard NVMe Controller Configuration and press Enter to check that an Intel Optane SSD is present 6 Press Esc to exit the menu and go to the Advanced menu 7 Select SATA Mode press Enter and select Intel RST Premium and select OK 8 Press F10 to Save and Exit and select Yes however note below Make sure the Windows 10 OS DVD is in the attache...

Страница 10: ... time 21 After the process has been completed restart the computer Disabling Intel Optane If you wish to disable an existing Intel Optane setup then follow the procedure below to do so 1 Run the Intel Rapid Storage Technology application 2 Click Disable 3 Click Yes when the message pops up 4 Restart the computer to complete the process 5 Run the Intel Rapid Storage Technology application 6 The Sta...

Страница 11: ...ilt In Array Microphone 4 LCD 5 Vent 6 LED Indicators 7 Keyboard 8 Touchpad Buttons 5 5 7 4 2 1 3 8 6 14 35 56cm Overheating To prevent your computer from overheating make sure nothing blocks any vent while the computer is in use Note that the Touchpad and Buttons valid opera tional area is that indi cated within the dotted lines above 8 3 NL40nNL50CU book Page 7 Wednesday October 9 2019 10 45 AM ...

Страница 12: ...rray Microphone 4 LCD 5 Vent 6 Power Button 7 LED Indicators 8 Keyboard 9 Touchpad Buttons 5 7 4 2 1 3 8 6 9 15 6 39 62cm Note that the Touch pad and Buttons valid operational area is that indicated within the dotted lines above 9 5 Overheating To prevent your computer from overheating make sure nothing blocks any vent while the computer is in use NL40nNL50CU book Page 8 Wednesday October 9 2019 1...

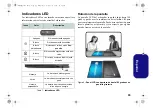
Страница 13: ...e screen to allow someone sitting facing you to view the screen if required Figure 5 LCD Panel Open to 180 degrees with Screen Ro tated Icon Color Description OFF The Computer is Off White The Computer is On Blinking White The Computer is in Sleep Mode White Caps Lock Activated White Number Lock Numeric Keypad Acti vated Orange The Battery is Charging Green The Battery is Fully Charged Blinking Or...

Страница 14: ...ing Fn Num Lk turns on off the numeric key pad It also features function keys to allow you to change operational features instantly Figure 6 Keyboard Function Keys Numeric Keypad Fn Key Menu Application Key Num Lk Scr Lk Windows Logo Key NL40nNL50CU book Page 10 Wednesday October 9 2019 10 45 AM ...

Страница 15: ...ys to allow you to change operational features instantly Figure 7 Full size Keyboard Figure 8 Factory Option Multi Color LED Keyboard Function Keys Numeric Keypad Fn Key Menu Application Key Num Lk Scr Lk Windows Logo Key Function Keys Numeric Keypad Fn Key Menu Application Key Num Lk Scr Lk Windows Logo Key NL40nNL50CU book Page 11 Wednesday October 9 2019 10 45 AM ...
Страница 16: ...ction Visual Indicators Fn Play Pause in Audio Video Programs Fn Airplane Mode Tog gle Fn Touchpad Toggle Fn Sleep Toggle Fn Turn LCD Backlight Off Press a key to or use Touchpad to turn on Fn Number Lock Toggle Fn Mute Toggle Fn Scroll Lock Toggle Fn Volume Decrease Increase Caps Lock Toggle Fn Change Display Configuration see page 20 Fn Control Center Tog gle see page 16 Fn Fn Brightness Decreas...

Страница 17: ... 3 MicroSD Card Reader 4 USB 2 0 Port 5 Power Button 6 2 In 1 Audio Jack Headphone and Microphone 7 Speakers 8 USB 3 1 Gen 2 Type C Port 9 USB 3 1 Gen 2 Type A Port 10 HDMI Out Port 11 Battery Power LED Indicator 12 DC In Jack 4 5 1 8 2 7 9 Front Left Right 3 6 11 7 10 12 NL40nNL50CU book Page 13 Wednesday October 9 2019 10 45 AM ...

Страница 18: ...r 12 DC In Jack 1 2 Front Left Right 4 5 7 3 6 4 8 9 11 7 10 12 USIM Card Ejection Simply press on the USIM card to eject it however do not do this while a connection is in progress If you do eject the card while a 4G connection is on going you will need to shut down the system rein sert the USIM card restart the system and then reestablish the 4G connection If you wish to change USIM cards then y...

Страница 19: ...f you need to replace remove the SSD RAM etc for any reason please contact your distributor sup plier for further information Overheating To prevent your computer from overheating make sure nothing blocks any vent while the computer is in use Figure 11 Bottom Rear Views 1 Vent 2 RJ 45 LAN Jack 3 Speakers 3 1 2 3 1 2 Model A Model B 3 3 NL40nNL50CU book Page 15 Wednesday October 9 2019 10 45 AM ...

Страница 20: ...ion or double click the icon in the notification area of the taskbar to access the Control Center The Con trol Center provides quick access to Power Modes Fan settings and LED Keyboard configuration for the optional multi color LED keyboard Figure 12 Control Center NL40nNL50CU book Page 16 Wednesday October 9 2019 10 45 AM ...

Страница 21: ...de is ideal for gaming with higher CPU and GPU performance Fan Speed Control You can set the fan speed to Maximum full power or Automatic Slient The fan speed will adjust itself auto matically to control the heat of the CPU GPU You can use the Offset slider to adjust the settings to your prefer ence However you can adjust the setting to Maximum if you prefer All these settings can be overidden by ...

Страница 22: ... colors for your keyboard backlight by clicking on the color required Click to select any color from the swatch to apply to the keyboard KB Sleep Timer Enable and then select the amount of time for which the system is idle before the keyboard LED enters sleep mode i e the LED keyboard illumination will turn off to save power KB Brightness You can adjust the keyboard brightness using the Bright nes...

Страница 23: ...area of the taskbar is in the bottom right of the screen Some of the control panels and applications referred to throughout the course of this manual can be accessed from here Throughout this manual you will see an instruction to open the Control Panel To access the Control Panel select Control Panel under the Windows System item in the Start Menu The Settings item in the Start Menu and also as an...

Страница 24: ...in LCD you can also use an external dis play connected to the HDMI Out port as your display device See your display device manual to see which for mats are supported In Windows it is possible to quickly configure external displays from the Project menu press the Windows Logo Key and the P key or press the Fn F7 key combination To configure the displays using the Project menu 1 Attach your external...

Страница 25: ...configure the options for the power button sleep button Fn F12 computer lid when closed display and sleep mode the default power saving state from the left menu Click Create a power plan in the left menu and select the options to create a new plan Click Change Plan Settings and click Change advanced power settings to access fur ther configuration options Volume Adjustment The sound volume level ca...

Страница 26: ...Microsoft Store and click Downloads and updates Get updates to update all Apps etc Driver Installation Power When installing drivers make sure your computer is powered by the AC DC adapter connect ed to a working power source Some drivers draw a significant amount of power during the in stallation procedure and if the remaining battery capacity is not adequate this may cause the system to shut dow...

Страница 27: ...k and click Disconnect to disconnect from a connected access point 8 You can click the Airplane Mode button to turn the mode On or Off 9 Alternatively you can click the Wi Fi button to turn just the Wi Fi On or Off Bluetooth Module Option Make sure the Bluetooth module is turned on and not in Airplane Mode before configuration begins Bluetooth Configuration in Windows 1 Click the Settings item in ...

Страница 28: ... the TPM within Windows As TPM is usually administered within large enterprises and organizations your system administrator will need to assist you in managing the information here TPM Actions 1 Click Prepare the TPM and follow the instructions in the Wizard to prepare the TPM this will probably require a restart of the computer and confirmation of the setting changes after restart by pressing the...

Страница 29: ...off see Table 2 on page 12 The Camera module cannot be detected The module is off Press the Fn F10 key combination in order to enable the module see Table 2 on page 12 Run the camera application to view the camera picture Gaming performance is slow It is recommended that you use Maximum fan speed when playing games Use the Fn 1 key combination to adjust the fan speed NL40nNL50CU book Page 25 Wedne...

Страница 30: ... Pin SO DIMM Socket Supporting DDR4 2666MHz Memory Memory Expandable up to 32GB Compatible with 4GB 8GB or 16GB Mod ules The real memory operating frequency depends on the FSB of the processor LCD Model A 14 35 56cm 16 9 FHD 1920x1080 Model B 15 6 39 62cm 16 9 FHD 1920x1080 Storage Model A One M 2 SATA PCIe Gen3 x4 Solid State Drive SSD Model B One Changeable 2 5 7mm h SATA HDD SSD Factory Option ...

Страница 31: ...x4 SSD Factory Option Model B Only Slot 3 for 4G Module Interface One USB 3 1 Gen 2 Type C Port The maximum amount of current supplied by USB Type C ports is 500mA USB 2 0 1500mA USB 3 1 One USB 3 1 Gen 2 Type A Port One HDMI Out Port One 2 In 1 Audio Jack Headphone and Microphone One DC in Jack One RJ 45 LAN Jack Model A One USB 2 0 Port Model B Two USB 2 0 Ports Features Intel Optane Technology ...

Страница 32: ...28 English NL40nNL50CU book Page 28 Wednesday October 9 2019 10 45 AM ...

Страница 33: ...lt zu verändern Einige oder alle Funktionen des Computers sind bereits eingerichtet worden Falls das nicht der Fall ist oder wenn Sie ein zelne Teile des Systems neu konfigurieren oder neu installieren möchten finden Sie eine Anleitung im erweiterten Benut zerhandbuch Die Disc Device Drivers Utilities User s Manual enthält nicht das Betriebssystem Einhaltung gesetzlicher Vorschriften und Sicherhei...

Страница 34: ...enn ein ungewöhnlicher Geruch Hitze oder Rauch aus dem Computer entweicht Sicherheitsinformationen Verwenden Sie nur einen AC DC Adapter der für die Verwendung mit diesem Computer zugelassen ist Verwenden Sie nur das Netzkabel und die Akkus die in diesem Benut zerhandbuch spezifiziert sind Entsorgen Sie die Akkus nicht in Feuer Sie können explodieren Richten Sie sich nach den regional gültigen Ent...

Страница 35: ...n mit niedrigen Temperaturen arbeiten verwenden Sie den AC DC Adapter um den Computer mit Strom zu versorgen Entsorgen der Akkus Batterien Achtung Das von Ihnen gekaufte Produkt enthält einen aufladbaren Akku Dier Akku ist wiederverwertbar Nach verschiedenen na tionalen und regionalen Getzgebungen kann es verboten in einen nicht mehr gebrauchsfähigen Akku in den normalen Hausmüll zu werfen Informi...

Страница 36: ...ter als 180 Mit der anderen Hand halten Sie das Unterteil des Computers fest siehe Abb 1 Hinweis Heben Sie den Computer niemals am Deckel LCD hoch 6 Drücken Sie auf den Netzschalter um den Computer einzuschalten Systemsoftware Möglicherweise wurde das Notebook bereits mit vorinstallierter Software ausgeliefert Ist das nicht der Fall oder wenn Sie das Notebook für ein anderes System neu konfigurier...

Страница 37: ...n Sie Enabled 4 Drücken Sie auf Esc um das Menü zu verlassen und gehen Sie zum Menü Main 5 Wählen Sie OffBoard NVMe Controller Configuration und drücken Sie die Eingabetaste um zu überprüfen ob eine Intel Optane SSD vorhanden ist 6 Drücken Sie auf Esc um das Menü zu verlassen und gehen Sie zum Menü Advanced 7 Wählen Sie SATA Mode drücken Sie auf die Eingabetaste und wählen Sie Intel RST Premium un...

Страница 38: ...nur mit dem Akku betrieben wird 20 Klicken Sie auf Ja um den Vorgang zu starten dies kann einige Zeit dauern 21 Starten Sie den Computer neu nachdem der Vorgang abgeschlossen ist Intel Optane deaktivieren Wenn Sie eine bestehende Intel Optane Einrichtung deaktivieren möchten gehen Sie wie folgt vor 1 Starten Sie die Intel Rapid Storage Technologie Anwendung 2 Klicken Sie auf Deaktivieren 3 Klicken...

Страница 39: ... Array Mikrofon 4 LCD Bildschirm 5 Luftungsoffnung 6 LED Anzeigen 7 Tastatur 8 Touchpad mit Tasten 5 7 4 2 1 3 8 6 14 35 56cm Überhitzung Zum Schutz vor Überhitzung Ihres Computers dürfen die Luftungsoffnung en nicht während das Notebook in Betrieb ist verdeckt werden Beachten Sie dass der Funktionsbereich des Touchpads und der Tasten innerhalb der gepunkteten Linien liegt 8 5 3 NL40nNL50CU book P...

Страница 40: ...rofon 4 LCD Bildschirm 5 Luftungsoffnung 6 Netzschalter 7 LED Anzeigen 8 Tastatur 9 Touchpad mit Tasten 5 7 4 2 1 3 8 6 9 15 6 39 62cm 5 Überhitzung Zum Schutz vor Überhitzung Ihres Computers dürfen die Luftungsoff nung en nicht während das Notebook in Betrieb ist verdeckt werden 9 Beachten Sie dass der Funk tionsbereich des Touchpads und der Tasten innerhalb der gepunkteten Linien liegt 3 NL40nNL...

Страница 41: ...emand der Ihnen gegenüber sitzt bei Bedarf den Bildschirm sehen kann Abb 5 LCD Bildschirm der bei gedrehtem Bildschirm um 180 Grad geöffnet ist Symbol Farbe Beschreibung Aus Der Computer ist ausgeschaltet Weiß Der Computer ist angeschaltet Lampe blinkt weiß Das System ist im konfigurierten Energiesparmodus Weiß Caps Lock ist aktiviert Weiß Scroll Lock ist aktiviert Orange Der Akku wird geladen Grü...

Страница 42: ... auf Fn Num wird die Nummerntastatur ein und ausgeschaltet Zusätzlich gibt es Funktionstasten über die Sie direkt zwischen den Funktionen um schalten können Abb 6 Tastatur Nummemtastatur Funktionstasten Num Rollen Windows Logo Taste Fn Taste Menü Anwendungstaste NL40nNL50CU book Page 38 Wednesday October 9 2019 10 45 AM ...

Страница 43: ...asten über die Sie direkt zwischen den Funktionen um schalten können Abb 7 Tastatur in voller Größe Abb 8 Werkseitige Option Mehrfarbige LED Tastatur in voller Größe Windows Logo Taste Menü Anwendungstaste Fn Taste Funktionstasten Num Rollen Nummemtastatur Windows Logo Taste Menü Anwendungstaste Fn Taste Funktionstasten Num Rollen Nummemtastatur NL40nNL50CU book Page 39 Wednesday October 9 2019 10...

Страница 44: ...in ausschalten Fn Touchpad aktivieren deaktivieren Fn Energiesparmodus wechseln Fn LCD Hintergrundlicht ausschalten zum Ein schalten beliebige Taste drücken oder Touchpad berühren Fn Ein Ausschalten der Nummerntastatur Fn Stummschaltung Stummschaltung aufheben Fn Ein Ausschalten des Scroll Modus Fn Audio Lautstärke verringern erhöhen Ein Ausschalten der Feststelltaste Fn Ändern der Anzeigeeinstell...

Страница 45: ...hse 2 RJ 45 LAN Buchse 3 MicroSD Kartenleser 4 USB 2 0 Anschluss 5 Netzschalter 6 2 in 1 Audiobuchse Kopfhörer und Mikrofon 7 Lautsprecher 8 USB 3 1 Gen 2 Typ C Anschluss 9 USB 3 1 Gen 2 Typ A Anschluss 10 HDMI Ausgangsanschluss 11 Batteriestrom LED Anzeige 12 DC Eingangsbuchse Linke Seite Vorderseite Rechte Seite NL40nNL50CU book Page 41 Wednesday October 9 2019 10 45 AM ...

Страница 46: ...nke Seite Vorderseite Rechte Seite 1 2 4 5 7 6 4 8 9 11 7 10 12 USIM Kartenauswurf Drücken Sie einfach auf die USIM Karte um sie auszuwer fen Tun Sie dies allerdings nicht wenn gerade eine Ver bindung besteht Wenn Sie die Karte bei einer bestehenden 4G Verbindung auswerfen müssen Sie das System herunterfahren die USIM Karte neu einsetzen das System neu starten und die 4G Verbindung anschließend wi...

Страница 47: ...n Entfernen Sie keine Gehäuseteile und oder Schrauben um das Gerät aufzurüsten da ande renfalls Ihre Garantieansprüche verloren gehen Ist es erforderlich die SSD den RAM usw auszuwechseln oder zu entfernen wenden Sie sich an Ihren Vertragshändler Lieferanten Abb 11 Ansicht von unten und hinten 1 Luftungsoffnung 2 RJ 45 LAN Buchse 3 Lautsprecher Modell A Modell B 3 1 2 3 1 2 3 3 NL40nNL50CU book Pa...

Страница 48: ...f das Symbol im Infobereich auf der Taskleiste doppelklicken um das Control Center zu öffnen Das Control Center bietet einen schnellen Zugriff auf die Leistungsmodi die Lüfter Einstellungen und die Konfiguration der LED Tastatur für die optionale Mehrfarbige LED Tastatur Abb 12 Control Center NL40nNL50CU book Page 44 Wednesday October 9 2019 10 45 AM ...

Страница 49: ...smodus ist ideal für Spiele mit höherer CPU und GPU Leistung FAN Speed Control LÜFTER Ge schwindigkeitsregelung Können Sie die Lüftergeschwindigkeit auf Maximal volle Leistung oder Automatisch Lautlos stellen Die Lüfterge schwindigkeit wird sich automatisch einstellen um die Tem peratur der CPU GPU zu regeln Mit dem Regler Versatz können Sie die Einstellungen nach Ihren Wünschen anpas sen Sie könn...

Страница 50: ...undbeleuchtung auswählen indem Sie auf die gewünschte Farbe klicken Klicken Sie hier um eine beliebige Farbe aus dem Muster auszuwählen die auf die gesamte Tastatur Tastatur Sleeptimer Aktivieren und wählen Sie anschließend die Zeitdauer der Leerlaufs nach der die Tastatur LED den Schlafmodus auf rufen d h die LED Tastaturbeleuchtung wird ausgeschaltet um Strom zu sparen KB Helligkeit Sie können d...

Страница 51: ...reich der Taskleiste befindet sich in der rechten unteren Ecke des Bildschir ms Hierüber können Sie manche Control Panels und Anwendungen aufrufen die in die sem Handbuch angesprochen werden In diesem Handbuch finden Sie eine Anleitung zum Öffnen der Systemsteuerung Um die Systemsteuerung aufzurufen wählen Sie Systemsteuerung unter dem Eintrag Windows System im Startmenü Der Eintrag Einstellungen ...

Страница 52: ...externen Bildschirm an den HDMI Ausgangsan schluss angeschlossen als Anzeigegerät anschließen Lesen Sie die Anleitung des Anzeigegerätes um zu erfahren welche Formate unterstützt werden Bei Windows ist es möglich schnell externe Monitore über das Projizieren Menü zu konfigurieren drücken Sie auf die Windows Logo Taste und gleichzeitig auf P oder drü kken Sie die Tastenkombination Fn F7 Konfigurati...

Страница 53: ... Zuklappeinstellung beim Schließen des Dekkels den Bildschirm und den Energiesparmodus die Standardeinstellung Energie sparen konfigurieren Klicken Sie im linken Menü auf Energiesparplan erstellen und wählen Sie die Optionen um einen neuen Plan zu er stellen Klicken Sie auf Energieplaneinstellungen ändern und klicken Sie auf Erweiterte Energieeinstellungen ändern um weitere Optionen für die Konfig...

Страница 54: ...ch Updates suchen und gehen Sie zum Microsoft Store und klicken Sie auf Downloads und Updates Updates abrufen um alle Apps usw zu aktualisieren Treiberinstallation und Stromversorgung Während die Treiber installiert wer den muss der Computer über den AC DC Adapter mit Strom versorgt werden Einige Treiber benötigen für den Installationsvorgang sehr viel Strom Wenn der Akku nicht mehr über genügend ...

Страница 55: ...u trennen wählen Sie das verbundene Netzwerk und klicken Sie auf Trennen 8 Klicken Sie auf die Schaltfläche Flugzeugmodus um den Flugzeugmodus ein oder auszuschalten 9 Alternativ können Sie auf die Schaltfläche WiFi klicken um nur das Wi Fi ein oder auszuschalten Bluetooth Modul Option Stellen Sie vor der Konfiguration sicher dass das Bluetooth Modul eingeschaltet ist Flugzeugmodus deaktiviert Blu...

Страница 56: ...ltung 4 Im Fenster TPM Verwaltung können Sie TPM unter Windows verwalten Da ein TPM normalerweise in großen Unternehmen und Organisationen verwaltet wird benötigen Sie bei der Verwaltung der hiesigen Informationen die Hilfe Ihres Systemadministrators TPM Aktionen 1 Klicken Sie auf TPM vorbereiten und folgen Sie den Anwei sungen des Assistenten um TPM vorzubereiten dabei wird mög licherweise ein Ne...

Страница 57: ...mera Modul kann nicht erkannt werden Das ist ausgeschaltet Mit der Tastenkombination Fn F10 können Sie das Kamera Modul einschalten siehe Tabelle 2 auf Seite 40 Starten Sie die Kamera Anwendung um das Kamerabild zu sehen Niedrige Gaming Leistung Im Betrieb mit Computerspielen wird empfohlen die Lüftergeschwindigkeit auf das Maximal zu setzen Verwenden Sie die Fn 1 Tastenkombination um die Lüfterge...

Страница 58: ...anzeigen BIOS Insyde BIOS 128Mb SPI Flash ROM Speicher Dual Channel DDR4 Zwei 260 Pin SODIMM Sockel Unterstützung von DDR4 2666MHz Speichermodulen Speicher auf bis zu 32GB erweiterbar Mit 4GB 8GB oder 16GB Modulen kompatibel Die tatsächliche Speicherarbeitsfrequenz hängt vom FSB des Prozessors ab LCD Modell A 14 35 56cm 16 9 FHD 1920x1080 Modell B 15 6 39 62cm 16 9 FHD 1920x1080 Speichereinheiten ...

Страница 59: ...r 4G Modul Schnittstellen Ein USB 3 1 Gen 2 Typ C Anschluss Die maximale Strommenge die von USB Typ C Anschlüssen geliefert wird beträgt 500mA USB 2 0 1500mA USB 3 1 Ein USB 3 1 Gen 2 Typ A Anschluss Ein HDMI Ausgangsanschluss Eine 2 in 1 Audiobuchse Kopfhörer und Mikrofon Eine DC Eingangsbuchse Eine RJ 45 LAN Buchse Modell A Ein USB 2 0 Anschluss Modell B Zwei USB 2 0 Anschlüsse Charakteristika I...

Страница 60: ...56 Deutsch NL40nNL50CU book Page 56 Wednesday October 9 2019 10 45 AM ...

Страница 61: ...réavis Certains ou tous les éléments de l ordinateur peuvent avoir été déjà installés Si ce n est pas le cas ou si vous avez l intention de reconfigurer ou réinstaller des portions du système reportez vous au Manuel de l Utilisateur complet Le disque Device Drivers Utilities User s Manual ne contient pas de système d exploitation Informations de réglementation et de sécurité Prêtez attention aux a...

Страница 62: ...on Si une odeur inhabituel de la chaleur ou de la fumée apparaissait sor tant de votre ordinateur Informations de sécurité Utilisez uniquement un adaptateur AC DC agréé avec votre ordina teur Utilisez uniquement le cordon d alimentation et les batteries indiqués dans ce manuel Ne jetez pas les batteries dans le feu Elles peuvent exploser Consultez la réglementation locale pour des instructions de ...

Страница 63: ...us travaillez dans des zones à basse température utilisez l adap tateur AC DC pour alimenter l ordinateur Elimination de la batterie avertissement Le produit que vous venez d acheter contient une batterie re chargeable Cette batterie est recyclable Quand elle n est plus utilisable en fonction des lois locales des différents états et pays il peut être illégal de s en débarrasser en la jetant avec l...

Страница 64: ...pas dépasser 180 degrés de l autre main comme illustré dans la Figure 1 maintenez la base de l ordinateur Remarque Ne soulevez jamais l ordinateur par le cou vercle LCD 6 Pressez le bouton de mise en marche pour allumer Logiciel système Votre ordinateur peut être livré avec un logiciel système pré ins tallé Si ce n est pas le cas ou si vous re configurez votre ordi nateur pour un système différent...

Страница 65: ...Utilities User s Manual 1 Allumez l ordinateur mais assurez vous que la condition dans le point à puce ci dessous est remplie avant de le faire Vérifiez que le DVD du SE Windows 10 est dans le lecteur DVD connecté ainsi l ordinateur démarrera automatiquement à partir du DVD du SE Windows 10 vous serez invité à appuyer sur une touche pour démarrer à partir du DVD 2 Appuyez sur Suivant Installer mai...

Страница 66: ...temps 14 Une fois le processus terminé redémarrez l ordinateur Désactivation de Intel Optane Si vous souhaitez désactiver une configuration Intel Op tane existante suivez la procédure ci dessous pour le faire 1 Exécutez l application Technologie de stockage Intel Rapid 2 Cliquez sur Désactiver 3 Cliquez sur Oui lorsque le message s affiche 4 Redémarrez l ordinateur pour terminer le processus 5 Exé...

Страница 67: ...rt Modèle A 1 Caméra PC 2 Indicateur LED de caméra Quand la caméra est en cours d utilisation le Indicateur LED sera illuminé 3 Réseau de microphones intégré 4 Écran LCD 5 Ventilation 6 Indicateurs LED 7 Clavier 8 Touchpad et boutons 5 7 4 2 1 3 8 6 14 35 56cm 5 8 Remarquez que la zone d utilisation va lide du Touchpad et des boutons est celle indiquée à l intérieur des lignes en pointillé ci dess...

Страница 68: ...Écran LCD 5 Ventilation 6 Bouton d alimentation 7 Indicateurs LED 8 Clavier 9 Touchpad et boutons 5 7 4 2 1 3 8 6 9 15 6 39 62cm 9 Remarquez que la zone d utilisation va lide du Touchpad et des boutons est celle indiquée à l intérieur des lignes en pointillé ci dessus Surchauffe Afin de ne pas causer une sur chauffe de votre ordinateur verifiez que rien ne bouche la les ventilation s quand le syst...

Страница 69: ...l écran afin de permettre à une per sonne assise face à vous de voir l écran si nécessaire Figure 5 Panneau LCD ouvert à 180 degrés avec écran pi voté Icône Couleur Description Éeint L ordinateur est désactivé Blanc L ordinateur est allumé Blanc cligno tant Le système est dans le mode de Veille configuré Blanc Verrouillage majuscule activé Blanc Verrouillage numérique pavé numérique activé Orange ...

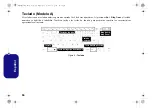
Страница 70: ... sur Fn Verr Num active ou désactive le pavé numérique Il est également doté de touches fonction pour vous permettre de changer instantanément de mode opérationnel Figure 6 Clavier Pavé Touche Fn Touches Fonction numérique Verr Num ArrêtDétl Touche du logo Windows Touche Menu Application NL40nNL50CU book Page 66 Wednesday October 9 2019 10 45 AM ...

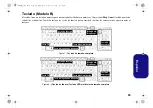
Страница 71: ...nger ins tantanément de mode opérationnel Figure 7 Clavier pleine taille Figure 8 Option d usine Clavier à LED multicolore pleine taille n Keys Numeric Keypad Keypad Touche du logo Windows Touche Menu Application Touches Fonction Touche Fn Pavé numérique Verr Num ArrêtDét n Keys Numeric Keypad Keypad Touche du logo Windows Touche Menu Application Touches Fonction Touche Fn Pavé numérique Verr Num ...

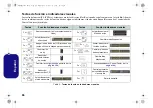
Страница 72: ...activer le Mode Avion Fn Activer Désactiver le touchpad Fn Permutation veille Fn Eteindre le rétroéclairage LCD Appuyez sur une touche ou utilisez le touchpad pour allumer Fn Activer Désactiver le pavé numérique Fn Allume Éteind le son Fn Activer Désactiver l arrêt défilement Fn Diminution Augmenta tion du volume sonore Basculer entre majus cule et minuscule Fn Modifiez la configuration de l affic...

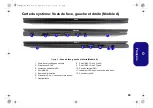
Страница 73: ... Lecteur de carte MicroSD 4 Port USB 2 0 5 Bouton d alimentation 6 Prise audio 2 en 1 casque et microphone 7 Haut parleurs 8 Port USB 3 1 Gen 2 Type C 9 Port USB 3 1 Gen 2 Type A 10 Prise de sortie HDMI 11 Indicateur LED de puissance de la batterie 12 Prise d entrée DC Face Gauche Droit 4 5 1 8 2 7 9 3 6 11 7 10 12 NL40nNL50CU book Page 69 Wednesday October 9 2019 10 45 AM ...

Страница 74: ...ED de puissance de la batterie 12 Prise d entrée DC Face Gauche Droit 1 2 4 5 7 3 6 4 8 9 11 7 10 12 Ejection de la carte USIM Il suffit d appuyer sur la carte USIM pour l éjecter ce pendant ne faites pas cela lorsqu une connexion est en cours Si vous éjectez la carte alors qu une connexion 4G est en cours vous devrez arrêter le système réinsérer la carte USIM redémarrer le système puis rétablir l...

Страница 75: ... quand le systeme est allumé Avertissement de retrait du capot inférieur Ne pas retirer le s capot s et ou la les vis dans le but de mettre à niveau l appareil car cela pourrait enfreindre les termes de votre garantie Si vous avez besoin de remplacer supprimer le SSD RAM etc pour une raison quel conque contactez votre distributeur fournisseur pour plus d informations Modèle A Modèle B 3 1 2 3 1 2 ...

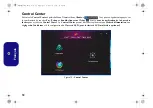
Страница 76: ...le cliquer sur l icône dans la zone de notification de la barre des tâches pour accéder au Control Center Le Control Center permet d accéder rapidement aux Modes d alimentation aux réglages du Ventilateur et à la configuration du Clavier à LED pour le clavier à LED multicolore optionnel Figure 12 Control Center NL40nNL50CU book Page 72 Wednesday October 9 2019 10 45 AM ...

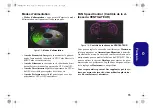
Страница 77: ...ormances CPU et GPU supérieures FAN Speed Control Contrôle de la vi tesse du VENTILATEUR Vous pouvez régler la vitesse du ventilateur sur Maximum pleine puissance ou Automatique Silencieux à partir de cet élément de menu La vitesse du ventilateur s ajuste auto matiquement pour contrôler la chaleur du CPU GPU Vous pouvez utiliser le curseur Décalage pour ajuster les para mètres selon vos préférence...

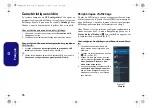
Страница 78: ...r en cliquant sur la couleur désirée Cliquez pour sé lectionner l une des couleurs du nuancier à appliquer à l en semble du clavier Minuterie de veille du clavier Activez puis sélectionnez la durée pendant laquelle le sys tème est inactif avant que la LED du clavier n entre en mode veille c est à dire que l éclairage du clavier LED s éteigne pour économiser de l énergie Luminosité du clavier Vous ...

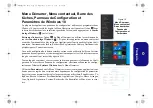
Страница 79: ...re des tâches se trouve en bas à droite de l écran Certains panneaux de configuration et certaines applications auxquels il est fait référence tout au long de ce manuel sont accessibles à partir d ici Tout au long de ce manuel vous verrez une instruction pour ouvrir le Panneau de Confi guration Pour accéder au Panneau de configuration sélectionnez Panneau de configu ration sous l élément Système W...

Страница 80: ... intégré vous pouvez aussi utiliser un écran externe connecté à la prise de sortie HDMI comme périphé rique d affichage Consultez le manuel de votre périphérique d affichage pour connaître les formats pris en charge Dans Windows il est possible de configurer rapidement des écrans externes dans le menu Projeter appuyez sur la Touche du logo Windows et la touche P ou appuyez sur la combinaison de to...

Страница 81: ...e veille Fn F12 couvercle de l ordinateur lors qu il est fermé écran et mode Veille l état d économie d énergie par défaut dans le menu de gauche Cliquez sur Créer un mode de gestion d alimentation dans le menu gauche et sélectionnez les options pour créer un nou veau mode Cliquez sur Modifier les paramètres du mode et cliquez sur Modifier les paramètres d alimentation avancés pour accéder à plus ...

Страница 82: ...s à jour Obtenir des mises à jour pour mettre à jour toutes les applications etc Installation des pilotes et alimentation Lors de l installation des pilotes assu rez vous que votre ordinateur est ali menté par l adaptateur CA CC connecté à une source d alimenta tion Certains pilotes consomment une quantité importante d énergie pendant la procédure d installation et si la capacité restante de la ba...

Страница 83: ...vous déconnecter d un point d accès connecté 8 Vous pouvez cliquer sur le bouton Mode Avion pour activer ou désactiver le mode 9 Vous pouvez également cliquer sur le bouton Wi Fi pour simplement activer ou désactiver Wi Fi Module Bluetooth Option Assurez vous que le module Bluetooth est activé et non en Mode Avion avant que la configuration commence Configuration Bluetooth dans Windows 1 Cliquez s...

Страница 84: ...ralement administré au sein de larges enterprises et organisations votre administrateur système devra vous assister pour la gestion des données Actions du TPM 1 Cliquez sur Préparer le module de plateforme sécurisée TPM et suivez les instructions de l Assistant pour préparer le TPM cela nécessitera probablement un redémarrage de l ordinateur et la confirmation des modifications des paramètres aprè...

Страница 85: ...age 68 Le module caméra ne peut pas être détecté Le module est désactivé Utilisez la combinaison de touches Fn F10 pour activer le module voir le Tableau 2 à la page 68 Exécutez l application Caméra pour voir l image de l appareil photo Les performances de jeu sont lentes Il est recommandé d utiliser la vitesse maximale du ventilateur pour jouer à des jeux Utilisez la combinaison de touches Fn 1 p...

Страница 86: ...teur BIOS Insyde BIOS SPI Flash ROM de 128Mb Mémoire Double canal DDR4 Deux emplacements SODIMM 260 broches Compatible avec les modules mémoire DDR4 2666MHz Mémoire extensible jusqu à 32Go Compatible avec les modules de 4Go 8Go ou 16Go La fréquence réelle d opération de la mémoire dépend du FSB du processeur LCD Modèle A 14 35 56cm 16 9 FHD 1920x1080 Modèle B 15 6 39 62cm 16 9 FHD 1920x1080 Stocka...

Страница 87: ...ion d usine Modèle B Seulement Logement 3 pour module 4G Interface Un port USB 3 1 Gen 2 Type C La quantité maximale de courant fournie par les ports USB Type C est 500mA USB 2 0 1500mA USB 3 1 Un port USB 3 1 Gen 2 Type A Un port de sortie HDMI Une prise audio 2 en 1 casque et microphone Une prise d entrée en DC Une prise réseau RJ 45 Modèle A Un port USB 2 0 Modèle B Deux ports USB 2 0 Mise en m...

Страница 88: ...84 Français NL40nNL50CU book Page 84 Wednesday October 9 2019 10 45 AM ...

Страница 89: ...n previo aviso Algunas o todas las características del ordenador pueden haberse configurado de antemano Si no lo están o si desea reconfigurar o reinstalar partes del sistema consulte el Manual del usuario completo El disco Device Drivers Utilities User s Manual no contiene un sistema operativo Información de regulación y seguridad Por favor preste especial atención a todos los avisos de regulació...

Страница 90: ...n de seguridad Utilice solamente un adaptador de alimentación aprobado para su uso con este ordenador Utilice solamente el cable de corriente y las baterías indicados en este manual No tire las baterías al fuego Podrían explotar Con sulte los códigos locales para posibles instrucciones para desechos especiales Nunca utilice una batería que se haya caído o que parezca dañada p ej doblada o retorcid...

Страница 91: ...no guarde las baterías sin usar durante mucho tiempo Si está trabajando en áreas de baja temperatura use el adaptador de AC DC para alimentar el ordenador Eliminación de la batería Cuidado El producto que usted ha comprado contiene una batería recargable La batería es reciclable Terminada su vida útil según las leyes locales y estatales puede ser ilegal desecharla junto con los residuos ordinarios...

Страница 92: ...sión cómodo no exceder 180 grados mientras utiliza la otra mano como se muestra en la Figura 1 para sostener la base del ordenador Nota Nunca levante el ordenador por la tapa LCD 6 Presione el botón de encendido para encender Software de sistema Puede ser que su ordenador tenga instalado un software de sistema Si no es el caso o si desea reconfigurarlo con otro sistema este manual se refiere a Mic...

Страница 93: ...ir del menú y vaya al menú Main 5 Seleccione OffBoard NVMe Controller Configuration y pulse Entrar para comprobar si hay el SSD Intel Optane está presente 6 Pulse Esc para salir del menú y vaya al menú Advanced 7 Seleccione SATA Mode pulse Entrar y seleccione Intel RST Premium y seleccione OK 8 Presione F10 para Guardar y salir Save and Exit y seleccione Yes pero tenga en cuenta lo siguiente Asegú...

Страница 94: ... vez finalizado el proceso reinicie el ordenador Desactivar Intel Optane Si desea desactivar una configuración de Intel Optane siga el procedimiento que se describe a continuación 1 Ejecute la aplicación Tecnología de almacenamiento Intel Rapid 2 Haga clic en Desactivar 3 Haga clic en Sí cuando aparezca el mensaje 4 Reinicie el ordenador para completar el proceso 5 Ejecute la aplicación Tecnología...

Страница 95: ...nel LCD abierto Modelo A 1 Cámara PC 2 LED de cámara Cuando la cámara esté en uso el LED se iluminará 3 Micrófono en línea incorporado 4 Panel LCD 5 Rejilla 6 Indicadores LED 7 Teclado 8 Touchpad y botones 5 5 7 4 2 1 3 8 6 14 35 56cm 8 Tenga en cuenta que el área válida de opera ción del Touchpad y los botones es la indicada dentro de las líneas de puntos de arriba 3 NL40nNL50CU book Page 91 Wedn...

Страница 96: ...anel LCD 5 Rejilla 6 Botón de encendido 7 Indicadores LED 8 Teclado 9 Touchpad y botones 5 7 4 2 1 3 8 6 9 15 6 39 62cm 9 Tenga en cuenta que el área válida de opera ción del Touchpad y los botones es la indicada dentro de las líneas de puntos de arriba Recalentamiento Para evitar que su ordenador se recaliente compruebe que nada bloquea la s rejilla s con el equipo encendido 5 3 NL40nNL50CU book ...

Страница 97: ...sario que alguien sentado frente a usted vea la pantalla Figura 5 Panel LCD con apertura de hasta 180 grados con pantalla giratoria Icono Color Descripción Apagado El ordenador está apagado Blanco El ordenador está encendido Blanco parpadeante El ordenador está en modo Sus pensión Blanco El bloqueo de mayúsculas está acti vado Blanco El teclado numérico NumLk está activado Naranja La batería se es...

Страница 98: ...clado numérico se habilita o inhabilita También incluye las teclas de función para permitirle cambiar las características operacionales al instante Figura 6 Teclado Teclado Tecla Fn Teclas de función numérico Bloq Num Bloq Despl Tecla Menú Aplicación Tecla del logotipo de Windows NL40nNL50CU book Page 94 Wednesday October 9 2019 10 45 AM ...

Страница 99: ...as características operacionales al instante Figura 7 Teclado de tamaño completo Figura 8 Opción de fábrica Teclado LED multicolor de tamaño completo Tecla Menú Aplicación Teclado Tecla Fn Teclas de función numérico Bloq Num BloqDespl Tecla del logotipo de Windows Tecla Menú Aplicación Teclado Tecla Fn Teclas de función numérico Bloq Num BloqDespl Tecla del logotipo de Windows NL40nNL50CU book Pag...

Страница 100: ...dio vídeo Fn Activar desactivar el Modo de avión Fn Activar desactivar el touchpad Fn Cambiar modo Suspensión Fn Apagar luz de fondo del LCD presione una tecla o utilice el touchpad para encenderlo Fn Activar disactivar el teclado numérico Fn Conmutación mudo Fn Cambiar el bloqueo de desplazamiento Fn Reducción aumento volumen de sonido Cambio Bloq Mayúsculas Fn Cambiar la configuración de pantall...

Страница 101: ...N RJ 45 3 Lector de tarjetas MicroSD 4 Puerto USB 2 0 5 Botón de encendido 6 Conector de audio 2 en 1 auriculares y micrófono 7 Altavoces 8 Puerto USB 3 1 Gen 2 Tipo C 9 Puerto USB 3 1 Gen 2 Tipo A 10 Puerto de salida de HDMI 11 Indicador LED de encendido de la batería 12 Conector de entrada DC Parte frontal Lateral izquierdo Lateral derecho NL40nNL50CU book Page 97 Wednesday October 9 2019 10 45 ...

Страница 102: ...ndicador LED de encendido de la batería 12 Conector de entrada DC Parte frontal Lateral izquierdo Lateral derecho Parte frontal Lateral izquierdo Expulsión de la tarjeta USIM Simplemente presione la tarjeta USIM para expulsarla pero no lo haga mientras la tarjeta está trabajando Si expulsa la tarjeta mientras hay una conexión 4G en curso necesitará apagar el sistema vuelva a insertar la tarjeta US...

Страница 103: ... la s reji lla s con el equipo encendido Advertencia sobre quitar la tapa inferior No quite ninguna tapa y o tornillo para actualizar el dispositivo pues podría violar los términos de su garantía Si necesita colocar o quitar el disco duro SSD RAM etc por cualquier razón contacte con su distribuidor o vendedor para más información Modelo A Modelo B 3 1 2 1 2 3 3 3 NL40nNL50CU book Page 99 Wednesday...

Страница 104: ...doble clic en el icono en el área de notificación de la barra de tareas para acceder al Control Center El Control Center ofrece acceso rápido a los ajustes de Modos de encendido Ventilador y a la configuración del Teclado LED para el teclado LED multicolor opcional Figura 12 Control Center NL40nNL50CU book Page 100 Wednesday October 9 2019 10 45 AM ...

Страница 105: ...n mayor rendimiento de la CPU y GPU FAN Speed Control Control de velocidad de FAN Desde este elemento del menú puede ajustar la velocidad del fan ventilador a Máximo potencia máxima o Automático Silencio Esto ajustará la velocidad del ventilador automáticamente para controlar el calor de la CPU GPU Puede usar el control deslizante Desplazamiento para ajustar la configuración según sus preferencias...

Страница 106: ...do haciendo clic en el color deseado Haga clic para seleccionar cualquier color de la paleta para aplicar a todo el teclado Temporizador de suspensión del teclado Habilitar y seleccionar la cantidad de tiempo que el sistema debe estar inactivo para que el teclado LED entre en modo de suspensión p ej la iluminación del teclado LED se apagará para ahorrar energía Brillo del teclado Puede ajustar el ...

Страница 107: ... de red etc El área de notificación de la barra de tareas está en la esquina inferior derecha de la pantalla Desde aquí se puede acceder a algunos de los paneles de control y aplicaciones a los que se hace mención a lo largo de este manual A lo largo de este manual verá una instrucción para abrir el Panel de Control Para acceder al Panel de control seleccione Panel de control debajo del elemento S...

Страница 108: ...orporado también puede utilizar una pantalla externa conectado al puerto de salida de HDMI como dispositivo de pantalla Consulte el manual de su dispositivo de pantalla para ver qué formatos son compatibles En Windows puede configurar rápidamente pantallas externas desde el el menú Proyectar presione la Tecla del logotipo de Windows y la tecla P o presione la combinación de teclas Fn F7 Configurar...

Страница 109: ...tapa del ordenador al cerrarla pantalla y modo de suspensión el estado de ahorro de energía predeterminado en el menú de la izquierda Haga clic en Crear un plan de energía en el menú izquierdo y seleccione las opciones para crear un plan nuevo Haga clic en Cambiar la configuración del plan y haga clic en Cambiar la configuración avanzada de energía para acceder a más opciones de configuración Ajus...

Страница 110: ...ones Obtener actualizaciones para actualizar todas las aplicaciones etc Driver Installation Power When installing drivers make sure your computer is powered by the AC DC adapter connect ed to a working power source Some drivers draw a significant amount of power during the in stallation procedure and if the remaining battery capacity is not adequate this may cause the system to shut down and cause...

Страница 111: ...ectarse de un punto de acceso al que está conectado 8 Puede hacer clic en el botón Modo de avión para activar o desactivar el Modo de avión 9 Como alternativa puede hacer clic en el botón Wi Fi para activar o desactivar la Wi Fi Módulo Bluetooth Opción Asegúrese de que el módulo Bluetooth esté encendido y no en Modo de avión antes de comenzar la configuración Configuración de Bluetooth en Windows ...

Страница 112: ... Administración del TPM le permite configurar el TPM desde Windows Como la TPM normalmente es administrada en empresas y organizaciones grandes su administrador de sistemas deberá asesorarle para administrar esta información Acciones TPM 1 Haga clic en Preparar TPM y siga las instrucciones del asistente para preparar el TPM esto probablemente requiera reiniciar el ordenador y confirmar los cambios...

Страница 113: ...96 El módulo cámara no puede detectarse El módulo está desactivado Utilice la combinación de teclas Fn F10 para activar el módulo vea la Tabla 2 en la página 96 Ejecute la aplicación de la cámara para ver la imagen de la cámara El rendimiento en videojuegos es lento Se recomienda usar la velocidad de ventilador máxima cuando juegue a videojuegos Utilice la combinación de teclas Fn 1 para ajustar l...

Страница 114: ...0 contactos SODIMM Soporta módulos de memoria DDR4 2666MHz Memoria expansible hasta 32GB Compatible con módulos de 4GB 8GB y 16GB La frecuencia de operación de memoria real depende del FSB del procesador LCD Modelo A 14 35 56cm 16 9 FHD 1920x1080 Modelo B 15 6 39 62cm 16 9 FHD 1920x1080 Almacenamiento Modelo A Una unidad Solid State SSD M 2 SATA PCIe Gen3 x4 Modelo B Una unidad de disco duro SSD i...

Страница 115: ...nura 3 para módulo 4G Interfaz Un puerto USB 3 1 Gen 2 Tipo C La cantidad máxima de corriente suministrada por los puertos USB Tipo C es 500mA USB 2 0 1500mA USB 3 1 Un puerto USB 3 1 Gen 2 Tipo A Un puerto de salida HDMI Un conector de audio 2 en 1 auriculares y micrófono Un conector de entrada DC Un conector LAN RJ 45 Modelo A Un puerto USB 2 0 Modelo B Dos puertos USB 2 0 Características Tecnol...

Страница 116: ...112 Español NL40nNL50CU book Page 112 Wednesday October 9 2019 10 45 AM ...

Страница 117: ...contenuto senza preavviso È possibile che alcune o tutte le funzionalità del computer siano già state configurate In caso contrario o se si sta pianificando di riconfigurare o reinstallare componenti del sistema fare riferimento al Manuale per l utente completo Il disco Device Drivers Utilities User s Manual non contiene il sistema operativo Informazioni legali e di sicurezza Prestare particolare ...

Страница 118: ...formazioni di sicurezza Utilizzare esclusivamente un adattatore approvato per l utilizzo di questo computer Utilizzare solo il cavo di alimentazione e le batterie indicate in que sto manuale Non gettare le batterie nel fuoco poiché potrebbero esplodere Fare riferimento alle normative locali per istruzioni spe ciali in tema di smaltimento rifiuti Non continuare a usare in alcun modo una batteria ch...

Страница 119: ...batterie inutiliz zate per periodi di tempo prolungati Se lavori in ambienti a bassa temperatura usa l adattatore AC DC per alimentare il computer Smaltimento della batteria Attenzione Il prodotto acquistato contiene una batteria ricaricabile La batteria è riciclabile Al termine della durata di uso in base alle diverse leggi locali e statali può essere illegale smaltire questa batteria insieme ai ...

Страница 120: ...superare i 180 gradi mentre con l altra mano come illustrato nella Figura 1 si mantiene la base del computer Nota Non sollevare mai il computer tenendolo dal coperchio LCD 6 Premere il pulsante di alimentazione per accendere Software del sistema È possibile che il software sia già pre installato sul computer In caso contrario oppure in casi di riconfigurazione del computer per un sistema diverso q...

Страница 121: ... e aprire il menu Main 5 Selezionare OffBoard NVMe Controller Configuration e premere Invio per verificare che una memoria SSD Intel Optane sia presente 6 Premere Esc per uscire dal menu e aprire il menu Advanced 7 Selezionare SATA Mode premere Invio e selezionare Intel RST Premium e selezionare OK 8 Premere F10 per Salvare e Uscire Save and Exit e selezionare Yes tuttavia notare quanto riportato ...

Страница 122: ...o 21 Una volta completato il processo riavviare il computer Disabilitazione Intel Optane Se si desidera disattivare un installazione Intel Optane esistente seguire la procedura riportata di seguito 1 Eseguire la applicazione Tecnologia Intel Rapid Storage 2 Fare clic su Disattiva 3 Fare clic su Sì quando viene visualizzato il messaggio 4 Riavviare il computer per completare il processo 5 Eseguire ...

Страница 123: ...sta anteriore con pannello LCD aperto Modello A 1 Camera PC 2 LED della camera Quando si utilizza la camera l indicatore LED si illumina 3 Microfono array integrato 4 Schermo LCD 5 Ventola 6 Indicatori LED 7 Tastiera 8 Touchpad e pulsanti 5 7 4 2 1 3 8 6 14 35 56cm 5 8 Si noti che l area operativa valida del touchpad e dei pul santi è quella indi cata all interno delle linee tratteg giate sopra 3 ...

Страница 124: ...LCD 5 Ventola 6 Pulsante di alimentazione 7 Indicatori LED 8 Tastiera 9 Touchpad e pulsanti 5 7 4 2 1 3 8 6 9 15 6 39 62cm Surriscaldamento Per prevenire il surriscaldamento del computer accertarsi che non vi sia nulla che ostruisca la le ventola ventole durante l uso del computer 5 9 Si noti che l area operativa valida del touchpad e dei pul santi è quella indi cata all interno delle linee tratte...

Страница 125: ...mo e mostrarlo eventualmente a chi di sta di fronte Figura 5 Pannello LCD aperto a 180 con lo schermo ruo tato Icona Colore Descrizione Spento Il computer è OFF Bianco Il computer è ON Bianco lam peggiante Il computer è in modalità Sospen sione Bianco Bloc Maiusc è attivato Bianco La funzione blocco numerico tastie rino numerico è attivata Arancione La batteria è in carica Verde Batteria completam...

Страница 126: ...ommutare l attivazione e la disattivazione della tastiera numerica Dispone anche di tasti funzione che consentono di cambiare istantaneamente le funzionalità operative Figura 6 Tastiera Tastierino Tasti funzione Bloc Num Bloc Scorr numerico Tasto logo Windows Tasto Fn Tasto Menu Applicazione NL40nNL50CU book Page 122 Wednesday October 9 2019 10 45 AM ...

Страница 127: ... che consentono di cambiare istantaneamente le funzionalità operative Figura 7 Tastiera a pieno formato Figura 8 Opzione di fabbrica Tastiera LED multicolore a pieno formato Tasto logo Windows Tastierino Tasti funzione Bloc Num Tasto Fn Bloc Scorr numerico Tasto Menu Applicazione Tasto logo Windows Tastierino Tasti funzione Bloc Num Tasto Fn Bloc Scorr numerico Tasto Menu Applicazione NL40nNL50CU ...

Страница 128: ...eo Fn Attiva disattiva touchpad Fn Attiva disattiva modalità Sospensione Fn Spegne la retroilluminazione dello schermo LCD premere un tasto o utilizzare il touchpad per ripristinare lo schermo Fn Attiva disattiva il tastierino numerico Fn Commutazione mute Fn Attiva disattiva il blocco dello scorri mento Fn Riduzione aumento volume audio Attiva disattiva maiu scolo Fn Cambia configurazione di visu...

Страница 129: ...te tipo RJ 45 3 Lettore di schede MicroSD 4 Porta USB 2 0 5 Pulsante di alimentazione 6 Audio jack 2 in 1 cuffie e microfono 7 Altoparlanti incorporati 8 Porta USB 3 1 Gen 2 Tipo C 9 Porta USB 3 1 Gen 2 Tipo A 10 Porta uscita HDMI 11 Indicatore LED di alimentazione della batteria 12 Jack di ingresso DC Lato sinistro Lato destro Lato anteriore NL40nNL50CU book Page 125 Wednesday October 9 2019 10 4...

Страница 130: ...LED di alimentazione della batteria 12 Jack di ingresso DC Lato sinistro Lato destro Lato anteriore Espulsione scheda USIM Premere la scheda USIM per espellerla tuttavia non eseguire questa operazione quando la connessione è in corso Se espellete la scheda mentre una connessione 4G è in esecuzione avrete bisogno di spegnere il sistema inserire nuovamente la scheda USIM riavviare il sistema e quind...

Страница 131: ...e ventola ventole durante l uso del computer Avviso di rimozione coperchio inferiore Non rimuovere il i coperchio i e o vite viti ai fini dell aggiornamento del dispositivo poiché così facendo si possono violare i termini della garanzia Se avete necessità di sostituire rimuovere HDD SSD RAM ecc per qualsiasi motivo per ulteriori informazioni contattare il vostro distributore fornitore Modello A Mo...

Страница 132: ...na nell area di notifica della barra delle applicazioni per accedere al Control Center Il Control Center consente di accedere rapidamente alle Modalità di Alimentazione alle impostazioni della Ventola e alla configurazione della Tastiera a LED per la tastiera LED multicolore opzionale Figura 12 Control Center NL40nNL50CU book Page 128 Wednesday October 9 2019 10 45 AM ...

Страница 133: ...superiori di CPU e GPU FAN Speed Control Controllo della velocità del VENTOLA Da questa voce di menu è possibile impostare la velocità della ventola su Massimo potenza massima o Automatico Silenzioso La velocità della ventola si regola automaticamente per controllare il calore della CPU GPU Puoi usare il cursore Offset per regolare le impostazioni in base alle tue preferenze Tuttavia se desiderato...

Страница 134: ...zione della tastiera cliccando sul colore richiesto Fare clic per selezionare i colori del campione da applicare all intera tastiera Timer inattività tastiera Attiva e seleziona la quantità di tempo per il quale il sistema è inattivo prima che la tastiera LED attivi la modalità sleep cioè l illuminazione della tastiera LED si spegnerà per risparmiare energia Luminosità tastiera È possibile regolar...

Страница 135: ...ioni di rete ecc L area di notifica della barra delle applicazioni è in basso a destra dello schermo Alcuni dei pannelli di controllo e applicazioni alle quali fa riferimento nel presente manuale sono accessibili da qui In questo manuale sarà richiesto di aprire il Pannello di controllo Per accedere al Pannello di controllo selezionare Pannello di controllo nell elemento Sistema Windows nel menu S...

Страница 136: ...zazione Oltre allo schermo LCD integrato è possibile utilizzare un display esterno collegato alla porta uscita HDMI come periferica di visualizzazione Vedere il manuale del display per vedere i formati supportati In Windows è anche possibile configurare velocemente display esterni dal menu Proietta Premere il tasto Tasto logo Windows e quindi il tasto P oppure premere la combinazione di tasti Fn F...

Страница 137: ... sospensione Fn F12 coperchio del computer chiuso schermo e modalità sospensione lo stato di risparmio di energia predefinito Fare clic su Crea combinazione per il risparmio di energia sul menu di sinistra e personalizzarla per creare una nuova combinazione Fare clic su Modifica impostazioni combinazione quindi su Cambia impostazioni avanzate risparmio energia per accedere a ulteriori opzioni di c...

Страница 138: ... tutte le applicazioni ecc Installazione dei driver e alimentazione Quando si installano i driver assicurarsi che il computer sia alimentato con l alimentatore collegato a una fonte di corrente funzionante Alcuni driver assorbono una quantità considerevole di energia durante la procedura d installazione e se la capacità rimanente della batteria non è sufficiente il computer potrebbe spegnersi e ca...

Страница 139: ...c su Disconnetti per disconnettersi da un punto di accesso collegato 8 È possibile fare clic sul pulsante Modalità aereo per ativare o disattivare la modalità 9 In alternativa è possibile fare clic sul pulsante Wi Fi per accendere spegnere il Wi Fi Modulo Bluetooth Opzione Accertarsi che il modulo Bluetooth sia attivato e non in Modalità aereo prima di iniziare la configurazione Configurazione Blu...

Страница 140: ...La finestra di gestione TPM vi consente di configurare il TPM dall interno di Windows Dato che in genere il TPM è amministrato all interno delle organizzazioni e delle imprese di grandi dimensioni l amministratore di sistema dovrà assistere l utente nella gestione delle informazioni qui riportate Azioni TPM 1 Cliccare Prepara TPM e seguire le istruzioni della procedura guidata per preparare il TPM...

Страница 141: ... 2 a pagina 124 Non è possibile rilevare il modulo camera II modulo è disattivato Utilizzare la combinazione di tasti Fn F10 per attivare il modulo vedere la Tabella 2 a pagina 124 Lanciare l applicativo fotocamera per visualizzare l immagine della fotocamera Le prestazioni di gioco sono lente Si consiglia di utilizzare la velocità massima della ventola durante il gioco Utilizzare la combinazione ...

Страница 142: ...ue prese SODIMM 260 pin Supporto per moduli di memoria DDR4 2666MHz Memoria espandibile fino a 32GB Compatibile con i moduli 4GB 8GB o 16GB La frequenza operativa reale della memoria dipende dal bus FSB del processore LCD Modello A 14 35 56cm 16 9 FHD 1920x1080 Modello B 15 6 39 62cm 16 9 FHD 1920x1080 Periferica di memorizzazione Modello A Un SSD M 2 2280 SATA PCIe Gen3 x4 Modello B Un disco rigi...

Страница 143: ...ello B Slot 3 per il modulo 4G Interfaccia Una porta USB 3 1 Gen 2 Tipo C La quantità massima di corrente fornita da porte USB Tipo C è 500mA USB 2 0 1500mA USB 3 1 Una porta USB 3 1 Gen 2 Tipo A Una porta uscita HDMI Un audio jack 2 in 1 cuffie e microfono Un jack di ingresso DC Un jack RJ 45 per LAN Modello A Una porta USB 2 0 Modello B Due porte USB 2 0 Caratteristiche Tecnologia Intel Optane A...

Страница 144: ...140 Italiano NL40nNL50CU book Page 140 Wednesday October 9 2019 10 45 AM ...

Отзывы: