


12
Revision date: 08.08.14
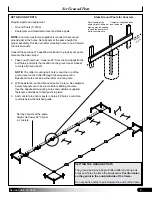
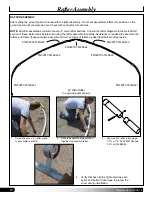
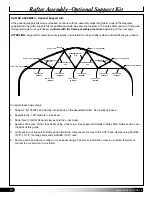
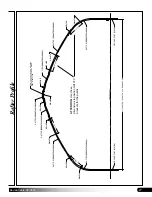
RAFTER ASSEMBLY—Optional Support Kits
If the optional support kits were purchased, continue with the assembly steps that follow. Consult the diagrams
supplied with the rafter support kits for additional details. See also the diagram in the Quick Start section of this guide.
If support kits were not purchased,
continue with the frame assembly procedure beginning on the next page.
ATTENTION:
Support kit components are typically not installed for the end rafters when end wall framing is present.
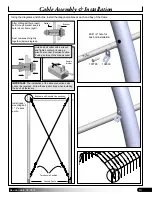
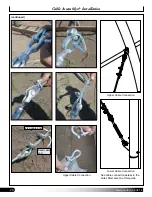
Complete these basic steps:
1. Slide six (6) 105238 band clamps into position on the assembled rafter. See locations above.
2. Assemble the 1.90" diameter cross beam.
3. Slide three (3) QH1404 band clamps onto the cross beam.
4. Secure each splice of the cross beam using a Tek screw. See support kit details in Quick Start Guide section near
the back of this guide.
5. Verify position of support kit clamps and install web components. Secure to the 3.50" band clamps using FAH322
(5/16" x 3-1/2") carriage bolts and FALB32B (5/16") nuts.
6. Secure each band clamp to rafter or cross beam using a Tek screw.
Install Tek screw in a position that will not
contact the cover when it is installed.
ST09275D13G17S1
ST06450D13G17S1
(QH1404)
(105238)
BAND CLAMP
(105238)
BAND CLAMP
BAND CLAMP
(QH1404)
BAND CLAMP
(QH1404)
BAND CLAMP
(105238)
BAND CLAMP
(105238)
BAND CLAMP
(105238)
BAND CLAMP
(105238)
BAND CLAMP
(190S099)
CROSS BEAM
(190S099)
CROSS BEAM
(190S099)
CROSS BEAM
(190S099)
CROSS BEAM
WEB
WEB
ST09275D13G17S1
WEB
ST09275D13G17S1
WEB
ST06450D13G17S1
WEB
(190P036)
CROSS BEAM
Rafter Assembly–Optional Support Kit


