ClearSounds 40XLC Скачать руководство пользователя страница 24

24

NOTE

: Those numbers can also be saved to your Phone Book 

(See pages 29-31 for instruc-

tions on setting up your phone book).

NOTE

: Your 40XLC stores up to 99 call records before the memory becomes full. When 

the next call comes in, the oldest record is automatically deleted.

If you answer a call before information appears on the screen, it will not be stored in the 
call history. Between the 

fi

rst and second rings the screen displays: 

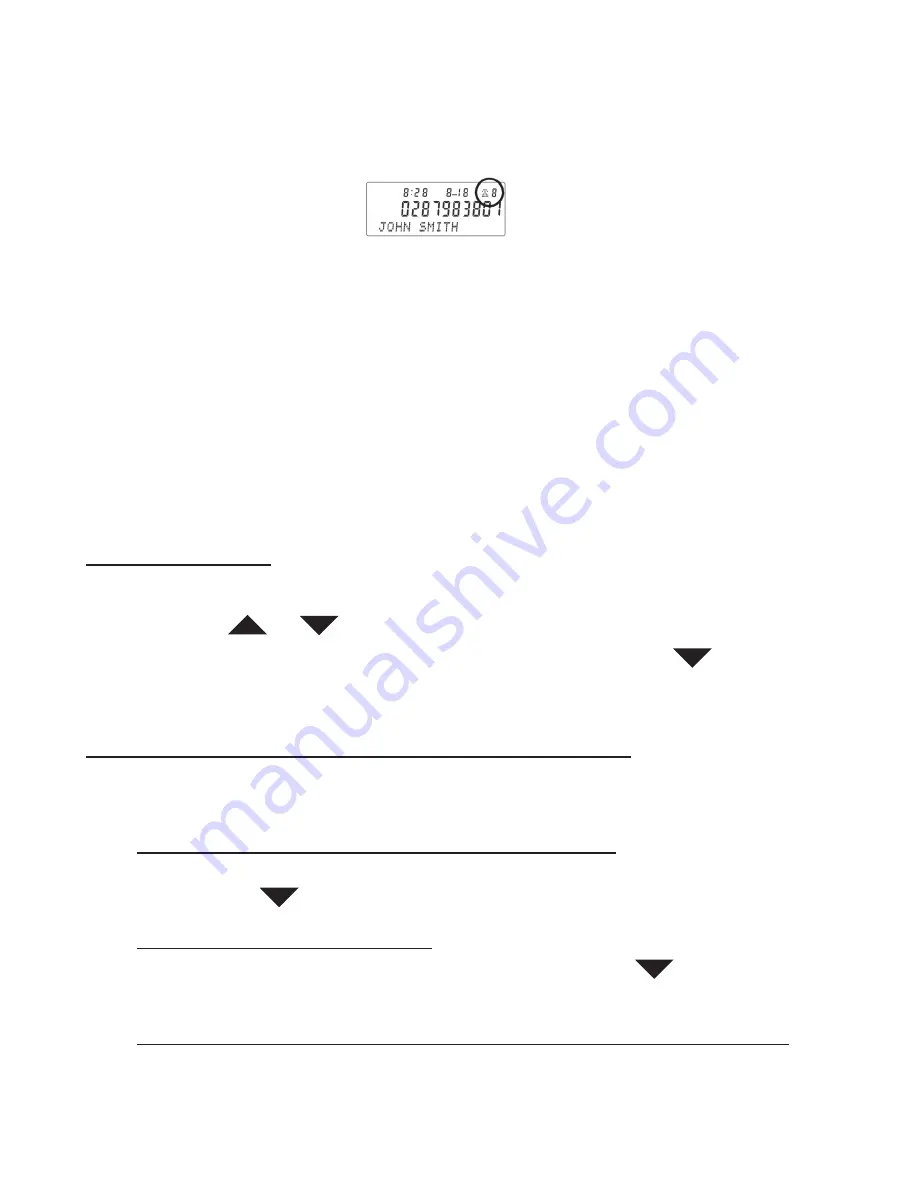
•   Your caller’s name (15 letters are sent by your phone company).
•   The caller’s area code and telephone number (area code is not display if it is pro-

grammed as the Home Area Code).

•   The time and date of the call.
•   The call’s position in call history.

NOTE

: Call information is displayed for about 30 seconds.

Review Call History

To review earlier calls 
In the hook position,

1.  Using the  

 or  

 arrow buttons to scroll through the caller list. 

2.  To advance through call history from an earlier call, press the  

 DOWN arrow 

button. When you have reach the end of the call history, the screen displays 

<<END 

OF LIST>>.


Turn OFF the New Calls / Message Waiting Indicator Light

This red light 

(See 

fi

gure #35)

 will remain lit unless you do one of the following in the hook 

position: 

1.   If you do not have Caller ID or Message Waiting Service, your 40XLC will alert you 

that you have missed a call by causing the red indicator light to 

fl

ash. To turn 

OFF

simply tap the 

 down arrow button once or until the light turns off. 

2.   If you only have Caller ID Service, your 40XLC will continue to 

fl

ash unless you 

review all new calls. To turn 

OFF

, simply continue to tap the  

 down arrow button 

to scroll through the Caller ID until the light turns off.

3.   If you have Message Waiting Service through your local telephone company, your 

40XLC will alert you that you have a message waiting after you have reviewed your 
Caller ID or missed calls. To turn 

OFF

, you will need to retrieve your message(s) 

before the red light will go off.   

Figure

 #35 – Caller ID Display

Call Counter

Содержание 40XLC

Страница 1: ...Congratulations You have just purchased the Most Remarkable Amplified Phone In The World 40XLC Amplified Telephone Installation Guide User Manual...

Страница 2: ...your 40XLC Phone Please read these instructions thoroughly before using your telephone Keep this manual for future reference Please save your sales receipt as proof of purchase in the event you need w...

Страница 3: ...se Pages 15 16 40XLC Phone Operation Making Receiving A Call Using the handset Page 17 Using the speakerphone Pages 17 18 Using audio telephone accessory jacks Pages 18 19 Using the amplification func...

Страница 4: ...ok Add new number name Page 20 Review modify number name Page 30 Delete number Page 30 Save number from Caller ID Page 30 Dial from the phone book Page 31 Recall Delete one of the last 30 numbers dial...

Страница 5: ...ms that come with your telephone You should have a AC adapter Owners manual Telephone base unit Telephone handset 6 ft long telephone line cord 8 inch short telephone line cord Handset coil cord Wall...

Страница 6: ...to retrieve it until after you have unplugged the line cord from the modular wall jack Do not plug the phone back in until it has dried completely WARNING Avoid using the telephone during electrical s...

Страница 7: ...ry button 8 AMPLI Amplification tone activation button 9 Volume control 10 Tone control 11 M1 M8 One Touch memory dial buttons 12 PROG Program save button 13 SPKR Speakerphone button 14 Headset button...

Страница 8: ...Volume select switch HI LO OFF 4 Ringer shaker strobe select mode 5 Phone line jack 6 AC power adapter jack 7 Volume reset override switch ON OFF 8 Optional bed shaker jack 9 Optional Audio Neckloop j...

Страница 9: ...9 Figure 4 1 Handset Boost button 2 Memory card to record speed dial numbers 3 Dialing mode select switch T P 4 Battery compartment 5 Phone keyholes mounts Handset Bottom 1 2 5 4 Features Functions 3...

Страница 10: ...lls 5 Validation button 6 UP DOWN arrow buttons 7 Cancel Clear button 8 Month 9 Day 1 2 3 4 5 6 7 8 9 OK button is used to confirm action or a choice on the screen UP DOWN arrow buttons are used to hi...

Страница 11: ...ment door located on the bottom of your phone by un screwing the battery compartment door and removing it from the bottom of your phone screwdriver provided 2 Insert correctly 4 AAA alkaline batteries...

Страница 12: ...K green button 4 Using the or arrow buttons scroll to select SET RING 5 Press OK button 6 There are four 4 ring tones available To hear each ring use the or arrow button to highlight any one of the fo...

Страница 13: ...ow See figure 12 NOTE The loud ringer will be triggered unless you have turned it OFF PROGRAMMING MEMORY DIAL BUTTONS These memory dial buttons are empty Should you choose to use this feature you will...

Страница 14: ...The Caller ID Screen will display SAVE OK See figure 16 6 To register your stored phone numbers use the phonebook insert card located under the base NOTE Numbers will be lost if the phone is not rece...

Страница 15: ...t the handset and listen for a dial tone If you hear a dial tone your phone is ready to use If there is no dial tone check all your cords to make sure they are plugged in securely Wall Mount Use 1 Sli...

Страница 16: ...l cord curly cord to the handset and to the telephone 7 Lift the handset and listen for a dial tone If you hear a dial tone your phone is ready to use If there is no dial tone check all your cords to...

Страница 17: ...Volume and Tone Settings if needed See pages 19 21 for assistance 3 On completion of the call carefully replace the handset in the cradle USING THE SPEAKERPHONE Your 40XLC Amplified Phone is also a f...

Страница 18: ...plification features These jacks accommodate a variety of ac cessories including Neckloops Headphones Earbuds Silhouettes Cellular Accessories and Cochlear Patchcords Caution Before plugging any cord...

Страница 19: ...adset button while the phone is ringing to answer the call 4 Depending on whether you are using the 3 5mm Audio Neckloop Jack or 2 5mm Telephone Headset Jack follow the directions above A B or C Using...

Страница 20: ...6 By pressing and holding this additional handset boost button you get an extra 10 dB gain of amplification IMPORTANT NOTE The Handset Boost button is designed to be used when listening only When you...

Страница 21: ...ing will remain as set On any call you can temporarily turn OFF and turn back ON the AUTO AMPLIFY feature by pressing the AMPLI button Using your 40XLC Amplified Phone with hearing aids Your 40XLC Pho...

Страница 22: ...uct a private conversation that you do not want the person on the other end to hear 1 Press and hold the MUTE button You will still be able to hear the caller but they cannot hear you during the mute...

Страница 23: ...ll history Your LCD screen will display the time and date the caller s phone number and name if they are sent with the call as well as a count number See figure 35 New calls are assigned a number from...

Страница 24: ...ugh call history from an earlier call press the DOWN arrow button When you have reach the end of the call history the screen displays END OF LIST Turn OFF the New Calls Message Waiting Indicator Light...

Страница 25: ...n displays ALL DEL 5 Press the C button to confirm 6 Press the OK button to exit NOTE Once a call is removed from call history it cannot be retrieved Call Waiting Your 40XLC Phone also has a Caller ID...

Страница 26: ...be to any Caller ID or Call Waiting services Display Screen Messages PRIVATE NAME The other party is blocking name information PRIVATE CALLER The other party is blocking name and number information UN...

Страница 27: ...ok When you use your phone for the first time or if you have moved to a different area code you need to enter your area code into the phone This assures that when dialing a call out of memory or your...

Страница 28: ...call If you currently do not have Caller ID service through you phone company please follow directions below You can change the format of the time and date to your preference Date format You can choo...

Страница 29: ...s and numbers To Add A New Number Name In the hook position 1 Press the MUTE button to access the Programming Menu 2 Using the or arrow buttons highlight PHONE BOOK 3 Press the OK button to confirm 4...

Страница 30: ...it Press a number key until the letter you want appears on the screen 11 After changes are complete press and hold the OK button for 3 seconds to save 12 This also takes you to the next number You ca...

Страница 31: ...numbers and select the number you wish to dial 4 Lift the handset or press the SPKR button the number will be automatically dialed To delete one of telephone numbers follow instructions below In the...

Страница 32: ...ems such as low ringer volume or impaired quality during calls No Strobe Ringer and or bed shaker will not activate 1 Make sure the strobe and or shaker switch is turned ON See diagram 12 2 Make sure...

Страница 33: ...red will be lost Caller ID information does not show 1 Make sure you are subscribed to Caller ID through your local phone company 2 Check batteries No Caller ID information while on a call 1 Make sure...

Страница 34: ...ponse to an incoming call In most but not all areas the sum of RENs should not exceed five 5 00 To be certain of the number of devices that may be connected to a line as determined by the total RENs c...

Страница 35: ...erference will not occur in a particular installation If this equipment does cause harmful interference to radio or television recep tion which can be determined by turning the equipment off and on th...

Страница 36: ......

Отзывы: