background image

7

Mounting the Dome Camera

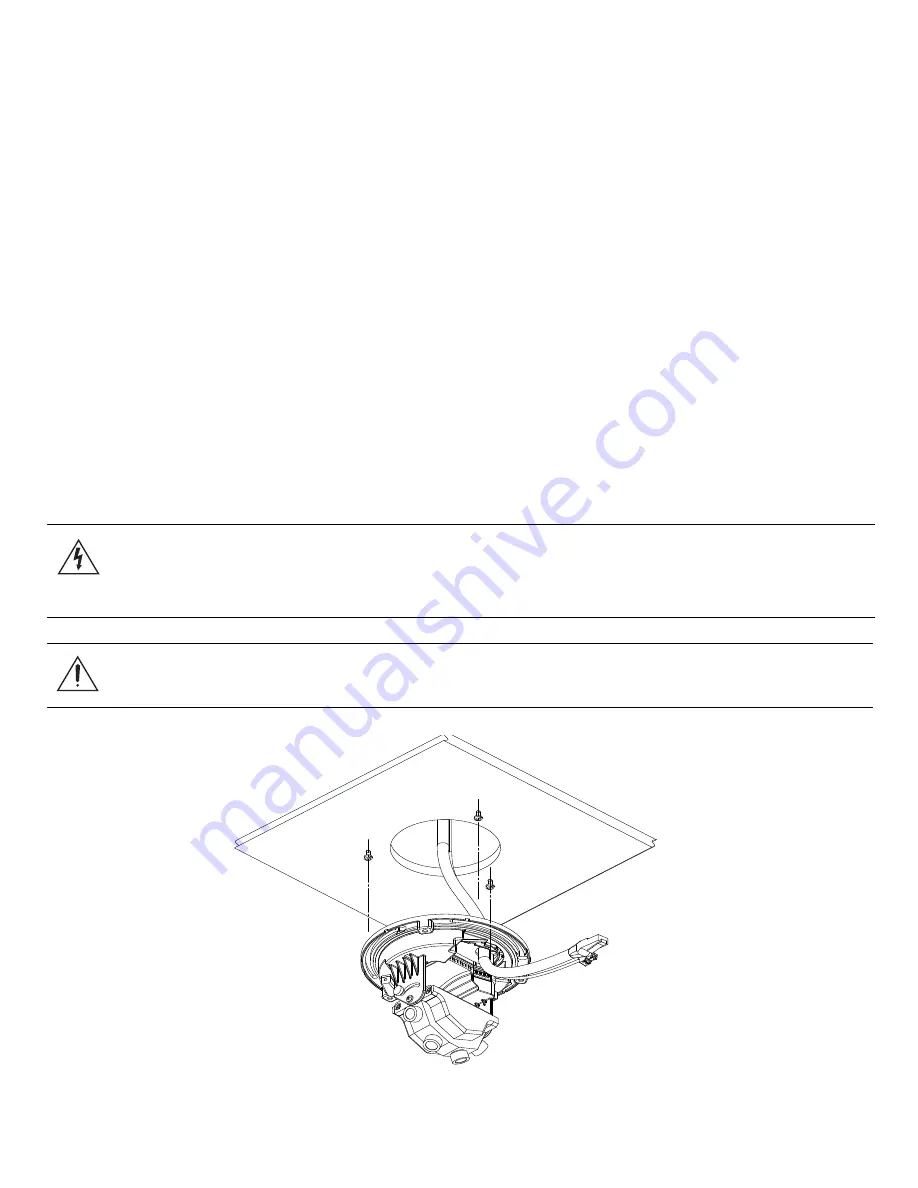
The dome camera can be mounted to a surface on its own or using one of the four dome
camera mounting accessories: indoor electrical box mounting plate, indoor in-ceiling
mount, indoor/outdoor mounting base, and indoor/outdoor pendant mount. 

To mount the dome camera, complete the following steps:

1. Using the drill template, drill three mounting holes and one cable entry hole 

in the ceiling/ wall. If using a dome camera mounting accessory, this step is 
not necessary.

2. Drive three screws into mounting holes and leave 6 mm (1/4”) between the 

screw head and the ceiling/wall surface.

3. Pull the cables through the cable entry hole in the ceiling/wall and the cable 

entry hole in the dome camera.

4. Place the dome base on the screws using the keyed mounting slots and 

rotate it clockwise.

5. Tighten the screws to hold the dome camera in place

For outdoor use, an outdoor mounting accessory is required.

 Figure A: 

Dome camera installation.

Warning — 

Only use UL listed mounting brackets suitable for the mounting 

surface and can sustain a minimum 0.53  kg (1.2 lbs), plus the weight of the 
attached lens.

Caution — 

This camera is designed for indoor use only. 

Содержание DM180PAN-2K

Страница 1: ...Installation Guide ClearPix 180 Panoramic High Definition IP Dome Camera 920 0029A Rev1...

Страница 2: ...all local codes This product is intended to be supplied by a UL Listed Power Unit marked Class 2 or LPS or Limited Power Source with output rated between 12 VDC or 24 VAC 7 W min or Power over Etherne...

Страница 3: ...s been dropped Do not use strong or abrasive detergents when cleaning the dome camera body Use only accessories recommended by ClearPix Avoid leaving the image sensor exposed for extended periods of t...

Страница 4: ...e harmful interference to radio communications Operation of this equipment in a residential area is likely to cause harmful interference in which case the user will be required to correct the interfer...

Страница 5: ...ications and materials contained herein and shall not be responsible for any damages including consequential caused by reliance on the materials presented including but not limited to typographical an...

Страница 6: ...ng the Dome Cover 6 Mounting the Dome Camera 7 Connecting Power 8 Aiming the Dome Camera 9 Connecting the Dome Camera to a Network Video Recorder NVR 9 IP Address Selection 10 Advanced Features 11 Upg...

Страница 7: ...over View Feature Description Dome Cover Vandal proof dome cover constructed out of aluminum with a polycarbonate bubble Tamper Proof Screws Torx tamper proof captive screws used to fix the dome cover...

Страница 8: ...ry hole for all network power and I O cables Dome Mounting Slot Mounting points for the dome camera Serial Number Tag Serial and part numbers for the dome camera Cable Entry Hole Serial Number Tag Dom...

Страница 9: ...ty right Power Connector Block Accepts a terminal block with either AC or DC power connected DC input can be either polarity Only required when Power over Ethernet is not available Audio Connector Acc...

Страница 10: ...n about the camera s operation See the Connecting the Dome Camera to a Network Video Recorder section for more information about the Connection Status LED It can be turned off during operation for cov...

Страница 11: ...5 Heater View Feature Description Heater Provides heat for the camera to extend the operating temperature range The heater is not included with all models...

Страница 12: ...ls Drill Template Installation Steps Complete the following procedures to install the dome camera 1 Removing the Dome Cover on page 6 2 Mounting the Dome Camera on page 7 3 Connecting Power on page 8...

Страница 13: ...cessary 2 Drive three screws into mounting holes and leave 6 mm 1 4 between the screw head and the ceiling wall surface 3 Pull the cables through the cable entry hole in the ceiling wall and the cable...

Страница 14: ...he insulation from 6 mm of the power wires Do not nick or damage the wires 3 Insert the two power wires into the two terminals on the dome camera The connection can be made with either polarity Use a...

Страница 15: ...on on how to configure the dome camera consult the software user guide The connection status LED on the back of the dome camera indicates the dome camera progress in connecting to the server as descri...

Страница 16: ...btain an IP address from a DHCP server If this fails the dome camera will use Zeroconf APIPA to choose an IP address When the dome camera IP address is set using Zeroconf its IP address is in the 169...

Страница 17: ...the dome camera can be reverted to run from bootstrap firmware Once reverted the dome camera can be upgraded as usual Figure B The firmware revert microswitch at the rear of the camera 1 Disconnect po...

Страница 18: ...TX Half duplex RS 485 interface for controlling external equipment 3 RS 485 RX TX 4 Input Output A Shared pin for Input and Output 5 Input The input uses a photocoupler and is electrically isolated f...

Страница 19: ...audio input Installing Replacement Dome Bubble The dome bubble can be replaced if it is damaged To replace the dome bubble perform the following steps 1 Remove the dome cover by loosening the 3 tamper...

Страница 20: ...14 Cleaning Body Use a dry or lightly dampened cloth to clean the camera body Caution Do not use strong or abrasive detergents when cleaning the camera body...

Страница 21: ...gray 2 Adjustment Range 360 pan 180 tilt 180 azimuth Electrical Power Source VDC 12 24 V VAC 24 V PoE IEEE802 3af Class 3 compliant Power Consumption 7 W 5 5 W with heater option Power Connector 2 pin...

Страница 22: ...stributors dealers agents or employees shall create another warranty or modify this warranty This warranty states ClearPix s entire liability and your exclusive remedy against ClearPix for any failure...

Отзывы: