Touch Panel conTroller
10
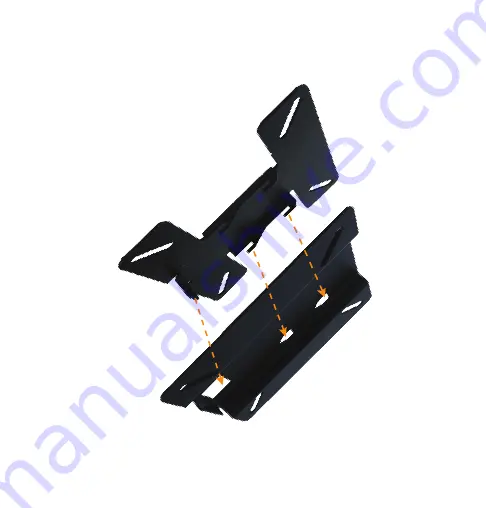
Fasten the Controller Mount Plate (installed on the controller) onto the Wall Mount Plate with fastening hooks face down.
Страница 1: ...Wall Mount Kit for Touch Panel Controller Installation Guide...
Страница 2: ...1 SKUs Used 2 Connections 3 Powering a Touch Panel Controller 3 Communication Connections 3 Wall Mount Installation 4 Parts Received 4 Tools Required 5 Wall Mounting Procedure 6 ClearOne Contacts 13 T...
Страница 3: ...calls IMPORTANT The Touch Panel Controller can only be used with CP2 systems It is not compatible with first generation CONVERGE Pro systems The Touch Panel Controller connects with the CP2 through a...
Страница 4: ...er 1 ft 910 001 004 PoE power supply for 1 device 1 x PoE power supply 1 x 6 ft power cord 2 x 25 ft plenum rated CAT5e cables 910 3200 202 PoE power supply kit for 3 devices 1 x PoE power supply 1 x...
Страница 5: ...hernet switch P Link from CP2 or other P link device carries only power Communication Connections RS232 A Touch Panel Controller can connect to a CP2 or GPIO USB expanders via serial RS232 cables up t...
Страница 6: ...stallation Parts Received The following parts are delivered with the Wall Mount Kit QTY 4 8 15 x 1 1 2 wood screw QTY 4 Flat washer for 8 screw QTY 4 TPEN 10 anchor QTY 1 Wall Mount Plate QTY 1 Contro...
Страница 7: ...ncluded If any of the items according to your customer order are missing or damaged contact your ClearOne distributor immediately 1 Phillips screwdriver Tools Required The following tools may be requi...
Страница 8: ...ate can be mounted to either a solid or hollow wall Slotted holes for mounting to wall with 8 Screws Security Screw Slotted holes for Controller Mounting Plate hooks Wall Mounting Plate To be attached...
Страница 9: ...Locate and mark for drill holes where the Wall Mounting Plate will attach to the wall Use the following dimensions for the drill holes 75mm 75mm 100mm 100mm...
Страница 10: ...st use a standard VESA 75 mount mounting holes are 75mm apart Drill holes to receive the anchors NOTE Take care while drilling and installing the anchors so the wall material does not tear out and wea...
Страница 11: ...adjust the position of the plate to be lower or higher on the controller but ClearOne recommends installing the Wall Mount Plate on the upper set of threads red outline Notice that the Controller Moun...
Страница 12: ...Touch Panel Controller 10 Fasten the Controller Mount Plate installed on the controller onto the Wall Mount Plate with fastening hooks face down...
Страница 13: ...Wall Mount Installation Guide 11 Insert the security screw into the hole securing the mount plates Tighten the screw with the 1 Phillips screwdriver Assembled Wall Mount Bottom View...
Страница 14: ...Touch Panel Controller 12 Assembled Wall Mount Wall Mount Side Assembled Wall Mount Controller Mount Side...
Страница 15: ...change without notice DOC 0321 001 Revision 1 0 APRIL 2017 ClearOne Contacts Headquarters 5225 Wiley Post Way Suite 500 Salt Lake City UT 84116 US Canada Tel 801 975 7200 Toll Free 800 945 7730 Fax 80...