background image

7. GPRS/UMTS/HSDPA installation 

This section explains how to use the WF105 Phone to access the internet from a PC. 
PC Requirement: The USB Modem software is supported by all versions of Win XP, 
Win Vista and Win 7. 


1)  Insert the data-enabled SIM in the compartment underneath the battery 

compartment in the bottom of the phone. 

2)  Connect the antenna to the connector on the side of the phone. 
3)  Connect the battery, and replace the battery cover. 
4)  Connect the power supply. 
5)  Press the Power button on the phone to power up the phone. (Enter the pin 

number of the SIM on the phone keypad if requested) 

6)  Disable Anti-Virus software on the PC for the duration of the installation.   
7)  Connect the USB cable to the phone and PC 
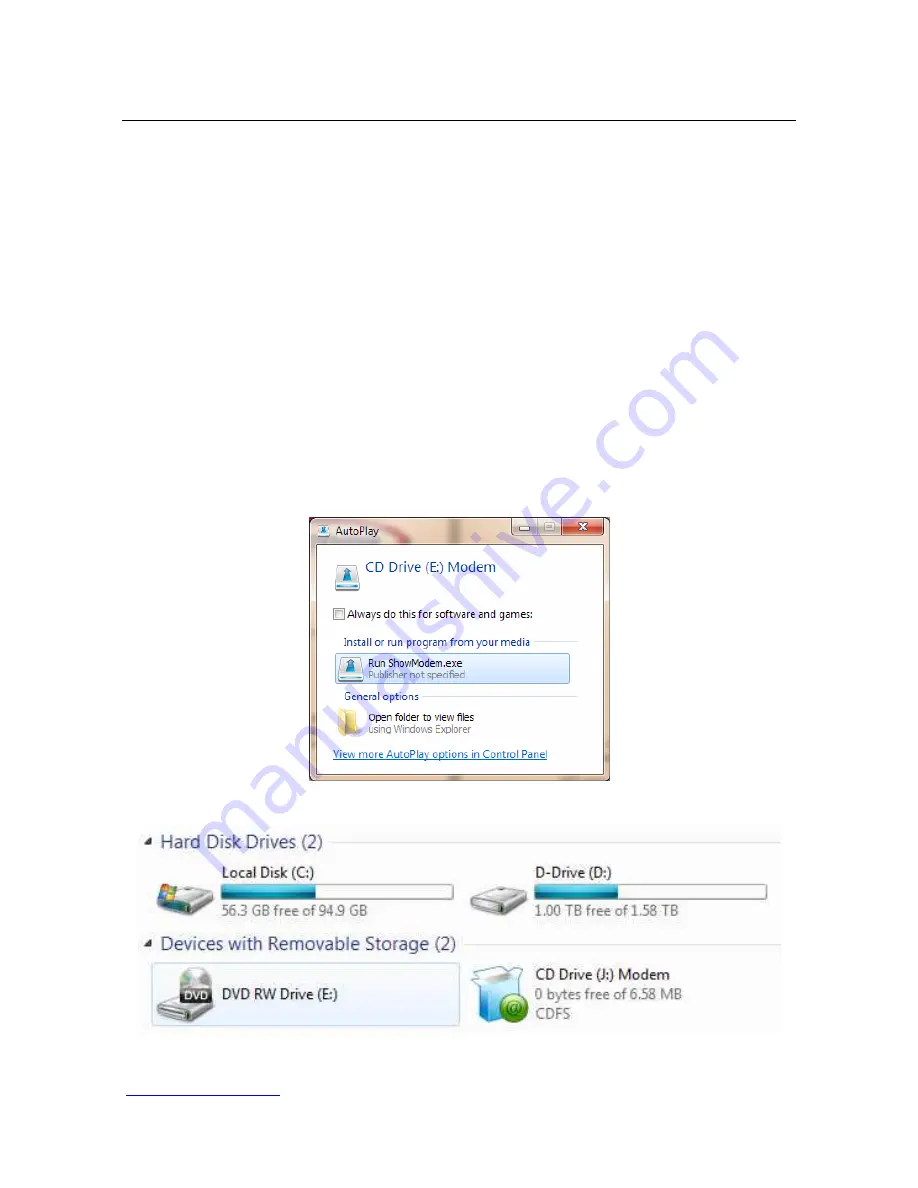
8)  A) On the PC, Run the “ShowModem.exe” to install the application and drivers. 

B) If the “autorun” is not enabled on the PC, the popup would not occur 
automatically. In this case the installer needs to run it manually for the virtual CD 
drive. Use the “Computer” or “My Computer shortcut to view the new drive, then 
click on the “Modem” icon 


A) Autorun 

Pop-Up 


B)  Example of Virtual CD (Drive J:) drive as seen in “My Computer” 

If this step cannot be executed, try to download the application and drivers from the 

www.telkomphones

.co.za website and do the installation manually. 

22 

Содержание WF-105

Страница 1: ...Fixed Wireless Terminal Model WF 105 User Guide Important Safety Instructions Read carefully and keep for future reference...

Страница 2: ...multiparty call 12 4 9 Low power indicator 12 4 10 Charge indicator 12 5 Text Input 13 5 1 Input Mode 13 5 1 1 Write with text input Abc 13 5 1 2 Write with text input abc 13 5 1 3 Write with text inp...

Страница 3: ...Cell broadcast 18 6 4 8 Voice mail 18 6 4 9 Settings 18 6 4 10 Memory status 18 6 5 Settings 19 6 5 1 Sounds 19 6 5 2 Display settings 19 6 5 3 Phone settings 19 6 5 4 Call Settings 19 6 5 5 Network...

Страница 4: ...divert 12 Sounds 13 Multiparty call 14 GPRS UMTS HSDPA 1 1 Safety instructions Some electronic devices are susceptible to electromagnetic interference sent by the FWT if inappropriately shielded Try...

Страница 5: ...ore before its first use Fully charged batteries could maintain more than 3 hours communication time or more than 48 hours standby time Do not unplug the connector of the data cable from the phone whe...

Страница 6: ...g the unit for purposes other that which it was intended or any damage that can be deemed an act of God 1 4 Contents of package The package contains 1 The phone 2 Handset 3 Antenna and battery 4 Adapt...

Страница 7: ...cord into the socket marked DC 5 0V on the side of the telephone and plug the power supply into a properly installed mains socket DC 5 0V Installing SIM card Open the battery cover at the back of the...

Страница 8: ...Installing battery Insert the BNC connector of the battery into the corresponding socket in the battery compartment and then close the battery cover 7...

Страница 9: ...2 Getting to know your phone DC 5 0V Data port External power port 8...

Страница 10: ...e call At the submenu state select the function shown above it on the bottom right of the screen 3 ON OFF After connecting the AC adapter the backlight will light up but the phone will remain in stand...

Страница 11: ...eys 0 9 In the off hook or hands free state enter the calling number using these keys Enter corresponding characters in all input modes and select the character you want to input In the English input...

Страница 12: ...end the call Speed dial In the off hook or hands free state press and hold any key 2 9 to dial that number preset in the Speed dial submenu Dial saved Contacts In standby mode press the PB phone book...

Страница 13: ...enables you to set up a three way conversation with two other users Contact your service provider to activate or deactivate Three way Calling Please make sure your SIM card supports the call waiting...

Страница 14: ...of the phone screen press the corresponding key to get the desired letter Press it several times until the desired letter appears on the screen Example Press the 2 key three time to enter the letter...

Страница 15: ...to change the character if needed 5 1 7 Insert number 123 Press until the 123 appears on the right corner of the screen and then enter the desired digits Press 0 key to get a blank space Except 123 in...

Страница 16: ...the call information 6 1 4 All calls Allow the viewing of all calls and the left soft key can be used to view the call information of the selected call 6 1 5 Call duration When entering the Call dura...

Страница 17: ...menu Press the left soft key again and choose Edit or New 6 3 Alarm You can set Alarm1 Alarm2 Alarm3 Select one to set Time You can set the alarm time 00 00 Alarm type You can select alarm type Once...

Страница 18: ...rward Forward the short message to others Delete Delete the short message Delete all Delete all short messages Call Dial the sender s number View mode Select to sort by date or subject Details View th...

Страница 19: ...tion only works if it is supported by the service provider s network Press the left soft key to enter this menu 6 4 8 Voice mail This function only works if it is supported by the service provider s n...

Страница 20: ...soft key to select the desired language Time and date You can set the Time Date Time format Date format or summer time 6 5 4 Call Settings In this submenu you can set these options Phone number You ca...

Страница 21: ...ft soft key The divert modes are available as follows z All calls Divert all calls z If busy Divert the incoming call when busy z If not answered Divert the incoming call when not answered z If not av...

Страница 22: ...SM network PIN lock PIN lock can prevent illegal usage on your SIM card Select On Off to enable or disable SIM password protection If you select On you will be prompted to enter the PIN code when the...

Страница 23: ...pin number of the SIM on the phone keypad if requested 6 Disable Anti Virus software on the PC for the duration of the installation 7 Connect the USB cable to the phone and PC 8 A On the PC Run the S...

Страница 24: ...tion instructions and restart the PC when prompted 10 Restart the phone And enter the SIM card s PIN on the phone if requested 11 Use the USB Modem shortcut on the desktop Or the Showmodem popup to op...

Страница 25: ...12 View the bar at the bottom of the application to ensure that the network was discovered and ready for connection 13 Use the Connect button to initiate the connection 24...

Страница 26: ...hase a replacement battery Poor connection between handset cord and the phone or handset Re connect the handset cord again No dialing tone The handset cord was broken or poor connection to the inner e...

Страница 27: ...drivers were installed correctly or if the driver installation failed If re installing the application does not resolve the problem download the application and drivers from the support website and i...

Страница 28: ...ienced ensure that the correct settings are used in the default connection Click on the Settings Gear button and select connection profile Select the default connection named Internet Ensure the follo...

Страница 29: ...lkom to show the amount of available data If another service provider s SIM is used contact their service center to confirm the data limit available For any service or product information queries rela...

Отзывы: