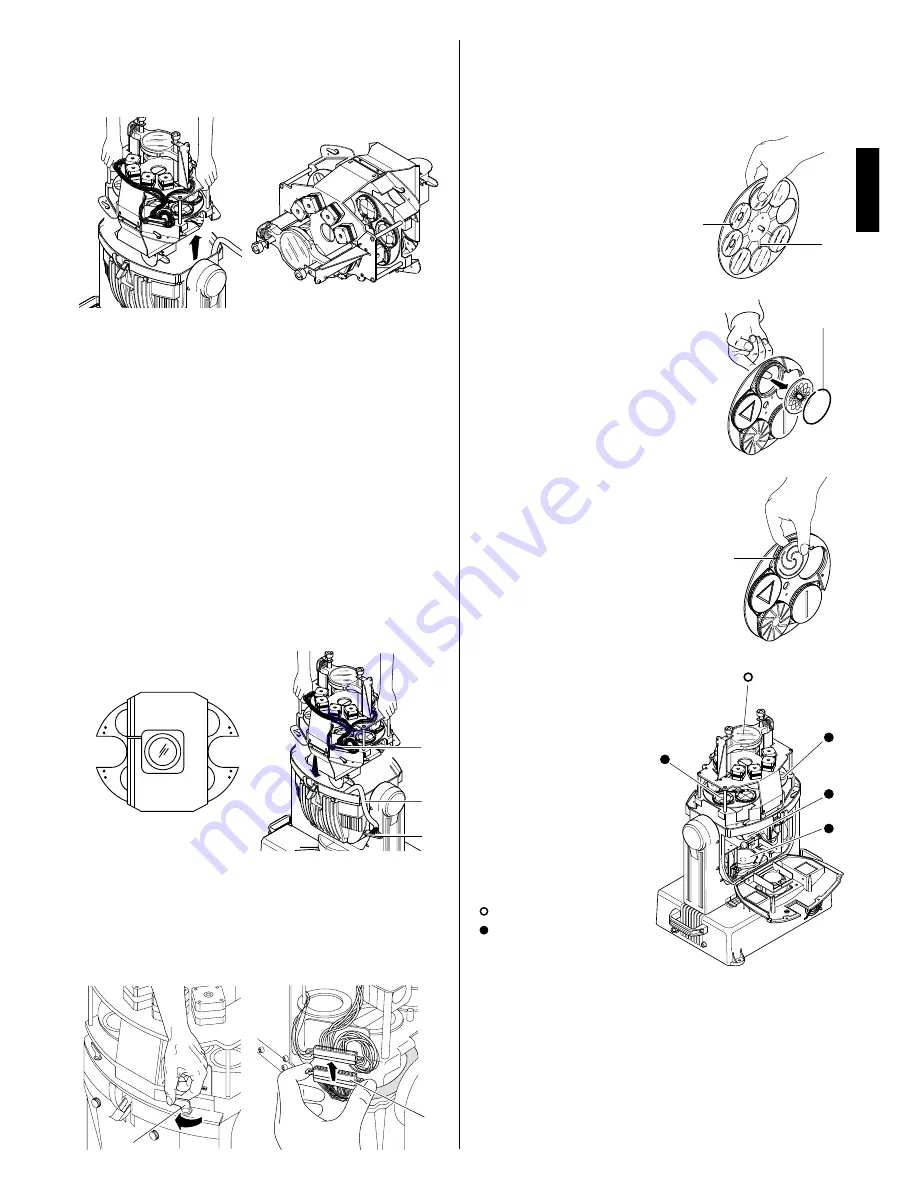
• Periodical cleaning
To keep optimum efficiency and
functionality over time, it is vital to
periodically clean the parts where
dust and grease can accumulate.
The frequency with which to carry
out the following operations depends
on several factors, such as the
number of movements of the effects
and the quality of the work
environment (air humidity, dustiness,
saltiness, etc.).
To remove dirt from the lenses and
filters, use a soft cloth dampened
with any liquid detergent for cleaning
glass.
Never use solvents or spirits.
Parts requiring frequent cleaning.
Parts requiring monthly cleaning.
11
• Inserting effects kit
Position the bundle of wires (41) for wiring the effects kit motors outside the movable
head, as shown in the figure.
Prepare the STAGE ZOOM 1200 effects kit by manually turning both gobos discs to
turn the empty positions (without gobos) towards the outside of the kit.
Lift the effects kit above the projector head and, slowly, rest it in the head, taking
special care to avoid interference with the electric wires of the internal wiring.
IMPORTANT:
- Before inserting the effects kit it is advisable to take out the lamp to prevent it
getting damaged during the operation.
- The effects kit must be inserted in the movable head so that the male connector
(42) is positioned in the same side where there is the bundle of wires (41)
terminating with a female connector (39).
Lock the four levers (40) of the quick lock/release devices by turning them clockwise.
Grip the connector “D” (39) by its side lugs, check the direction of insertion and insert
it correctly into the connector on the effects kit, forcing parallel to it, taking care not to
stretch the wires.
• Replacing effects kit
The instructions provided for extracting and inserting the whole effects kit are clearly
useful also for replacing it completely with another effects kit for STAGE ZOOM 1200.
For conversion into STAGE COLOR 1200 refer to the specific manual code 099552.
• Replacing colour filters
Find the filter to replace, grip it
between your fingers and push it
towards the movable point of
anchorage (43) until the filter comes
out of the fixed points of anchorage
(44). Bend the filter outwards and
take it out. Insert the new filter into
the mobile point (43) and anchor it in
the two fixed points (44).
Slowly lift the effects kit till it comes completely out of the projector head, taking care
over any interference with the wiring cables of the movable head. Rest this effects kit
on a flat surface in the position shown.
IMPORTANT: when handling the effects kit, it must be gripped by the framework and
not the motors, wirings, effects wheels or other parts that could easily get damaged
or deformed.
41
39
42
• Replacing glass gobos
Find the gobo to replace and press
on it delicately to make the spring
(45) come out of its seat. Take care
the spring does not fall inside the
projector. Replace the gobo and
insert the spring (45) positioning first
the two terminals and completing
insertion by pressing on the rest of
the spring.
• Replacing metal gobos
Find the gobo to replace and delica-
tely press towards the anchorage
points (46) until the gobo comes out.
To insert the new gobo, position it at
the two points of anchorage and,
lightly pressing it, slot it into the
remaining points, verifying the
levelness of the gobo in its housing.
40
39
Once a year it is recommended to submit the projector to qualified technical
personnel for non-routine maintenance consisting of at least the following operations:
- General cleaning of internal parts.
- Restoring lubrication of all parts subject to friction, using lubricants specifically
supplied by Clay Paky.
- General inspection of internal components, wiring, mechanical parts, etc.
- Electrical, photometric and functional tests.
- Any repairs.
43
44
46
ENGLISH
45


