background image

5

E

n

g

li

s

h

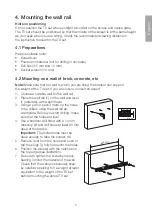
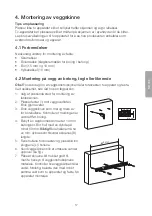
60 mm

Ø

10 mm

600 mm

4. Mounting the wall rail

Hints on positioning

Do not position the TV set where sunlight would fall on the screen and cause glare. 
The TV set should be positioned so that the middle of the screen is at the same height 
as your eyes when you are sitting. Check the recommended viewing distance in  
the instruction manual for the TV set.

4.1 Preparations

Prepare suitable tools:
•  Screwdriver 
•  Power drill (hammer drill for drilling in concrete)
•  Drill bits (3.5 mm and 10 mm)
•  Socket wrench (10 mm)

4.2 Mounting on a wall of brick, concrete, etc

Note!

 Make sure that the wall to which you are fixing the bracket can support 

the weight of the TV set. If you are unsure, consult an expert.
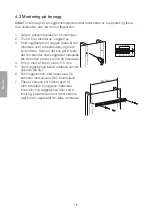
1.  Choose a suitable wall for the wall rail.
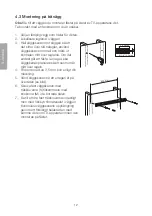
2.  Place the wall rail (1) on the wall and level 

it, preferably with a spirit level.

3.  Using a pen or pencil, mark up the holes 

to be drilled, using the wall rail as 
a template. Before you start drilling, make 
sure that the holes are level. 

4.  Use a hammer drill fitted with a 10 mm 

masonry bit and drill holes at least 60 mm 
deep at the marks.  

Important:

 The drilled holes must be 

deep enough to take the screws (K).

5.  Remove dust from the holes and push or 

tap the plugs (L) fully home into the holes.

6.  Position the wall rail with the notches on 

the top edge (see illustration).

7.  Be sure to tighten the screws properly, 

bearing in mind the material of the wall. 
Check that the wall rail is securely fixed 
by carefully applying to it a weight at least 
equivalent to the weight of the TV set 
before mounting the actual TV set.

Содержание 38-4413

Страница 1: ...E ngl i sh Sve n ska Norsk Suomi Wall Mount for 32 55 TV sets V ggf ste f r TV 32 55 Veggfeste for TV 32 55 Sein kiinnike 32 55 n televisioille Art no Model 38 4413 PSW007M Ver 201105...

Страница 2: ...2...

Страница 3: ...ight of the bracket and the TV set Always use the correct tools Two people should assist each other when mounting a heavy TV set on the wall bracket If you attempt to mount a heavy TV set on your own...

Страница 4: ...6 M6 x 25 mm 4 pcs 7 M8 x 30 mm 4 pcs 8 Spacer 10 mm 4 pcs 9 Tools Parts A to M come in separate bags A M4 x 15 mm 4 pcs B M5 x 15 mm 4 pcs C M6 x 15 mm 4 pcs D M8 x 20 mm 4 pcs E M4 x 35 mm 4 pcs F...

Страница 5: ...unsure consult an expert 1 Choose a suitable wall for the wall rail 2 Place the wall rail 1 on the wall and level it preferably with a spirit level 3 Using a pen or pencil mark up the holes to be dril...

Страница 6: ...s to be drilled These must be central on the studs If it is only possible to fix the wall rail to one stud position the wall rail so that the centre of the wall bracket is central on that stud 4 Using...

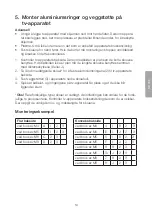
Страница 7: ...of the bolts supplied to secure the aluminium rings 2 to the back of the TV set 2 Bolt the wall support 3 into the lower bolt holes of the TV set 3 Check that there is space for the cable connections...

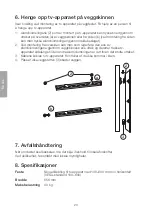
Страница 8: ...le to bring down one of the aluminium rings through one of the notches in the wall rail and then pull the TV set sideways until the other aluminium ring is directly in front of the other notch 3 Conne...

Страница 9: ...alltid r tt verktyg och var alltid tv personer vid montering av tunga TV apparater p v ggf stet Om du f rs ker att montera en tung TV apparat ensam kan det resultera i material och personskador Ta h...

Страница 10: ...25 mm 6 4 st M6 x 25 mm 7 4 st M8 x 30 mm 8 4 st distanser 10 mm 9 Verktyg Detaljerna A till M finns i separata p sar A 4 st M4 x 15 mm B 4 st M5 x 15 mm C 4 st M6 x 15 mm D 4 st M8 x 20 mm E 4 st M4...

Страница 11: ...ed en fackman om du r os ker 1 V lj en l mplig v gg f r v ggskenan 2 Placera v ggskenan 1 mot v ggytan och rikta in den v gr t anv nd g rna ett vattenpass 3 G r markeringar f r borrh l med en penna an...

Страница 12: ...h m rk ut borrh len mitt ver reglarna Om det endast g r att f sta i en regel ska v ggskenan placeras s att centrum r mitt ver regeln 4 F rborra med ca 3 5 mm borr enligt din m rkning 5 V nd v ggskenan...

Страница 13: ...2 Anv nd n gra av de medf ljande skruvarna f r att montera aluminiumringarna 2 p TV apparatens baksida 3 Skruva fast v ggst den 3 i TV apparatens nedre skruvh l 4 Kontrollera att kabelanslutningarna...

Страница 14: ...montering fr n ovansidan g r det oftast att ta ned en av aluminiumringarna genom v ggskenans ena urtag och sedan dra TV apparaten i sidled tills den andra aluminiumringen r rakt framf r det andra urt...

Страница 15: ...riktig verkt y og v r alltid to personer ved montering av tunge tv apparater og veggfester Dersom du monterer et tungt tv apparat alene kan det resultere i b de materielle skader og personskader Ta he...

Страница 16: ...6 4 stk M6 x 25 mm 7 4 stk M8 x 30 mm 8 4 stk distansestykke 10 mm 9 Verkt y Detaljene A M er i separate poser A 4 stk M4 x 15 mm B 4 stk M5 x 15 mm C 4 stk M6 x 15 mm D 4 stk M8 x 20 mm E 4 stk M4 x...

Страница 17: ...n t ler totalvekten tv apparat og feste Ved usikkerhet s k r d hos en fagperson 1 Velg et passende sted for montering av festeskinnen 2 Plasser festet 1 mot veggoverflaten Bruk gjerne vater 3 Bruk veg...

Страница 18: ...over to trestendere og merk borehullene Dersom det kun g r feste det i n stender skal veggfestet plasseres slik at midten p det er midt p stenderen 4 Forbor med et trebor p ca 3 5 mm 5 Vend veggskinn...

Страница 19: ...8 eller J 2 Ta i bruk medf lgende skruer for feste aluminiumsringene 2 til tv apparatets bakside 3 Fest veggst tten 3 i apparatets nedre skruehull 4 Sjekk at kabelut og inngangene p tv apparatet f r p...

Страница 20: ...rsiden kan man som regel f re den ene av aluminiumsringene gjennom veggskinnens ene uttak og deretter trekke tv apparatet sidelengs til den andre aluminiumsringen er rett foran det andre uttaket 3 Kab...

Страница 21: ...t kiinnikkeen ja television yhteispainon K yt tarkoitukseen sopivia ty kaluja l koskaan asenna painavaa televisiota sein kiinnikkeeseen ilman toisen henkil n apua Painavan television asentaminen ilman...

Страница 22: ...mm 6 4 kpl M6 x 25 mm 7 4 kpl M8 x 30 mm 8 4 kpl V like 10 mm 9 Ty kalu Osat A M ovat omissa pusseissaan A 4 kpl M4 x 15 mm B 4 kpl M5 x 15 mm C 4 kpl M6 x 15 mm D 4 kpl M8 x 20 mm E 4 kpl M4 x 35 mm...

Страница 23: ...n Ota yhteys asiantuntijaan jos olet ep varma 1 Valitse sopiva sein kiinnikekiskolle 2 Aseta sein kisko 1 vaakasuoraan sein lle mielell n vesivaa an avulla 3 Merkitse porauskohdat kyn ll k ytt en kisk...

Страница 24: ...dat suoraan koolausten p lle Jos kiinnitys onnistuu vain yhteen koolaukseen aseta kisko siten ett sen keskikohta on koolauksen keskikohdan p ll 4 Esiporaa noin 3 5 mm n poralla merkint jen kohdalta 5...

Страница 25: ...Kiinnit alumiinirenkaat 2 television takapuolelle pakkauksen ruuveilla 3 Ruuvaa sein tuet 3 kiinni television alempiin ruuvinreikiin 4 Varmista ett television kaapeliliit nn ille j tarpeeksi tilaa ja...

Страница 26: ...yhden alumiinirenkaista voi yleens painaa sein kiskon yl osassa olevien aukkojen l pi mink j lkeen televisiota vedet n sivusuunnassa kunnes toinen alumiinirenkaista on suoraan toisen aukon edess 3 Lii...

Страница 27: ...27...

Страница 28: ...0 E post kundesenter clasohlson no Internett www clasohlson no Post Clas Ohlson AS Postboks 485 Sentrum 0105 OSLO Suomi Asiakaspalvelu Puh 020 111 2222 S hk posti info clasohlson fi Internet www claso...

Отзывы: