


5
Parts & Service: 020 8988 7400/E-mail:[email protected] or [email protected]
THE TABLE TOP
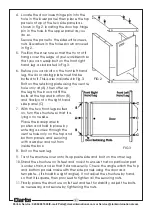
1. Turn the table top face down and attach the two drawer runners as
shown in fig 4, using three screws each side, entering them in the pre-
drilled holes in the tabletop.
2. The table is now ready to
be assembled to the
cabinet.
3. With the table top
remaining face down,
position the cabinet on
top, with the feet
uppermost.
NOTE: The front of the table top is the edge closest to the drawer runners. Take
care to align this with the front of the cabinet.
4. Line up the holes in the legs with the pre-drilled holes in the table top, and
locate with screws. Tighten fully.
5. Turn the structure back onto its feet.
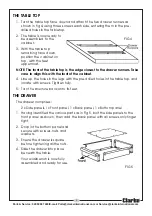
THE DRAWER
The drawer comprises:
2 x Side panels, I x Front panel, 1 x Back panel, 1 x Bottom panel
1. Having identified the various parts as in Fig 5, bolt the side panels to the
front panel as shown, then add the back panel with all screws only finger
tight.
2. Drop in the bottom panel and
secure with screws, nuts and
washers.
3. Ensure the drawer is square
before tightening all the nuts.
4. Slide the drawer into place
beneath the table.
Your workbench is now fully
assembled and ready for use.
FIG 5
FIG 4
Содержание CWB80B
Страница 1: ...ASSEMBLY INSTRUCTIONS GC05 12 Workbench with Cabinet Model CWB80B Part No 4800110 ...
Страница 8: ......