Clarke CWB80B Скачать руководство пользователя страница 4

4

Parts & Service: 020 8988 7400/E-mail:[email protected] or [email protected]

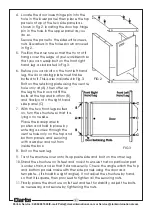
4. Locate the door lower hinge pin into the

hole in the lower panel, then place the top
panel on top of the two side panels as
shown in Fig 2, locating the door top hinge
pin in the hole in the upper panel as you
do so.

Secure the panel to the sides with screws,
nuts & washers in the holes shown arrowed
in Fig 2.

5. Position the structure so that the front of it

hangs over the edge of your workbench so
that you can easily bolt on the front right
hand leg, as indicated in Fig 3.

6. Before you can bolt on the front left hand

leg, the door closing plate must first be
bolted to it. This is also indicated in Fig.3.

Bolt on the retaining plate using the centre
hole only at (A), then offer up
the leg to the box and fit the
bolts at the top and bottom (B),
and finally on to the right hand
side panel (C).

7. With the two front legs bolted

on, turn the structure so that it is
lying on one side.

Place the back panel in
position and hold in place by
entering a screw through the
centre hole only on the top and
bottom panels, and securing
with a washer and nut from
inside the box.

8. Bolt on the rear leg.

9. Turn the structure over onto its opposite side and bolt on the other leg.

10. Stand the structure on its feet and rock it to ensure that no particular part

is under strain, and so that it stands evenly. Check the angle which the top
and bottom panels make with ther side panels using the door as a
template....(it should be right angles). If not adjust the structure by hand,
so that it is square, then proceed to tighten all the securing nuts.

11. Finally place the structure on its feet and test for stability, adjust the bolts,

as necessary, and secure by tightening the nuts.

FIG 3

FIG 2

Содержание CWB80B

Страница 1: ...ASSEMBLY INSTRUCTIONS GC05 12 Workbench with Cabinet Model CWB80B Part No 4800110 ...

Страница 2: ...t faulty manufacture for a period of 12 months from the date of purchase Please keep your receipt as proof of purchase This guarantee is invalid if the product is found to have been abused or tampered with in any way or not used for its intended purpose Faulty goods should be returned to their place of purchase no product can be returned to us without prior permission This guarantee does not effec...

Страница 3: ... You will find it easier and more comfortable to assemble the cabinet complete with legs on a workbench Additionally it is easier and quicker if an assistant screws on the nuts from inside the cabinet whilst the screw is held on the outside NOTES 1 Assembly is simplified if an extra pair of hands is available 2 All fixing screws should be finger tight ONLY until the complete structure is assembled...

Страница 4: ...p the leg to the box and fit the bolts at the top and bottom B and finally on to the right hand side panel C 7 With the two front legs bolted on turn the structure so that it is lying on one side Place the back panel in position and hold in place by entering a screw through the centre hole only on the top and bottom panels and securing with a washer and nut from inside the box 8 Bolt on the rear l...

Страница 5: ...s Take care to align this with the front of the cabinet 4 Line up the holes in the legs with the pre drilled holes in the table top and locate with screws Tighten fully 5 Turn the structure back onto its feet THE DRAWER The drawer comprises 2 x Side panels I x Front panel 1 x Back panel 1 x Bottom panel 1 Having identified the various parts as in Fig 5 bolt the side panels to the front panel as sh...

Страница 6: ...6 Parts Service 020 8988 7400 E mail Parts clarkeinternational com or Service clarkeinternational com PARTS DIAGRAM ...

Страница 7: ...8 B W C A G 6 d r a d n a t s g e L 3 6 0 B 0 8 B W C A G 7 t n o r F d n a H t f e L g e L 1 7 0 B 0 8 B W C A G 8 l e n a P r o o D 1 8 0 B 0 8 B W C A G 9 b a t s y e k w c y l b m e s s A k c o L r o o D 1 9 0 B 0 8 B W C A G 0 1 m o t t o B r e w a r D 1 0 1 0 B 0 8 B W C A G 1 1 t n o r F r e w a r D 1 1 1 B 0 8 B W C A G 2 1 k c a B r e w a r D 1 2 1 B 0 8 B W C A G 3 1 e d i S r e w a r D ...

Страница 8: ......

Отзывы: