6
Parts & Service: 020 8988 7400 / E-mail: [email protected] or [email protected]
MAINTENANCE
DISASSEMBLY
1. The filter/regulator can be disassembled without removal from air line.
2. Shut off the inlet pressure. Reduce pressure in inlet and outlet lines to zero.
3. Turn the adjustment knob fully anti-clockwise.
4. Remove the bowl by pushing into the body and turning anti-clockwise.
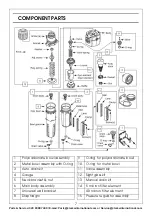
5. Disassemble in accordance with the parts illustrated on page 7. Do not
remove the drain unless replacement is necessary. Remove and replace
only if the drain malfunctions or if converting to automatic drain.
CLEANING
1. Clean the plastic bowl with warm water only. Clean other parts with warm
water and soap.
2. Rinse and dry all parts. Blow out internal passages in the body with clean,
dry, compressed air. Blow air through the filter element from inside to
remove surface contaminants.
3. Inspect all parts and replace any found to be damaged. Replace the
plastic bowl with a metal bowl if the plastic bowl is cracked or cloudy.
ASSEMBLY
1. Lubricate all o-rings, adjusting screw threads and tip, outer circumference
and both sides of thrust washer, the portion of the manual drain body that
contacts the bowl, the hole in the manual drain body that accommodates
the stem of the drain valve and valve stem with o-ring grease.
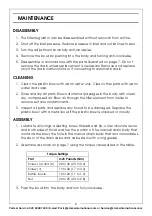
2. Assemble as shown on page 7 using the torque values listed in the table.
3. Push the bowl into the body and turn fully clockwise.
Torque Settings
Part
Inch Pounds (Nm)
Screws (a) and (b)
20 to 30 (2.3 to 3.4)
Screw (c)
15 to 30 (1.7 to 3.4)
Baffle, louvre
10 to 20 (1.1 to 1.2)
Nut
20 to 25 (2.3 to 2.8)
Содержание CAT193
Страница 8: ......

