


14
Parts & Service: 020 8988 7400 / E-mail: [email protected] or [email protected]
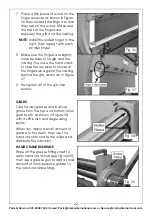
5. Turn the hand crank to process
the material through the slip
rollers. Continue turning until the
workpiece is completely through
the upper and lower rollers, as
illustrated in Figure 18.
6. Rotate the workpiece 180°, insert
the curved end into the rollers,
then process it through the
machine, as illustrated in Figure
19.
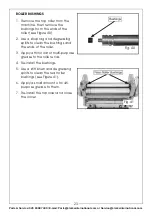
7. Reduce the radius of the curve by
raising the rear roller, then repeat
Steps 4-7 until you have produced
the desired cylinder (see the
illustration in Figure 20).
• If the ends of the cylinder do not meet, lift the rear roller equally at both
ends, then process the entire cylinder through the slip roller again.
Repeat as necessary.
• If the ends of the cylinder
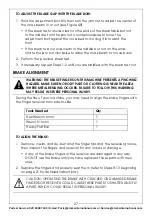
overlap, remove the cylinder as
described in “Removing the
workpiece from the rollers” on
page 15. Then, either attempt
to increase the radius by
manually bending it, or scrap
the workpiece and start this
procedure again with a new
blank.
8. When the cylinder is complete,
refer to “Removing the workpiece from the rollers” on page 15 for detailed
instructions on removing the cylinder from the top roller.
Fig. 18
Fig. 19
Fig. 20


