Page -26-
Clarke Owner's Manual -Vision 38 I\32 I/IX - 26 I/IX
7. Check the squeegee and the scrub brushes or the pad
drivers for damage.
8. Check the squeegee and the vacuum hose for damage,
leaks and obstructions.
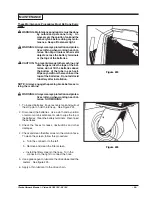
Maintenance For The Squeegee
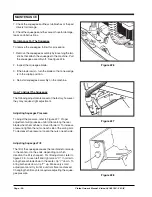
To remove the squeegee, follow this procedure:
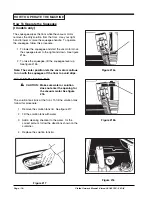
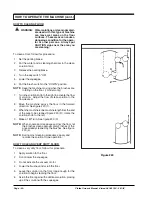
1. Remove the squeegee assembly by loosening the two
knobs that attach the squeegee to the machine. Pull
the squeegee assembly off. See figure #26.
2. Inspect the squeegee blade.
3. If the blade is worn, turn the blade so that a new edge
is in the wiping position.
4. Reinstall squeegee assembly on the machine.
How To Adjust The Squeegee
The following adjustments are set at the factory, however
they may require slight adjustment.
Adjusting Squeegee Pressure
:
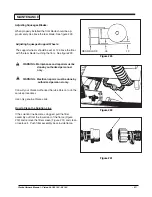
To adjust the pressure, refer to Figure #27. Proper
adjustment will produce a uniform flare along the rear
blade when the machine is moved forward. To increase
pressure, tighten the nuts on each side of the swing arm.
To decrease the pressure, loosen the nuts on each side.
Adjusting Squeegee Tilt:
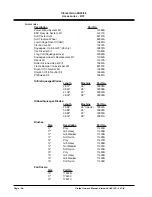
The tilt of the squeegee causes the rear blade to raise up
in the center or on the ends, depending on which
direction the tilt is changed. For tilt adjustment, refer to
figure # 28. Loosen left and right screw "X". In order to
bring the rear blade down in the center, tip "Y" down. To
bring both ends down, tip "Y" up. Make very small
adjustments and try it until a uniform flare is achieved.
Changing the tilt may also require readjusting the squee-
gee pressure.
MAINTENANCE
Figure #26
Figure #27
Figure #28
Содержание 26I-00260A
Страница 29: ...Clarke Owner s Manual Vision 38 I 32 I IX 26 I IX 29 NOTES...
Страница 54: ...Page 54 Clarke Owner s Manual Vision 38 I 32 I IX 26 I IX Clarke Vision 32 IX 26 IX ElectricalSchematic10 96...
Страница 55: ...Clarke Owner s Manual Vision 38 I 32 I IX 26 I IX 55 Clarke Vision 38 I 32 I 26 I Electrical Schematic 10 96...
Страница 62: ...NOTES...


