


VX387AU 27
English
English
Owner’s Manual
14. iPod/iPhone OPERATIONS
Select iPod Mode
1. Connect your iPod to the USB connector to the front
panel. The system will automatically detect the connected
device and switch to iPod mode and start playback after a
while.
When iPod is already connected.
2. Press the
button on the Home Screen to select
USB/iPod mode. The display will change accordingly.
3. System will start playback from the last played track of the
iPod.
Play/Pause Playback
1. Press the
button to pause during playback.
2. Press the
button to resume playback.
Switch to Previous/Next Track
Press
or
during playback to play previous/
next file.
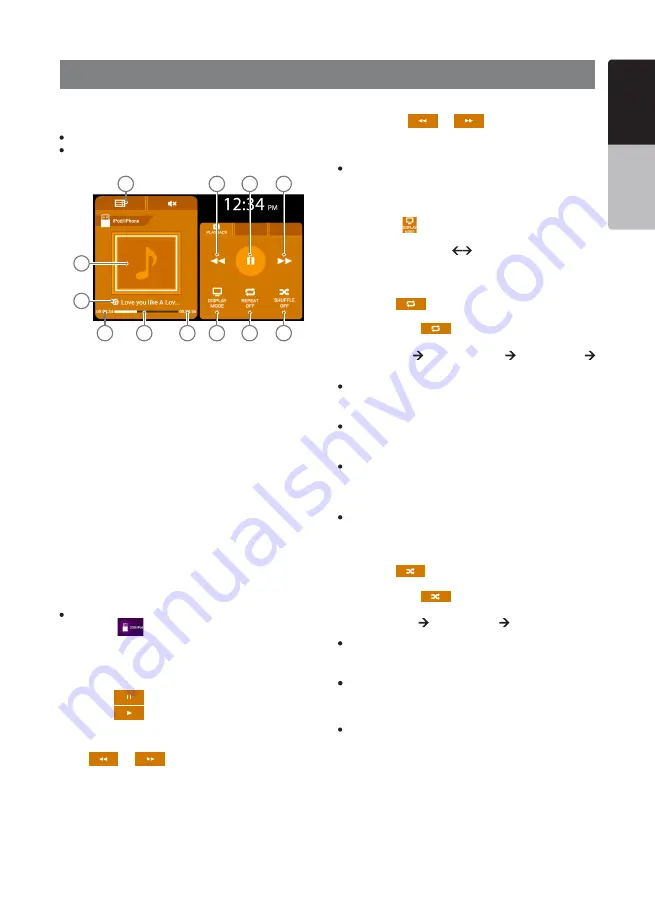
1. iPod Menu Button
2. Previous Track/ Fast Backward Button
3. Play/Pause Button
4. Next Track/ Fast Forward Button
5. Shuffle Button
6. Repeat Button
7. Toggle Display Button
8. Total Playtime
9. Playtime Progress Bar Display
10. Current Playtime
11. Track Title Display
12. Album Art Display
This section describes operations when connected to an
Apple iPod/iPhone via the USB slot.
Notes:
Read the iPod user manual for operation conditions.
The unit may not operate properly with unsupported devices or unsup-
ported versions.
Fast Forward/Backward
Long press the
or
button to start fast back-
ward or fast forward during playback. Releasing the button
will resume playback at normal speed.
Note:
The fast forward and fast backward speed may differ depending on
the iPod.
Tag Display Function
Each time the
button is pressed, the display is toggled
in the following order:
(Album Art + Song Title)
(Song Title + Album Name
+ Artist Name)
Repeat Play
1. Press the
button to select the repeat status for
playback. The text will change accordingly.
2. Every time the
button is pressed, the text will
change as:
REPEAT OFF TRACK REPEAT ALL REPEAT
REPEAT OFF…
TRACK REPEAT
Has the same behaviour as the ONE TRACK REPEAT
status of iPod. The button will be displayed as “TRK RPT”.
ALL REPEAT
Has the same behaviour as the ALL REPEAT status of
iPod. The button will be displayed as “ALL RPT”.
REPEAT OFF
In this status, none of the tracks are repeated. The button
will be displayed as “RPT OFF”.
Note:
Repeat Play for Audiobooks and Podcasts may not be available
depending on the device.
Shuffle Play
1. Press the
button to select the shuffle status for
playback. The text will change accordingly.
2. Every time the
button is pressed, the text will
change as:
SHUFFLE OFF SHUFFLE ON SHUFFLE OFF…
SHUFFLE ON
Shuffle On is equivalent to Shuffle Songs in the iPod. The
button will be displayed as “SHUFFLE ON”.
SHUFFLE OFF
Shuffle play is turned off. The button will be displayed as
“SHUFFLE OFF”.
Note:
Shuffle Play for Audiobooks and Podcasts may not be available
depending on the device.
1
10
11
12
9
8
7
6
5
2
3
4


