background image

12 VX387AU

English

Owner’s Manual

6.  BASIC OPERATIONS

Turning on/off the power

Note:

  Be careful about using this unit for a long time without running the 

engine. If you drain the car’s battery too much, you may not be able 

to start the engine and this can reduce the service life of the battery.

1. Press the [ ] knob to turn on the power.
2. It automatically remembers its last source mode and will 

automatically switch to display that mode.

3. Press the [ ] knob for more than 1 second to turn off the 

power of the unit.

Switching Source Modes

1. Press the [ ] knob to access the Home Screen.
2. When the Home Screen is displayed, press the [ ] knob 

to exit the Home Screen.

Home Screen

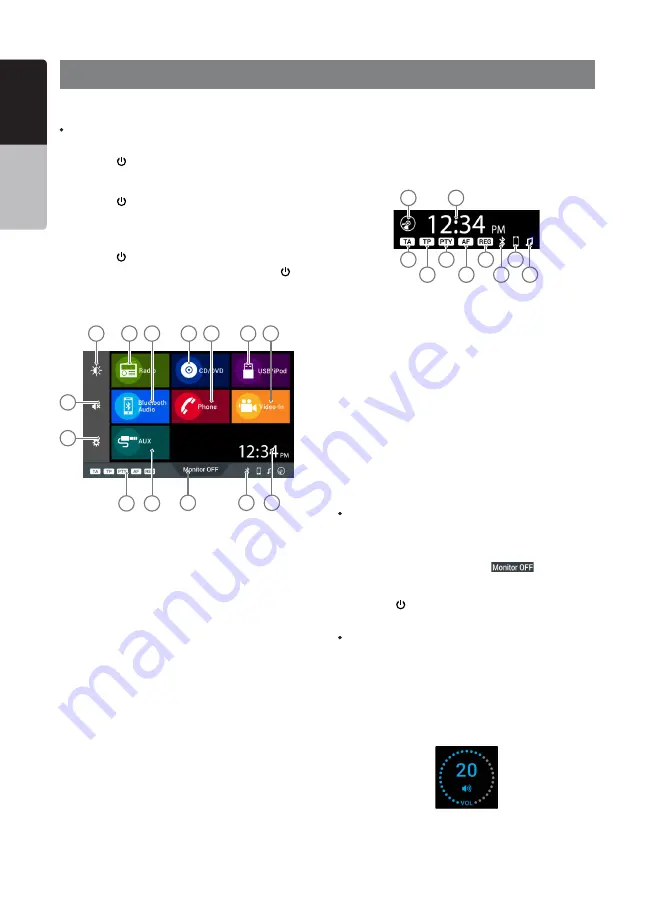
Clock and Indicators Display

The clock is displayed on the top right corner of the touch 

screen.  To adjust the clock, refer to “Settings Operations”.
The RDS indicators are displayed on the top right corner of 

the  touch  screen,  below  the  clock  display. To  adjust  RDS 

settings, refer to “RDS Operations”.

1.  CD/DVD indicator. Lights up when a CD/DVD is inserted 

into the unit.

2.  Clock Display.
3.  Bluetooth A2DP indicator. Lights up when A2DP profile is 

connected to the unit.

4.  Bluetooth HFP indicator. Lights up when HFP profile is 

connected to the unit.

5.  Bluetooth  indicator.  Lights  up  when  Bluetooth  is  con-

nected to the unit.

6.  REG indicator.
7.  AF indicator.
8.  PTY indicator.
9.  TP indicator.
10. TA indicator.

Note:

  The Home Screen indicator bar has the same indicator images but 

in a different arrangement and layout.

Turning off the Display Monitor

1. On the Home Screen, press the 

 button to turn 

off the display monitor. The screen will be blank, while the 

audio is still heard in the background.

2. Press the [ ] knob, or any area on the blank screen, for 

the display to restore.

Note:

  The [SOURCE] button on the remote control can also restore the 

display.

Adjusting the Volume

Turning  the  [VOLUME]  knob  clockwise  increases  the  vol-

ume;  turning  it  counter-clockwise  decreases  the  volume. 

The  volume  will  be  displayed  in  overlapping  the  touch 

screen for 4 seconds. Press any area of the touch screen to 

immediately cancel the volume display.

*  The volume level is from 0 (minimum) to 33 (maximum). The fac-

tory default setting for this volume is “13”.

1.  Brightness button.
2.  Radio mode button.
3.  Bluetooth Audio mode button.
4.  CD/DVD mode button.
5.  Phone mode button.
6.  USB/iPod mode button.
7.  Video-in/DVB-T2 mode button.
8.  Clock display.
9.  Bluetooth indicators.
10. Monitor OFF button.
11. AUX mode button.
12. RDS indicators.
13. Settings button.
14. Mute button.

1

2

3

4

5

6

7

10

9

8

14

13

12

11

1

2

3

4

5

6

7

8

9

10

Содержание VX387AU

Страница 1: ...VX387AU Owner s manual DVD Multimedia Station With 6 2 Touch Panel Control...

Страница 2: ...13 7 RADIO MODE OPERATIONS 14 Listening to the Radio 14 Seek Tuning 14 TP Seek 14 Manual Tuning 14 Autostore 14 Storing Preset Memory 15 Recalling a Preset Station 15 8 RDS OPERATIONS 15 RDS Radio Dat...

Страница 3: ...12 CD USB MTP AUDIO OPERATIONS 24 Playing Audio Files in CD USB memory MTP device 24 Play Pause Playback 24 Switch to Previous Next File or track 24 Fast Forward Fast Backward Operation 24 Repeat Play...

Страница 4: ...er 30 Key Input 31 Phonebook 31 History 32 Bluetooth Settings 33 Pairing with an External Device 33 Cancelling Pairing Mode 33 Connecting to a Bluetooth Device 33 Disconnecting a Bluetooth Device 34 D...

Страница 5: ...ability via USB memory MTP device Built in Bluetooth Handsfree HFP Audio Streaming A2DP AVRCP and Phonebook PBAP External Digital Video Broadcast Terrestrial 2 DVB T2 support Front panel Auxiliary Inp...

Страница 6: ...earest Clarion ser vice center for safety Professional skills and experience are requires to do so As the driver you alone are responsible for your driving safety In order to avoid a traffic accident...

Страница 7: ...istributor shall not be liable for any damage When using an USB memory stick we recommend that you backup your data stored on it before by using a per sonal computer etc Data files may be broken when...

Страница 8: ...Made for iPod and Made for iPhone mean that an elec tronic accessory has been designed to connect specifical ly to iPod or iPhone respectively and has been certified by the developer to meet Apple per...

Страница 9: ...unit is turned on to display Home Screen press again to return to current source Press and hold the knob to turn off the power Rotate the knob left or right to decrease or increase the volume RESET h...

Страница 10: ...nsure the tray is inserted in the correct direction Notes Misuse may result in rupture of the battery producing leakage of fluid and resulting in personal injury or damage to surrounding materials Alw...

Страница 11: ...ction Menu PTY must be turned on Press this button in CD USB MTP mode to enter exit the directory view Press this button in iPod mode to enter exit the iPod Menu Press this button in Radio mode to swi...

Страница 12: ...hen HFP profile is connected to the unit 5 Bluetooth indicator Lights up when Bluetooth is con nected to the unit 6 REG indicator 7 AF indicator 8 PTY indicator 9 TP indicator 10 TA indicator Note The...

Страница 13: ...t the unit can only be displayed when the parking brake is enabled when the car is parked The audio portion of the video can still be played but a blank screen will be displayed in place of the video...

Страница 14: ...is not lit if you press the button TA in the display lights up and the unit automatically searches for a TP station 3 If a TP station is not received the unit continues the search operation Press the...

Страница 15: ...ET button recalls the stored radio frequency RDS Radio Data System Press the RDS button to select the RDS Tab The tab con trols will change accordingly This unit has a built in RDS decoder system that...

Страница 16: ...t broadcast reception is cancelled and the unit returns to the TA standby mode Searching for a TP station 1 When TP is not lit if you press the button TA in the display lights up and the unit automati...

Страница 17: ...ous receiving station Volume Setting of TA Emergency Broadcast and PTY The volume for TA emergency broadcast and PTY inter rupts can be set during their respective interrupts The factory default setti...

Страница 18: ...ystem When writing an MP3 WMA AAC file on a disc please select ISO9660 level 1 or level 2 without including ex pansion format as the writing software format Normal playback may not be possible if the...

Страница 19: ...oaded Auto reload If you leave the ejected CD without removing it it will be drawn into the unit automatically after about 15 seconds USB This system can play audio files MP3 WMA AAC stored in an USB...

Страница 20: ...ect direction as this will damage the USB memory device as well as the USB slot Watching Listening to a track with USB memory MTP device 1 If a USB memory MTP device have been inserted press the HOME...

Страница 21: ...ume playback Skip Search a Chapter Press CHAPTER or CHAPTER button during playback Chapters are skipped down or up from current locations as many times as the button is pressed and playback start Skip...

Страница 22: ...ossible on some scenes Switching Subtitles On discs which have two or more subtitle language options you can switch among the subtitle languages during play back 1 Showing the button menu press the bu...

Страница 23: ...ll change accordingly 2 Every time the button is pressed the text will change as RPT OFF VIDEO RPT FLD RPT RPT OFF VIDEO RPT Video Repeat The current video will be repeated after finish playing FLD RP...

Страница 24: ...ast backward speed may differ depending on the media device Repeat Playback 1 Press the button to select the repeat status for playback The text will change accordingly 2 Every time the button is pres...

Страница 25: ...n to enter directory view 2 Press the track title on the display list The selected track will start playing 3 When the desired track is not displayed press and to flick the track list up and down 4 Wh...

Страница 26: ...Button 2 Effect Mode Toggle Button 3 Rotate Operation Button 4 Repeat Button 5 Next Picture Button 6 Previous Picture Button 7 Play Pause Button 8 Directory Path Display 9 Picture Number Display Play...

Страница 27: ...during playback Releasing the button will resume playback at normal speed Note The fast forward and fast backward speed may differ depending on the iPod Tag Display Function Each time the button is p...

Страница 28: ...gories Playlists Artists Albums Songs Genres Composers Audiobooks Podcasts Availability depends on iPod 1 Exit iPod Menu Button 2 Category Track List 3 Page Down Button 4 Page Up Button 5 Return Butto...

Страница 29: ...gmented or switch noises may be generated Playing Music After the connection with a Bluetooth audio player is estab lished the play mode is automatically engaged When playback is not started for some...

Страница 30: ...n is dependent on Bluetooth connected phone 1 Voicedial Button 6 5 4 3 2 1 7 1 Return Button 2 Voicedial Tab 3 Key input Tab 4 Phonebook Tab 5 History Tab 6 Bluetooth Settings Tab 7 Tab display Differ...

Страница 31: ...ress the button again 7 Press the button to mute the microphone The voice from another side can be heard but the other side cannot hear the voice from here 8 Press the button to show the keypad Press...

Страница 32: ...g informa tion will be erased and replaced with the new downloaded History Bluetooth Telephone Operations 2 1 4 1 3 2 Download Contacts 1 Press the button to download the contacts 2 Press the button t...

Страница 33: ...rts Simple Secure Pairing SSP both device and head unit will display the same random 6 digits pairing code 4 Confirm the pairing code on the head unit and the de vice Only the same pairing code will b...

Страница 34: ...Select Reset Bluetooth in the Bluetooth Settings tab A confirmation screen will be displayed on the unit 2 Press to confirm or to cancel the process Notes All pairing information will be deleted 3 If...

Страница 35: ...e AUX input 18 VIDEO INPUT DVB T2 OPERATIONS 1 When an external DVB T2 receiver is connected to the unit press the button on the Home Screen to select DVB T2 mode to view digital television broadcast...

Страница 36: ...justment range for balance is R12 to F12 2 Pressing the button emphasizes the sound from the front speakers 3 Pressing the button emphasizes the sound from the rear speakers 4 Press the button to rese...

Страница 37: ...audio on the unit 1 Press the button to toggle the loudness function on or off The button display will change accordingly Subwoofer Controls High Pass and Low Pass Filters 1 Press the button to selec...

Страница 38: ...ingly Note The button is only available in 12 Hour clock display 1 Reset Button 2 Exit Button 3 Programmable Buttons 1 Select Programmable Steering Remote Control on the General Settings menu A series...

Страница 39: ...y 1 Current Mode Layout 2 Next Category Button 3 Increase Effect Button 4 Progress Bar Display 5 Category Name Display 6 Decrease Effect Button 7 Previous Category Button Touch Panel Calibration Scree...

Страница 40: ...he light receptive part of the remote control unit it may not work The battery of the remote control unit is dead or there is no battery in the remote control unit Check the battery of the remote cont...

Страница 41: ...is not supported Use a file with supported video codec Video is played without audio Audio codec is not supported Use a video file with supported audio codec Music is muted and skips to the next file...

Страница 42: ...unds distorted or is intermittent Volume is too loud depends on the car environment speakers and microphone and half duplex mode is automatically triggered Try reducing the telephone volume level Call...

Страница 43: ...not engaged Check that the parking brake is engaged The display is dark The Brightness control is too low Adjust the Brightness properly The headlight of the vehicle is lit The display is made dark a...

Страница 44: ...vice An error occurred when controlling the device Disconnect the device and reconnect it again Disconnect and restart the iPod device and reconnect it again The device is connected via the USB Hub Di...

Страница 45: ...mpeg VOB vob DAT dat Playable image format JPEG jpeg Rear USB port Charging only Specification USB 2 0 Charging Power 1 5A iPod iPhone Refer to Supported iPod iPhone Devices Screen Screen size 6 2 inc...

Страница 46: ...Printed in Malaysia VX387AU...

Отзывы: