background image

21

CLAGE

EN

Classic

Arc

4. Installation

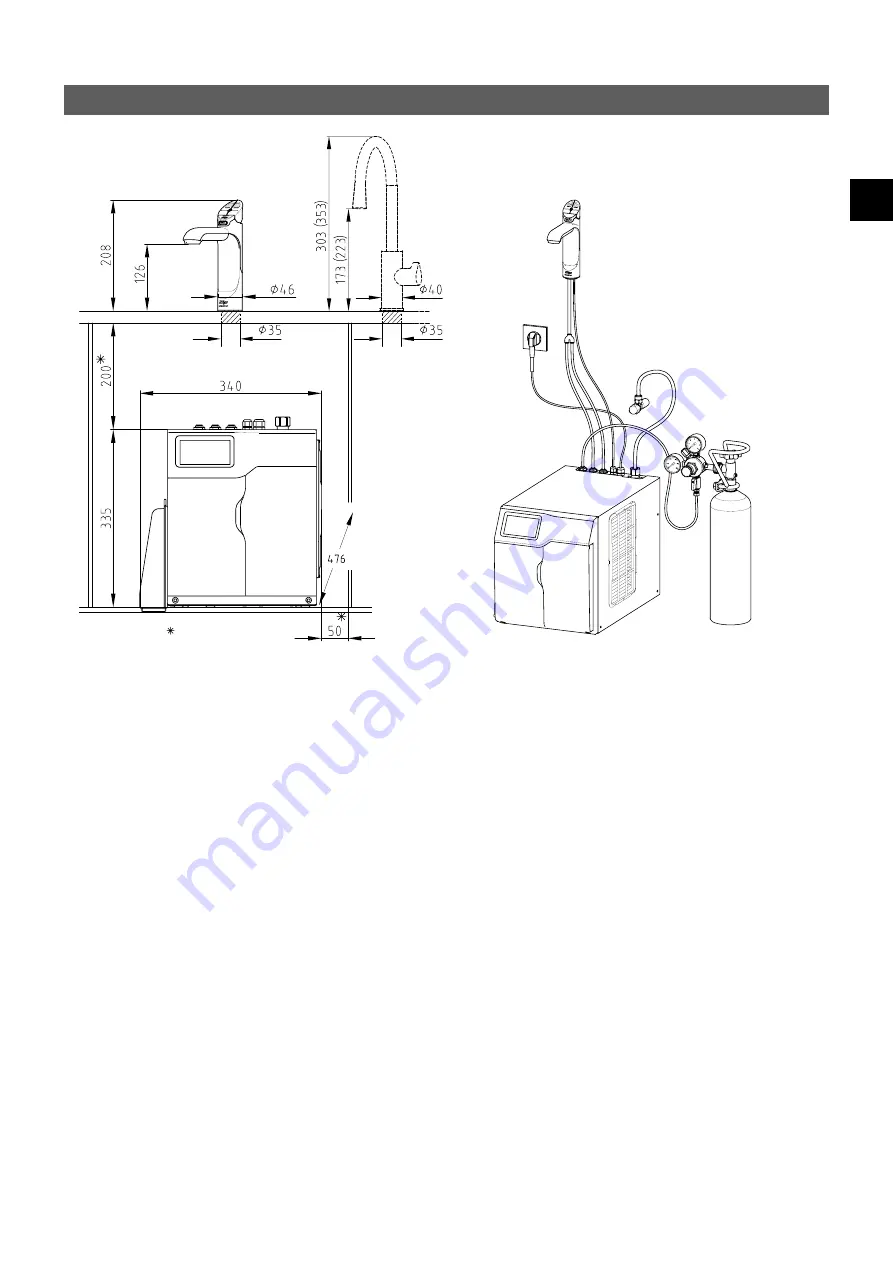
Dimensions in mm

Min. clearance  
distance (in mm)

CO

2

 bottle (obtainable 

from specialist shops)

Electrical connection  

with plug 

230 V AC 50 Hz

Angle valve  
(customer’s)

The following regulation must be observed:

•  VDE 0100
•  EN 806
•  Installation must comply with all statutory regulations, as well as those of the local electricity and water supply companies.
•  The rating plate and technical specifications

Before installation, ensure that: 

•  There is enough space for the undersink unit, the carbon dioxide bottle and the additional ventilation (see drawing).
•  The undersink unit and the carbon dioxide bottle will stand upright on a horizontal surface.
•  A socket fitted with at least a 10 A fuse is available within reach of the power cord and the socket will still be accessible after the 

unit has been installed.

•  A water supply connection at the rated pressure of the appliance with an isolating valve is available within reach of the feed pipe 

and the connection will still be accessible after the unit has been installed.

In addition to standard tools, the following special tools may be required:

•  35 mm diameter sheet metal hole punch for sink tops (not supplied)
•  35 mm diameter hole saw for timber worktops (not supplied)
•  Pipe wrench (supplied) for fixing the tap

Handling the plastic hoses and push-fit connector (supplied):

•  If shortening the hoses be sure to make a clean cut straight across the hose, using a sharp blade. Never pinch off the hose with a 

blunt instrument.

•  The hoses must not be under tension when installed. The minimum bending radius is 25 mm. If there is a kink in the hose, there is 

a risk of leakage at the kink.

•  Push the hose into the quick-release connector as far as it will go (approx. 15 mm) to ensure a tight connection.

Содержание Zip HydroTap G4 CS 175

Страница 1: ...v2 1 09 19 0053DE0S2ZN1C 803317DE de 2 en 18 fr 34 Gebrauchs und Montageanleitung Operating and installation instructions Zip HydroTap G4 CS175 Zip HydroTap G4 CS175...

Страница 2: ...e 5 Installation Classic 6 Installation Arc 6 Installation der Untertischeinheit 7 Optional Installation mit KXB 8 Optional Installation des Tableaus 9 Inbetriebnahme 10 5 Gebrauch 11 Bedienung 11 Men...

Страница 3: ...gr nden nicht allein angehoben werden Das genaue Gewicht ist den technischen Daten zu entnehmen Benutzen Sie das Ger t nur nachdem es korrekt installiert wurde und wenn es sich in technisch ein wand f...

Страница 4: ...m flachen Ablauftableau an beliebiger Stelle platziert 2 Ger tebeschreibung 3 Technische Daten Typ Zip HydroTap G4 CS175 Nennspannung Nennleistung 230V AC 0 45kW Nenndruck MPa bar 0 25 0 70 2 5 7 0 Te...

Страница 5: ...enenfalls folgende Spezialwerkzeuge ben tigt Blech Lochstanze mit 35mm Celsius Arc 50mm Durchmesser f r Sp len nicht im Lieferumfang enthalten Lochs ge mit 35mm Celsius Arc 50mm Durchmesser f r Holzar...

Страница 6: ...dem Boden des Untertischger tes installiert werden um einen zu niedrigen Wasserdruck zu ver meiden Hinweis Die Armatur darf unter keinen Umst nden gedreht werden nachdem sie fest montiert wurde Die Ar...

Страница 7: ...tter Vergewissern Sie sich vor dem Festziehen der Mutter dass der Armaturkopf in die gew nschte Richtung zeigt Achten Sie auf den korrekten Sitz des O Rings unter dem Sockel Installation der Untertisc...

Страница 8: ...ptschacht und fixieren Sie ihn mit den zwei kleinen Schrauben am Unterschrankboden 9 Stellen Sie das CS175 auf den KXB und installieren Sie den seitlichen L ftungsschacht des Ger tes passend im daf r...

Страница 9: ...Hinweis Die Kohlendioxid Gasflasche darf keiner Hitze oder direkter Sonnenstrahlung ausgesetzt werden Beachten Sie daher die maximale Umgebungstemperatur von 35 C und sorgen Sie gegebenenfalls f r K h...

Страница 10: ...cheint die Aufforderung den Karbonisator mit Kohlendioxid zu sp len a Tippen Sie Start um die Sp lung zu starten Daraufhin str mt Kohlendioxid durch das Ger t und h rbar aus der Armatur b Tippen Sie n...

Страница 11: ...Taste niedergedr ckt wird flie t gek hltes Wasser solange sie festgehalten wird Wenn die Taste angehoben wird flie t Wasser f r eine im Men einstellbare Zeitdauer zwischen 5 und 15 Sekunden Anschlie e...

Страница 12: ...r wird mit Kohlendioxid her ausgesp lt um eine einwandfreie Funktion des Karbonisators sicherzustellen Tippen Sie nach etwa 10 Sekunden auf Stopp um die CO2 Sp lung zu beenden Kalibrierung Lichtsensor...

Страница 13: ...ng 1 Schlie en Sie die Wasserversorgung wieder an und ffnen Sie das Eckventil Achten Sie auf eventuelle Undichtigkeiten 2 Stecken Sie den Netzstecker wieder in die Steckdose und schalten das Ger t ein...

Страница 14: ...en Sie die Gasflasche aus und sichern Sie die neue Gasflasche mit der Halterung gegen Umfallen Verbinden Sie den Druckminderer mit der neuen vollen Gasflasche Ziehen Sie dabei die berwurfmutter ma vol...

Страница 15: ...elle Datum Dabei muss eine Ber hrung der O Ringe und der ffnung des Filters vermieden werden da dies eine Bakterienkontamination des Filters zur Folge haben k nnte 6 Schieben Sie die neue Ersatzfilter...

Страница 16: ...hger t berpr fen Langsames Wiederauff llen des Ger tes nach Entnahme Filter verstopft berpr fen ob ein notwendiger Filterwechsel durch Blinken der wei en LED angezeigt wird Wasser nicht kalt Sehr h uf...

Страница 17: ...gs und Gebrauchsanleitung eigenm chtige Eingriffe in das Ger t oder Einbau von Ersatzteilen die nicht vom Hersteller stammen entstanden sind Die Garantie erstreckt sich ferner nicht auf die nat rliche...

Страница 18: ...21 Installing Classic 22 Installation Arc 22 Installing the undersink unit 23 Optional Installation with KXB 24 Optional Installing the tray 26 Commissioning 26 5 Using the Tap 27 Operation 27 Menu 28...

Страница 19: ...d not attempt to lift it on their own The exact weight is shown in the Technical Data Do not use the appliance until it has been correctly installed and unless it is in perfect working order The appli...

Страница 20: ...raining tray as desired 2 Description of Appliance 3 Technical Data Model Zip HydroTap G4 CS175 Rated voltage rated power 230V AC 0 45kW Rated pressure MPa bar 0 25 0 70 2 5 7 0 Cold water temperature...

Страница 21: ...still be accessible after the unit has been installed A water supply connection at the rated pressure of the appliance with an isolating valve is available within reach of the feed pipe and the conne...

Страница 22: ...circumstances should the tap be twisted after the installation is complete The Arc can be fixed in three positions for left and right handed operation and the spout height can be set in two levels see...

Страница 23: ...min 10mm from the left side wall and min 115mm to the front cover There must be a distance from at least 10cm between the cut outs A and B to avoid a thermal short circuit O Ring Rubber seal Socket N...

Страница 24: ...front of the cupboard floor 4 Adjust the depth of the main box section 2 by sliding the box back to suit the depth of the CS175 max 50mm Check that both sides of the main box are parallel with the ou...

Страница 25: ...ave a minimum room volume of 17m3 for every kg of bottle capacity 8 Secure the gas bottle in an upright position to the gas bottle holder 9 Connect the undersink unit to the pressure reducer for the g...

Страница 26: ...n facing the sink Drill a 13mm diameter hole in the drain pipe behind the snap connecting sleeve for a drain connection Use a suitable sealant to make a watertight seal between the snap connecting sle...

Страница 27: ......

Страница 28: ...che Hole for tap connecting hoses Trou pour les tuyaux de raccordement de la robinetterie ffnung f r die Tableauvertiefung Hole for tray recess Ouverture pour la cuvette du tableau Aussparung f r den...

Страница 29: ......

Страница 30: ...leaus Outside diameter of tray Diam tre ext rieur du tableau Loch f r die Armatur Anschlussschl uche Hole for tap connecting hoses Trou pour les tuyaux de raccordement de la robinetterie ffnung f r di...

Страница 31: ...emplate for the Tray Arc 77 5 38 8 67 1 67 1 10 Ma stab 1 1 Scale 1 1 chelle 1 1 Bohrung f r den Befestigungsbolzen Hole for fastening bolt Orifice pour le boulon de fixation Gabarit de montage pour l...

Страница 32: ......

Страница 33: ...21 73 Loch f r die Armatur Anschlussschl uche 35mm 0 5 mm Ma stab 1 3 3 Scale 1 3 3 chelle 1 3 3 Ma stab 1 1 Scale 1 1 chelle 1 1 Au endurchmesser des Tableaus Outside diameter of tray Diam tre ext r...

Страница 34: ......

Страница 35: ...timum flow rate Note If you adjust the flow rate too high you will empty the carbonation can of water leaving only CO2 to be dispensed from the tap Take care NOT to use excessive force during adjustme...

Страница 36: ...ated at the filter in a collecting container and open the isolating valve on the hose before starting to flush the filter Reset filter resets the filter consumption data CO2 flush air and water inside...

Страница 37: ...subpoint Install and subsequently drain at least 2 litres of cold water from the fitting If necessary collect the water in a suitable container 5 The appliance is now ready for use Note If the system...

Страница 38: ...as bottle to the pressure reducer Remove the gas bottle and secure the new gas bottle in place on the holder so that it cannot topple over Connect the pressure reducer to the new full gas bottle Tight...

Страница 39: ...rite today s date in the space provided at the label Avoid contact with the O rings and filter opening as that could result in bacterial contamination of the filter 6 Push a new replacement filter car...

Страница 40: ...ing water Filter blocked Check whether the white LED is flashing indicating that the filter needs to be replaced Water not cold Very frequent use Wait for the blue lever to show a steady light Possibl...

Страница 41: ...inlet or outlet fittings failure to follow the installation mainte nance and use instructions unauthorised modifications to the unit or use of spare parts not originating from the manufacturer Natura...

Страница 42: ...38 Installation Arc 38 Installation de l unit sous vier 39 En option Installation avec KXB 40 En option Installation du tableau 41 Mise en service 42 5 Utilisation 43 Utilisation 43 Menu 44 Non usage...

Страница 43: ...techniques N utiliser le dispositif qu une fois celui ci install correctement et qu il se trouve en parfait tat technique Le dispositif doit tre mis la terre Ne jamais ouvrir le dispositif sans aupar...

Страница 44: ...un tableau d coulement plat Type Zip HydroTap G4 CS175 Tension puissance nominale 230V AC 0 45kW Pression nominale MPa bar 0 25 0 70 2 5 7 0 Plage de temp rature eau froide C 5 10 Volume d eau gazeuse...

Страница 45: ...arr t ayant la pression nominale du dispositif se trouve port e de la conduite d arriv e et qu il soit encore port e apr s l installation du dispositif Outre les outils usuels les outils suivants pour...

Страница 46: ...cas tre tourn e une fois qu elle a t mont e de mani re fixe Le mod le Arc peut tre fix sur 3 positions pour les droitiers et les gauchers et la hau teur de sortie peut tre r gl e sur deux niveaux voi...

Страница 47: ...doivent se trouver une distance d au moins 10cm l une de l autre afin d viter un pont thermique Fixez la robinetterie avec l crou de fixation Assurez vous avant de serrer l crou que la t te du robinet...

Страница 48: ...l armoire au moyen des deux petites vis 9 Placer le CS175 sur le KXB est installer le puits de ventilation lat ral du dispositif correctement dans la d coupe de ventilation du puits principal pr vue c...

Страница 49: ...e pression et ainsi la s curit du dispositif Indications La bouteille de dioxyde de carbone ne doit pas tre expos e la cha leur ou au rayonnement solaire direct Respecter donc la temp rature ambiante...

Страница 50: ...ans la prise 5 La demande de rin age du carbonateur avec du dioxyde de carbone apparait sur l cran a Appuyer sur D marrage pour lancer le rin age Du dioxyde de carbone coule alors travers le dispositi...

Страница 51: ...Utilisation Classic Appuyer sur la touche bleue glac e pour tirer de l eau glac e De l eau glac e coule tant que la touche est maintenue enfonc e Lorsque la touche est relev e l eau coule pendant une...

Страница 52: ...veau du filtre dans le r cipient collec teur et ouvrir la vanne d arr t du tuyau avant de commencer le rin age du filtre R initialiser le filtre r initialise les donn es d utilisation du filtre Rin ag...

Страница 53: ...l eau cesse de couler pour vider le dispositif 3 Fermer l alimentation en CO2 4 Mettre le dispositif hors tension au moyen de l interrupteur sur le c t droit et d brancher la fiche secteur Apr s un no...

Страница 54: ...s anti horaire pour r duire la pression et dans le sens horaire pour l augmenter b Bouteille de gaz avec molette Ouvrir la molette sur la bouteille de CO2 Tourner la vis de r glage 2 pour modifier la...

Страница 55: ...int torique et l ouverture du filtre car cela pourrait entra ner une contamination bact rienne du filtre 6 Ins rer la nouvelle cartouche de filtre de remplacement dans le support de filtre et la verro...

Страница 56: ...ltre bouch V rifier si un changement de filtre n cessaire est indiqu par le clignotement de la LED blanche L eau n est pas froide Utilisation tr s fr quente Attendre jusqu ce que la LED bleue soit all...

Страница 57: ...ntie Le mieux sera de nous envoyer le certificat de garantie pour inscription apr s l installation Le droit la garantie ne s applique pas en cas de dommages ou dysfonctionnements caus s par l entartra...

Страница 58: ...ng water Press the Select button until the LEDs light up white then turn the lever Tirer de l eau gazeuse Appuyer sur la touche Select jusqu ce que les LEDs s allument en blanc puis tourner le levier...

Страница 59: ......

Страница 60: ...technical changes design changes and errors Sauf modifications techniques changements constructifs et erreur ou omission 9120 91937 09 19 CLAGE GmbH Pirolweg 1 5 21337 L neburg Deutschland Telefon 49...

Отзывы: