Citronic 170.885UK Скачать руководство пользователя страница 7


170.885UK User Manual 

REC - Record Function  


Insert a USB pen drive which is formatted to FAT32 in order to record the main output onto it.  

If there are any audio files already stored on the USB device, they will begin to play automatically.  

Press and hold the MENU button and this will enter the recording mode in a paused state.  

Press 

/

 to begin recording and 

/

 to pause or continue. Hold 

/

 to stop and store the file.  

The recording will be stored as an mp3 file named “FILE****.mp3” where **** is the track numb

er.  

Each recorded file 

will be stored onto the USB media in a folder named “JL_REC”. 


SYS - System Menu  


Backlight: Press 

/


to select “Backlight” and use 

 and 

 to choose the time-out value for the display 

backlight  

 
10sec, 30sec, 1min, 5min, 10min or never.  


This is the time of no activity before the display backlight automatically switches off and then will switch on 

again when any button is pressed.  


Contrast: Press 

/


to select “Contrast” and use


 and 

 to choose the balance of LCD to backlight. This 

helps to set the optimum clarity of the display for reading.
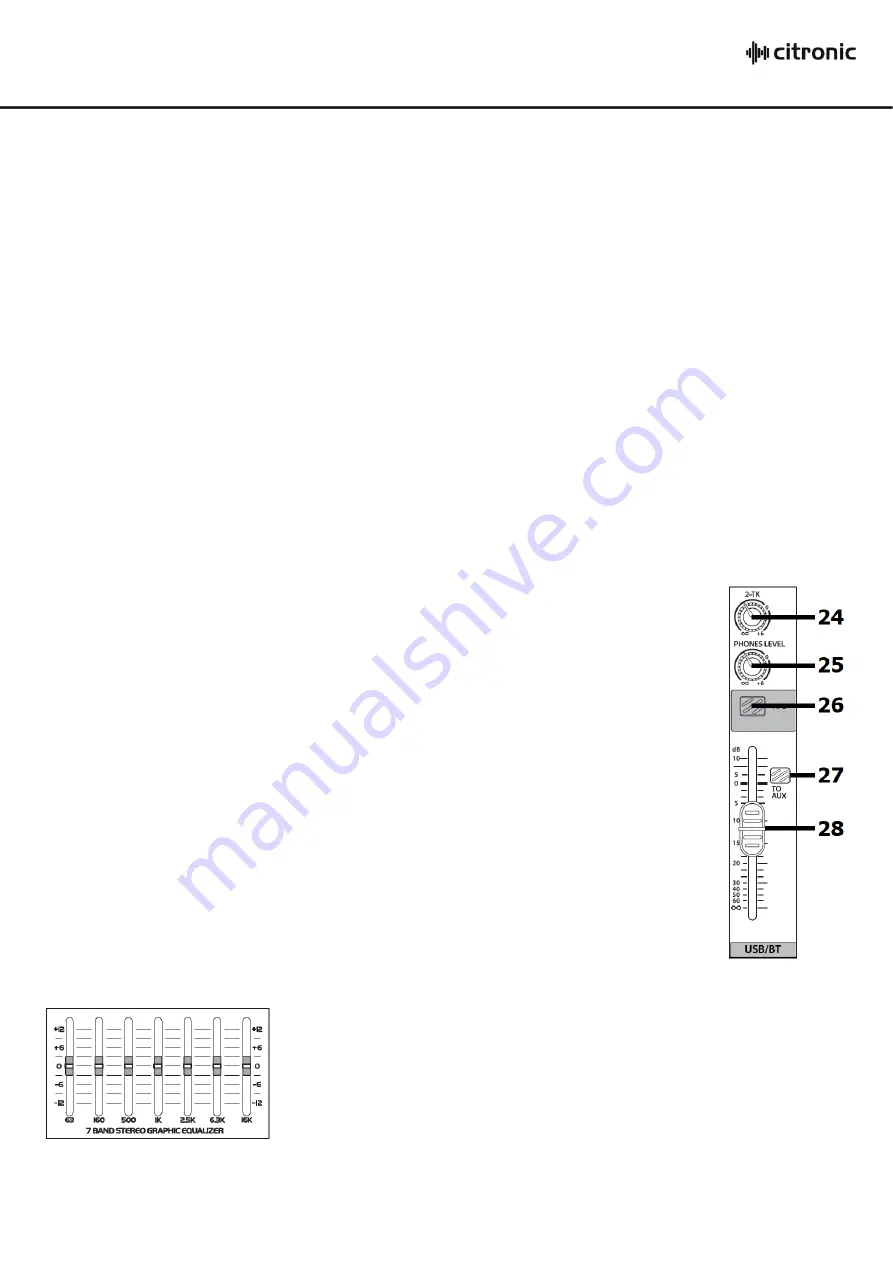


2-TK/USB/BT Channel 


24.


2-TK 


Adjusts the level of the 2-TK input (L+R RCA input) to the  

Main L/R outputs 


25.


PHONES LEVEL  Adjusts the volume of the headphones and monitor outputs 


26.


AFL 


After Fade Listen: routes USB player/recorder or BT wireless receiver  

output to the headphones and monitor outputs and LED VU meters. 


27.


TO AUX   

When pressed in, this will route the USB player/recorder or BT  

wireless receiver to the AUX output. Ideal for sending guide tracks or 

prompts to stage monitors. 


28.


USB/BT Fader 

Controls the playback output volume of the USB Media 


Player/Recorder or BT wireless receiver for playback 


Graphic EQ 


The main EQ is a stereo 7-band graphic equalizer to give overall tone 

shaping and can be used to help avoid feedback in live microphone 

setups.  


Each band controls a boost or cut of up to 12dB centred at the specified 

frequency indicated at the bottom of each slider. 


Running from bass to treble, these are 63Hz, 160Hz, 500Hz, 1kHz, 2.5kHz, 6.3kHz and 16kHz 

DSP Effects (FX) 

Содержание 170.885UK

Страница 1: ...CSX 18 MIXING CONSOLE Item ref 170 885UK User Manual Version 1 0 Caution Please read this manual carefully before operating Damage caused by misuse is not covered by the warranty ...

Страница 2: ... to rain or moisture If liquids are spilled on the console stop using immediately allow the unit to dry out and have checked by qualified personnel before further use Avoid impact or heavy vibration to any of the components No user serviceable parts inside refer servicing to qualified service personnel Safety Ensure that the correct mains lead is used with adequate current rating and that the main...

Страница 3: ...path throughout the signal chain The input stages are repeated across each channel of the console which simplifies operation and enables quick and easy location of various controls The following pages of this manual are divided up into these stages to explain the details and function of each control Mic Line Input Connections Channel inputs are provided as XLR and or 6 3mm jack sockets The connect...

Страница 4: ...el level on the main VU LEDs 3 GAIN control This control trims the input signal to the optimum level for the channel strip circuitry Too low a signal level can result in a weak signal to noise ratio and too high can result in overload and distortion in the signal output 4 Stereo inputs The two right most input channels on the console are stereo with Left and Right 6 3mm jack inputs Alternatively a...

Страница 5: ...nal direct to monitoring This means that the channel signal is shown on the main VU LEDs and routed directly to the headphones output If many PFLs or AFLs are selected all are routed to monitoring 13 Channel fader 60mm fader to adjust the channel level to the master output Output Section 14 2 TRACK INPUT L R RCA line input shared with MPR 15 2 TRACK OUT L R RCA line output for recording or Monitor...

Страница 6: ...VICE To initiate playback of audio files from a USB pen drive insert the pen drive into the USB port 21 Playback should start automatically If not press the button or remove the USB drive and check that the files stored are either mp3 wma ape or flac format before re inserting the drive During playback the display will show the file name elapsed time playback mode and track number To navigate thro...

Страница 7: ...ast and use and to choose the balance of LCD to backlight This helps to set the optimum clarity of the display for reading 2 TK USB BT Channel 24 2 TK Adjusts the level of the 2 TK input L R RCA input to the Main L R outputs 25 PHONES LEVEL Adjusts the volume of the headphones and monitor outputs 26 AFL After Fade Listen routes USB player recorder or BT wireless receiver output to the headphones a...

Страница 8: ...ignals 33 AFL After Fade Listen routes AUX output to the headphones and monitor outputs and VU meters 34 FX MASTER Master volume control for output of DSP FX 35 AFL After Fade Listen routes DSP FX output to the headphones and monitor outputs and VU meters 36 TO AUX Press in to send DSP FX output to the AUX bus 37 EFFECTS Fader Controls the output of the DSP FX to the main mix Main Output 38 48V Ph...

Страница 9: ...170 885UK User Manual ...

Страница 10: ...wn When using condenser microphones check that 48V phantom is on Check that PFL AFL buttons are all switched out Check that all Graphic EQ sliders are not fully down For MPR digital audio inputs check signal routing Power light and VU LEDs lighting but no speaker output Check output connections to speakers Check that speakers are in good working order Check MASTER faders are not fully down No play...

Отзывы: