background image

209

Istruzioni per l’uso

1

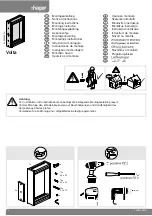
Correzione della posizione

La posizione dello stampo del foglio millimetrato RSP sulla piastra base RSP può esse-

re modificata orizzontalmente, verticalmente e diagonalmente (± 1,5 mm).

•  Innanzitutto stringere le viti a testa piatta della cerniera di chiusura posteriore, 

quindi serrare le corrispondenti viti a testa piatta della cerniera di chiusura ante-

riore e spostare secondo necessità (Fig. 1).

•  Stringere nuovamente le viti a testa piatta della cerniera di chiusura anterio-

re, tensionare il foglio con l’aiuto dello sblocca cerniera sulla cerniera di chiusura 

posteriore e stringere nuovamente le viti a testa piatta.

Содержание RSP System 2.0

Страница 1: ...mpany RSP System 2 0 MEA00063 DT NR190528 DE Bedienungsanleitung 3 EN Operating Manual 47 ES Manual de instrucciones 91 FR Manuel d utilisation 135 IT Istruzioni per l uso 179 CS N vod k pou it 223 DE...

Страница 2: ...CITO SYSTEM GmbH Haimendorfer Str 37 46 90571 Schwaig bei N rnberg Germany Phone 49 911 95885 0 Fax 49 911 95885 500 info cito de www cito de...

Страница 3: ...a CITO GROUP Company RSP System 2 0 Das System zum Rillen Stanzen Anstanzen und Perforieren in Offsetdruckmaschinen Bedienungsanleitung DEUTSCHE VERSION NR190528 DE...

Страница 4: ...fbringen des RSP Gegendruckschutzbleches 10 Schritt 2 Einbau der RSP Basisplatte 12 Schritt 3 Einspannen der RSP Standfolie bzw des RSP Direktstanzbleches 12 4 Einbau des RSP System 2 0 16 4 1 SM 52 D...

Страница 5: ...rieben werden Automatische Waschanlage nicht benutzen Auftragswalzen abstellen Druckplatte ausbauen Rasterwalze Lackauftragswalze im Lackwerk ausbauen Abstand f r ersten Abzug auf 0 35mm zwischen Gumm...

Страница 6: ...Einh ngen der RSP Standfolie oder der RSP Direktstanzble che c Printstartmarkierung zum Positionieren der RSP Basisplatte an der Druckanfangslinie des Gummituchzylinders 2 RSP Standfolie a Dimensionss...

Страница 7: ...erden Zum Aufkleben der RSP Stanzbleche unsere auf die erforderliche H he abgestimmte Spezialklebefolie verwenden 6 RSP Direktstanzbleche RSP Direktstanzbleche m ssen nach dem RSP Konstruktionsstandar...

Страница 8: ...olie aufkleben und mit den beigelegten Klebeb ndern sichern Abb 3 Achtung Keine Bearbeitungslinien oder Stanzbleche Stanzblech r nder in den gekennzeichneten Greiferrand kleben Hinweis beim Aufbau Die...

Страница 9: ...ndfolie und dem Direktstanzblech Tipp Bei bestimmten Papiersorten bzw durch L ngs und Querabwicklung hat man unterschiedliche Druckverh ltnisse in der Druck maschine Es empfiehlt sich die querliegende...

Страница 10: ...mkomponenten einsetzen Beim Ein und Ausbau von RSP Gegendruckschutzblechen empfehlen wir Sicherheitshand schuhe RSP Zubeh r zu tragen Zum sicheren und einfachen Ausbau von RSP Gegendruckschutzblechen...

Страница 11: ...schutzblech mit dem beigelegten Klebeband am Druckanfang und Druckende sichern bei l ngerem Maschinen stillstand Klebehaftung vor Druckmaschi nenanlauf berpr fen Abb 2 Abstand Gummituch zu Gegendruckz...

Страница 12: ...durch Vorw rtstippen einziehen RSP Basisplatte in die hintere Gummituchspannwelle einh ngen und unter Verwendung eines Drehmomentschl ssels mit 25Nm spannen Vordere Positionsmarkierung nochmals kontr...

Страница 13: ...sreichend Abstand 0 35 mm einstellen Das RSP System 2 0 darf auch im Tippbetrieb nur mit geschlossenemVerschlussschar nier betrieben werden Die Feststellschrauben immer mit einem Anzugswert von 1 2 Nm...

Страница 14: ...sscharnier durch Zusammendr cken schlie en Abb 3a Mit dem RSP Verschlussscharnier Entriegler pr fen ob das Oberteil des Verschluss scharniers und alle Rasthaken richtig eingerastet sind Nun mit dem En...

Страница 15: ...15 Bedienungsanleitung...

Страница 16: ...nach unten dr cken dabei muss die Spannschiene in die Spannwelle einrasten RSP Basisplatte an derVorderkante auf Printstart stellen Kalibrierten Unterlagebogen zwischen RSP Basisplatte und Gummituchzy...

Страница 17: ...r hinteren Spannwelle l sen l sst Abb 5 RSP Basisplatte aus der hinteren Spannwelle entnehmen Achtung Zentralspannschraube wieder um 3 volle Umdrehungen schlie en RSP Basisplatte r ckw rts bis zurVord...

Страница 18: ...ung der Lacktuchspannung auf Polyesterlackplatte stellen bis Markierung auf rotem Strich steht Abb 1 Standfolienunterlageset ARH00023 mit Dicke von 0 90 mm in Unterlagenklemmung befestigen und Klemmex...

Страница 19: ...prechend anpassen Registerstanzblech in Vorderkante der Registerleiste befestigen und Klemmexzenter schlie en Abb 2b Klemmung des Registerstanzblechs berpr fen Basisplatte mit den Noppen in die Lochst...

Страница 20: ...2 RSP Unterlagebogen je 0 45 mm in Pass und Halteleiste befestigen Bitte beach ten dass keine Unterlagefolien auf den Gummituchzylinder geklebt sind sonst ggf die Unterlagen entsprechend anpassen Hal...

Страница 21: ...die Bohrungen des Zylinderkanals stecken Kunststoffbasisplatte mit Spannschiene in vordere Spannschienenhalterung einsetzen RSP Registerstanzblech in vordere Klemmschiene einh ngen und Exzenter schlie...

Страница 22: ...gen und in Maschine h ngen Abb 2 Bitte beachten dass keine Unterlagefolien auf den Gummi tuchzylinder geklebt sind sonst ggf die aufgeklebten Unterlagefolien entfernen Aufgebaute Standfolie in vordere...

Страница 23: ...keine Unterlagefolien auf den Gummi tuchzylinder geklebt sind sonst ggf die aufgeklebten Unterlagefolien entfernen Registerstanzblech in vordere Klemmeinrichtung einschieben und auf korrekte Anla ge...

Страница 24: ...inishing f r das Lackwerk ausw hlen Lacktuchzylinder positionieren Dr cken Sie zweimal kurz nacheinander die Taste Bedienstelle ausw hlen Die LED in derTaste leuchtet Die Bedienstelle ist ausgew hlt f...

Страница 25: ...r cken Sie erneut die Taste Positionieren Der Lacktuchzylinder dreht in die Einspannposition f r die Hinterkante der Lackplatte ffnen Sie die Klemmung an der Hinterkante Schwenken Sie die Einlegehilfe...

Страница 26: ...geklebte Unterlage entfernen Das System darf nicht mit zus tzlichen Unterlagen betrieben werden es ist immer nur die jeweilige Basisplatte f r Standfolie oder Registerstanzblech zu verwenden Hinweis A...

Страница 27: ...in Taster bet tigen Spannschiene Druckende schlie t und die Standfolie wird gespannt 2 B RSP Basisplatte KBA Rapida 105 106 730 mm Registerstanzblech mit einer Dicke von 2 4 mm hinter das Registerstan...

Страница 28: ...ntfernen kalibrierte Unterlagebogen am Gummituchzylinderanfang einh ngen Abb 1 hierzu unten stehenden Hinweis und Skizze beachten Abb 5 und 6 RSP Basisplatte mit der Druckanfangsseite Printstart in di...

Страница 29: ...einer Standfolie mit einer Unterlage von 0 20 mm gearbeitet werden Abb 6 Die Unterlage von 0 50 mm ist nur im Einsatz mit einem RSP Direktstanzblech zu verwenden und ersetzt in diesem Fall die Unterla...

Страница 30: ...ang einh ngen hierzu unten stehenden Hinweis und Skizze beachten Abb 3 und 4 RSP Basisplatte mit der Druckanfangsseite Printstart in die vordere Gummituch spannwelle vom Gummituchzylinder einh ngen Gu...

Страница 31: ...einer Standfolie mit einer Unterlage von 0 20 mm gearbeitet werden Abb 4 Die Unterlage von 0 50 mm ist nur im Einsatz mit einem RSP Direktstanzblech zu verwenden und ersetzt in diesem Fall die Unterla...

Страница 32: ...endruckzylin der 0 35mm d Farbheber Feucht und Farbauftragswalzen abgestellt sind Nachdem RSP Basisplatte und Standfolie korrekt eingespannt sind und das Gegendruck schutzblech auf den Gegendruckzylin...

Страница 33: ...kopfschrauben des hinteren Verschlussscharniers lockern dann die entsprechenden Flachkopfschrauben des vorderen Verschlussscharniers lockern und nach Bedarf verschieben Abb 1 Flachkopfschrauben des vo...

Страница 34: ...eingerichtet ist wird das Druckwerk im Maschi nenstillstand manuell auf Druck geschaltet Obere Schutzfolie TOP von der Offset Rillzurichtung abl sen Abb 1 Die Offset Rillzurichtung mit der Kanalnutse...

Страница 35: ...parallel zur Zylinderachse wird die Offset Rillzurichtung komplett aufge klebt und die Schutzfolie von der R ckseite der Rillzurichtung im Ganzen abgezogen Wenn nur gerillt wird den Abstand zwischen G...

Страница 36: ...g mit dem RSP System 2 0 Grundregel RSP System 2 0 nicht ber Schmitzringh he aufziehen Festlegung der Zylinderaufzugsst rke in Abh ngigkeit der Gummituchzylinder Einstichtiefen RSP Bearbeitungslinie R...

Страница 37: ...ebogen 2 30mm 2 30mm 2 00mm keine Unterlagebogen 2 60mm 2 30mm 2 00mm 0 30 bzw 0 20mm manroland 2 80mm 2 30mm 2 00mm 0 50mm 3 00mm 2 30mm 2 00mm 0 70mm 3 20mm 2 30mm 2 00mm 0 90mm Ihre Maschine Wichti...

Страница 38: ...0 2 1 2 700 30 St 0 2 1 3 700 30 St 0 2 1 4 700 30 St 0 2 1 6 700 30 St 0 3 0 7 700 30 St 0 3 0 8 700 30 St 0 3 1 0 700 30 St 0 3 1 2 700 30 St 0 3 1 3 700 30 St Ausf hrung Off Center OCC f r Doppelr...

Страница 39: ...4 0 8mm 6m Perfo 12 tpi 1 4 0 8mm 6m Perfo 16 tpi 0 8 0 8mm 6m Perfo 18 tpi 0 7 0 7mm 6m Perfo 35 tpi 0 3 0 4mm 6m Perfo 50 tpi 0 2 0 3mm 6m 4 RSP Schneidlinien Abb 2 Bezeichnung VE Schneidlinie 6m 5...

Страница 40: ...itshandschuhe 1 Paar Gehrungshandschere S 80 1 St ck S 80 Ersatzklinge 1 St ck CITOTAPE blau 0 03 mm 40 m 6 0 mm 3 Rollen CITOTAPE rot 0 05 mm 30 m 6 0 mm 3 Rollen RSP Haltepunktschleifger t mit Akku...

Страница 41: ...chen Umschl ge l ngs u quer z Perf 12tpi 16tpi Karten l ngs u quer z Perf 8tpi 12tpi Umschl ge mit Klap pe Perforation d Klap pe im Falz quer z Falz l ngs z Falz 35tpi quer z Falz 12tpi Cellophanierte...

Страница 42: ...0 2 0 8mm 0 20mm 0 3 1 0mm 0 2 1 0mm 0 25mm 0 3 1 0mm 0 2 1 0mm 0 30mm 0 3 1 2mm 0 2 1 2mm 0 35mm 0 50mm 0 3 1 3mm Anmerkung Die oben angegebenen Werte sind grobe Richtwerte und daher nicht verbindli...

Страница 43: ...anzblechen in den trockenen Druckbogen in den farbfrischen Druckbogen Nur Schneid und oder Perforationslinien 0 50mm 0 45mm Schneid und oder Perforationslinien in Kombination mit Rilllinien 0 27mm 0 2...

Страница 44: ...endet Gegendruckschutzblech f r Maschi ne mit Wendung verwenden Inbetriebnahme des RSP System 2 0 Problem m gliche Ursache L sung Abdruck der Stanzform auf dem Druckzylinder Gegendruckschutzblech nich...

Страница 45: ...ab Rilllinie R1 verwendet trotz gleich zeitiger Stanzung Perforation Rilllinie R2 verwenden keine Stanzungen Rillungen Perfora tionen am Bogenanfang Bearbeitungsbeginn innerhalb ca 13 mm von der Bogen...

Страница 46: ...CITO SYSTEM GmbH Haimendorfer Str 37 46 90571 Schwaig bei N rnberg Germany Phone 49 911 95885 0 Fax 49 911 95885 500 info cito de www cito de...

Страница 47: ...a CITO GROUP Company RSP System 2 0 The system for creasing cutting kiss cutting and perforating on offset printing presses Operating Manual ENGLISH VERSION NR190528 EN...

Страница 48: ...ective impression cylinder jacket 54 2nd Step Clamping the RSP base plate 56 3rd Step Fitting the RSP grid sheet or RSP direct fit flexible die 57 4 Installation instructions for RSP System 2 0 60 4 1...

Страница 49: ...xpand your printing press simply and at a reasonable cost to a real finishing system Creasing cutting kiss cutting and perforating without an extra machine without additional personnel without time co...

Страница 50: ...heet or the RSP direct fit flexible die c Marking for the positioning of the base plate at the print start line of the blanket cyl inder 2 RSP grid sheet a Dimensionally stable grid sheet b Cut out fo...

Страница 51: ...design standard For fixing of the magnetic flexible dies use our special adhesive tape adjusted to the required height 6 RSP direct fit flexible dies which is hung directly on the RSP base plate 2 0 R...

Страница 52: ...h the pre determined values and secure them with the enclosed adhesive tapes Fig 3 Attention No processing rules or flexible dies flexible die edges may be glued to the marked gripper edge Tip for mou...

Страница 53: ...grid sheet and the direct fit flexible die Tip With some paper grades resp by longitudinal and diagonal unwinding there are various pressure conditions in the printing machine Patching the traverse p...

Страница 54: ...alling and removing the RSP protective impression cylinder jacket we recom mend wearing safety gloves RSP accessories To remove the RSP protective impression cylinder jacket safely and easily we recom...

Страница 55: ...cylinder jacket with the enclosed adhesive tape at print start and tail edge after longer machine down times check the adhesiveness before the start up of the machine Fig 2 Set the distance from blan...

Страница 56: ...ed packing sheets by inching forward Hang the base plate into the rear blanket lock up shaft and clamp by 25Nm at the rear edge using a torque screwdriver The front position marking should be checked...

Страница 57: ...whenever changing an RSP grid sheet RSP direct fit flexible die The RSP system 2 0 must only be operated even during inching of the press with the locking hinge closed Always tighten the locking screw...

Страница 58: ...inge lower section and close the closure hinge by pressing together Fig 3a Check that all retaining hooks in the upper section of the closure hinge are correctly engaged Now insert the unlocking tool...

Страница 59: ...59 Operating Manual...

Страница 60: ...mping shaft Place the front edge of the base plate on Printstart Mount a calibrated packing sheet between the base plate and the blanket cylinder Inch the press forward until the base plate is inched...

Страница 61: ...ed from the back blanket clamping bar Fig 5 Remove the base plate from the back blanket clamping bar Attention Lock the central clamping screw again with 3 full turns Inch the base plate back to the p...

Страница 62: ...e coating blanket tension to polyester coating plate until the mark points to the red stop Fig 1 Fasten the grid sheet packing set ARH00023 with a thickness of 0 90 mm in the packing clamping bar and...

Страница 63: ...he register flexible die in the front edge of the register bar and close the clamping cams Fig 2b Check the clamping for the register flexible die Hang the base plate with the nubs on the punched hole...

Страница 64: ...mp eccentrics Fasten 2 RSP packing sheets each 0 45 mm thick into pass rail and retaining rail Ensure that no packing foils are attached to blanket cylinder otherwise adjust packings as necessary Fit...

Страница 65: ...ng rail into holes on cylinder channel Insert plastic base plate with clamping rail into front clamping rail mounting Hang RSP register flexible die into front clamping rail and close the eccentric Fi...

Страница 66: ...lamping rail and hang into the machine Fig 2 Ensure that no packing foils are attached to the blanket cylinder if these are present the adhered packing foils should be removed Move mounted grid sheet...

Страница 67: ...hine Fig 2 Ensure that no packing foils are attached to the blanket cylinder if these are present the adhered packing foils should be removed Move register flexible die into the front clamping device...

Страница 68: ...rol system Position the coating cylinder Press the Select control point button twice in quick succession The LED in the button comes on The control position has been selected Open the cylinder protect...

Страница 69: ...ositioning button again The coating cylinder rotates into the clamping position for the trailing edge of the coating plate Open the clamp on the trailing edge Swivel the positioning aid with the locki...

Страница 70: ...not be operated with additional bases only the respective base plate for the grid sheet or register flexible die may be used Note Plate exchange with flexible coating plate must be activated on the c...

Страница 71: ...button Clamping bar end of printing closes and the grid sheet is clamped 2 B RSP base plate KBA Rapida 105 106 730 mm Insert a register flexible die with a thickness of 2 4 mm behind the register cutt...

Страница 72: ...f the protective impression cylinder jacket Mounting the base plate Remove the blanket Hang the calibrated packing sheet at the start of the blanket cylinder Fig 1 following the instructions and sketc...

Страница 73: ...substrate thickness set ting and the limited printing pressure A packing of 0 5 mm is only for use with an RSP direct fit flexible die and in this case it replaces the packing of 0 3 mm or 0 2 mm Fig...

Страница 74: ...e Remove the blanket Hang the calibrated packing sheet at the start of the blanket cylinder following the instructions and sketch below figs 3 and 4 Hang the Print Start edge of the RSP base plate ont...

Страница 75: ...substrate thickness set ting and the limited printing pressure A packing of 0 5 mm is only for use with an RSP direct fit flexible die and in this case it replaces the packing of 0 3 mm or 0 2 mm Fig...

Страница 76: ...ary d ink ductor dampening form and inking form rollers are switched off After base plate and grid sheet are clamped correctly and the protective impression cylin der jacket has been affixed to the im...

Страница 77: ...se plate 1 5 mm First loosen the flat head screws on the rear locking hinge then loosen the corre sponding flat head screws on the front locking hinge and reposition to suit Fig 1 Re tighten the flat...

Страница 78: ...ve the upper protective foil TOP from the offset creasing rule Fig 1 Fix the offset creasing rule with the creasing channel side on the centre of the creas ing rule of the RSP form then remove the pro...

Страница 79: ...the cylinder parallel to the cylinder axle the offset creasing rule is glued totally and the protective paper torn off the back side of the offset creasing rule Whencreasingonly setdistancebetweenimpr...

Страница 80: ...RSP System 2 0 Fundamental Rule Do not mount the RSP System 2 0 above cylinder bearer level Determination of the cylinder packing thickness depending on the blanket cylinder under cuts RSP processing...

Страница 81: ...s 2 30mm 2 30mm 2 00mm no packing sheets 2 60mm 2 30mm 2 00mm 0 30 and 0 20mm manroland 2 80mm 2 30mm 2 00mm 0 50mm 3 00mm 2 30mm 2 00mm 0 70mm 3 20mm 2 30mm 2 00mm 0 90mm Maschine Importand note In s...

Страница 82: ...00 30 pcs 0 2 1 0 700 30 pcs 0 2 1 2 700 30 pcs 0 3 0 7 700 30 pcs 0 3 0 8 700 30 pcs 0 3 1 0 700 30 pcs 0 3 1 2 700 30 pcs 0 3 1 3 700 30 pcs Off Center OCC Fig 2 H W L mm unit 0 3 1 0 700 30 pcs 0 3...

Страница 83: ...4 0 8mm 6m 12 tpi Perfo 1 4 0 8mm 6m 16 tpi Perfo 0 8 0 8mm 6m 18 tpi Perfo 0 7 0 7mm 6m 35 tpi Perfo 0 3 0 4mm 6m 50 tpi Perfo 0 2 0 3mm 6m 4 RSP Cutting Rules Fig 2 Description Unit Cut Rule 6m 5 RS...

Страница 84: ...impression cylinder jacket 1 pc Safety gloves 1 pair S 80 scissors 1 pc S 80 replacement blade 1 pc CITO TAPE blue 0 03 mm 40 m 6 0 mm 3 rolls CITO TAPE red 0 05 mm 30 m 6 0 mm 3 rolls RSP Manual Nic...

Страница 85: ...orms vertical and horizontal to perforation 4 tpi 16tpi 18 tpi 35tpi 50tpi Up to 200g qm coated and uncoated Postcards vertical and horizontal to perforation 12tpi 16tpi 18 tpi Flyers vertical and hor...

Страница 86: ...mm 0 20mm 0 3 1 0mm 0 2 1 0mm 0 25mm 0 3 1 0mm 0 2 1 0mm 0 30mm 0 3 1 2mm 0 2 1 2mm 0 35mm 0 50mm 0 3 1 3mm Note The value mentioned above are guide numbers and are therefore not binding The following...

Страница 87: ...with flexible dies RSP direct fit flexible dies in dry ink in fresh ink Only cutting and or perforating 0 50mm 0 45mm Only cutting and or perforating in combination with creasing 0 27mm 0 23mm Working...

Страница 88: ...otective impression cylinder jacket for presses with perfection Initial operation of the RSP System 2 0 Problem Possible cause Solution Impression of the diecutting form on the impression cylinder Pro...

Страница 89: ...rule R1 used in spite of same diecutting perforation Use creasing rule R2 No diecutting creasing perforating on the beginning of the sheet Processing start within approx 13 mm from the front edge of...

Страница 90: ...CITO SYSTEM GmbH Haimendorfer Str 37 46 90571 Schwaig bei N rnberg Germany Phone 49 911 95885 0 Fax 49 911 95885 500 info cito de www cito de...

Страница 91: ...a CITO GROUP Company RSP System 2 0 El sistema para hendir troquelar semi troquelar y perforar en m quinas offset Manual de instrucciones VERSI N EN ESPA OL NR190528 ES...

Страница 92: ...P 98 Paso 2 Incorporaci n del caucho base RSP 100 Paso 3 Incorporaci n de la hoja milimetrada de posicionamiento RSP o de la chapa de estampaci n directa RSP 101 4 Instalaci n RSP System 2 0 104 4 1 S...

Страница 93: ...instalaci n autom tica de lavado Parar los rodillos de aplicaci n Desmontar la plancha impresora Llevar el rodillo portatrama rodillo entintador en la unidad de barnizado a una distancia m xima Ajusta...

Страница 94: ...Marca Printstart para posicionar el caucho base RSP en la l nea de comienzo de impre si n del cilindro de mantilla de caucho 2 Hoja milimetrada de posicionamiento RSP a L mina de dimensiones estables...

Страница 95: ...r de cons trucci n RSP Para emplear las chapas para estampar RSP deben utilizarse nuestras l minas adhesivas especiales adaptadas a la altura 6 Chapas para estampaci n directa RSP Las chapas de estamp...

Страница 96: ...posicionamiento RSP y ase gurar con las cintas adhesivas adjuntas Fig 3 Atenci n no pegar herramientas procesadoras o chapas de estampaci n bordes de chapas de estampaci n en el borde marcado de las p...

Страница 97: ...y la chapa para estampaci n directa Consejo En determinados tipos de papel existen diferentes condiciones de impresi n en la m qui na de imprenta a causa de un desbobinado longitudinal y transversal c...

Страница 98: ...res accesorios RSP durante el montaje y des montaje de las chapas protectoras del cilindro de impresi n Para el montaje seguro y sencillo de las chapas protectoras del cilindro de impresi n recomendam...

Страница 99: ...adhesiva faci litada en el comienzo y final de la impresi n comprobando en caso de una parada prolongada de la m quina la adherencia antes la puesta en marcha de la m quina de impresi n Fig 2 Ajustar...

Страница 100: ...as alzas calibradas mediante movimiento intermitente hacia adelante Colocar el caucho base RSP en el rbol trasero de suje ci n de mantilla de caucho y tensar en el borde trasero empleando una llave di...

Страница 101: ...una chapa de estampaci n direc ta RSP El RSP System 2 0 debe activarse nicamente con la charnela de cierre cerrada incluso en modo de impulsos Apriete los tornillos de fijaci n siempre con un par de a...

Страница 102: ...arnela posterior y cierre la charnela de cierre apretando Fig 3a Con el desbloqueador de charnela de cierre RSP compruebe si la parte superior de la charnela de cierre y todos los ganchos de retenci n...

Страница 103: ...103 Manual de instrucciones...

Страница 104: ...scala Fig 2 Insertar el caucho base RSP en el riel de sujeci n delantero en las mordazas de suje ci n del rbol tensor Presionar el riel de sujeci n contra la fuerza del resorte de las mordazas de suje...

Страница 105: ...rir en 3 vueltas enteras el tornillo de sujeci n del cilindro de la mantilla de caucho Fig 4 Con la ayuda del mandril presionar hacia abajo los pernos de resorte hasta que pue da soltarse el caucho ba...

Страница 106: ...izado Destensar los rboles de sujeci n de mantilla de caucho Uso con l mina de montaje Indicaci n Colocar el pretensado del tensado de la mantilla de barnizado en plancha de barnizado de poli ster has...

Страница 107: ...na de base pegada al cilindro de mantilla de caucho en caso contrario adaptar eventualmente de forma correspondiente las l minas de base Fijar la chapa de estampaci n de registro en el borde delantero...

Страница 108: ...1 Abra las exc ntricas de delante y detr s Fije 2 alzas RSP de 0 45 mm cada una en la gu a de ajuste y sujeci n Por favor com pruebe que no hay ninguna alza adherida al cilindro portamantillas y si as...

Страница 109: ...tela seg n convenga Inserte la gu a de sujeci n en los huecos del canal del cilindro Coloque la placa base de pl stico con la gu a de sujeci n en el soporte delantero correspondiente Cuelgue la chapa...

Страница 110: ...quina Fig 2 Por favor compruebe que no hay ninguna alza adherida al cilindro portamantillas y si as fuera ret rela Inserte la hoja milimetrada de posicionamiento preparada en el dispositivo de suje ci...

Страница 111: ...ida al cilindro portamantillas y si as fuera ret rela Inserte la chapa para estampaci n de registro en el dispositivo de sujeci n delantero compruebe la correcta instalaci n en el perno de registro y...

Страница 112: ...impresora y seleccionar en el control Inline Finishing para la unidad de barnizado Posicionar el cilindro de camisa de barnizado Pulse brevemente y de forma consecutiva dos veces la tecla seleccionar...

Страница 113: ...e en la m quina Pulse de nuevo la tecla posicionar El cilindro de camisa de barnizado girar hasta la posici n de sujeci n para el borde trasero de la plancha de barnizado Abra el mecanismo de apriete...

Страница 114: ...n bases adicionales siempre debe emplearse nicamente la placa base respectiva para la hoja de posicionamiento o la chapa de estampaci n de registro Nota En el puesto de mando se debe activar el cambio...

Страница 115: ...u a tensora del final de la impresi n se cierra y se fija la hoja de posicionamiento 2 B Meter la placa de base RSP KBA Rapida 105 106 para chapa de estampaci n de registro de 730 mm con un grosor de...

Страница 116: ...a protectora del cilindro de impresi n contrapresi n Montaje de la placa base Retire la mantilla Cuelgue el juego de alzas calibradas en el inicio del cilindro portamantillas Fig 1 observe la informac...

Страница 117: ...mm Fig 6 La alza de 0 50 mm solamente debe utilizarse con la chapa para estampaci n directa RSP y sustituye en ese caso la alza de 0 30 y 0 20 mm Fig 6 La informaci n y los datos expuestos hacen refe...

Страница 118: ...tire la mantilla Cuelgue el juego de alzas calibradas en el inicio del cilindro portamantillas observe la informaci n y los diagramas m s adelante Fig 3 y 4 Enganche el lado del inicio de impresi n Pr...

Страница 119: ...mm Fig 4 La alza de 0 50 mm solamente debe utilizarse con la chapa para estampaci n directa RSP y sustituye en ese caso la alza de 0 30 y 0 20 mm Fig 4 La informaci n y los datos expuestos hacen refe...

Страница 120: ...del color los rodillos mojadores y los rodillos entintadores han sido sepa rados Despu s de la sujeci n correcta de caucho base RSP y hoja milimetrada de posiciona miento RSP y tras la colocaci n de l...

Страница 121: ...avellanados de la charnela de cierre posterior luego afloje los tornillos avellanados correspondientes de la charnela de cierre delantera y si fue ra necesario despl celos Fig 1 Vuelva a apretar los t...

Страница 122: ...la posici n correcta del molde RSP la unidad de impresi n conmuta manualmente de parada a impresi n Separar la l mina protectora superior TOP del contrahendido offset RSP Fig 1 Pegar el contrahendido...

Страница 123: ...se pega completamente el contrahendido offset RSP retir ndose completamente la l mina protectora del dorso del contrahendido offset RSP Si s lo se ranura se ajusta la distancia entre el cilindro de c...

Страница 124: ...No montar el RSP System 2 0 por encima de la altura de la corona del cilindro Determinaci n del espesor de revestimiento del cilindro en funci n de las profundidades de penetraci n de la mantilla de c...

Страница 125: ...requieren pliegos extra Profundidades de penetraci n de cilin dro Cilindro de manti lla de caucho Espesor total caucho base RSP con hoja milimetrada de posi cionamiento RSP Espesor total cau cho base...

Страница 126: ...1 0 700 30 pza 0 2 1 2 700 30 pza 0 3 0 7 700 30 pza 0 3 0 8 700 30 pza 0 3 1 0 700 30 pza 0 3 1 2 700 30 pza 0 3 1 3 700 30 pza Versi n Off Center OCC para ranurados dobles Fig 2 Al An Lo mm Unidad...

Страница 127: ...m Perfo 16 tpi 0 8 0 8mm 6m Perfo 18 tpi 0 7 0 7mm 6m Perfo 35 tpi 0 3 0 4mm 6m Perfo 50 tpi 0 2 0 3mm 6m 4 Herramientas para corte RSP Fig 2 Designaci n Unidad Herramienta para corte RSP 6m 5 Herrami...

Страница 128: ...antes protectores tama o 1 Par Tijeras para ingletes S 80 1 Pieza S 80 Hojas de recambio 1 Pieza CITO TAPE azul 0 03 mm 40 m 6 0 mm 3 Rollos CITO TAPE rojo 0 05 mm 30 m 6 0 mm 3 Rollos M quina para mu...

Страница 129: ...Sobres long y transv a la perf 12tpi 16tpi Tarjetas Mapas long y transv a la perf 8tpi 12tpi Sobres con solapa per foraci n de la solapa en el pliegue transv al ple gado long al pleg 35tpi trans al p...

Страница 130: ...0 20mm 0 3 1 0mm 0 2 1 0mm 0 25mm 0 3 1 0mm 0 2 1 0mm 0 30mm 0 3 1 2mm 0 2 1 2mm 0 35mm 0 50mm 0 3 1 3mm Nota Los valores arriba indicados representan valores orientativos aproximados por lo que no s...

Страница 131: ...RSP En pliegos de imprenta secos En pliegos de imprenta de tinta fresca S lo herramientas para corte y o perforaci n 0 50mm 0 45mm Herramientas para corte y o perforaci n en combinaci n con herramien...

Страница 132: ...de impresi n RSP para m quina con sis tema de retiraci n Puesta en servicio del RSP System 2 0 Problema Posible causa Soluci n Reproducci n del molde de estampa do sobre el rodillo de impresi n Chapa...

Страница 133: ...a hendido R1 a pesar del estampado perforaci n simult neo Usar herramientas para hendido R2 No hay estampados ranurados perfo raciones al comenzar el pliego Inicio del trabajo dentro de los aprox 13 m...

Страница 134: ...CITO SYSTEM GmbH Haimendorfer Str 37 46 90571 Schwaig bei N rnberg Germany Phone 49 911 95885 0 Fax 49 911 95885 500 info cito de www cito de...

Страница 135: ...a CITO GROUP Company RSP System 2 0 Le syst me pour le rainage le d coupage le d coupe mi chair la perforation dans votre presse offset Manuel d utilisation VERSION FRAN AISE NR190528 FR...

Страница 136: ...ndre de marge 142 tape 2 Tension de la plaque de base RSP 144 tape 3 Serrage de la feuille de positionnement RSP ou de la forme de d coupe flexible directe pour RSP 145 4 Montage du RSP System 2 0 148...

Страница 137: ...iser l installation de lavage Automatique Arr ter le rouleau de mouillage Retirer la plaque d impression D monter le rouleau tram rouleau d application d encre R gler la distance entre le cylindre du...

Страница 138: ...ible directe pour RSP c Marquage du d but d impression pour le positionnement de la plaque de base RSP sur 2 Feuille de positionnement RSP a Feuille aux dimensions stables b Perforation pour fixer la...

Страница 139: ...adh sive sp ciale adapt e la hauteur requise pour l encollage des forme de d coupe flexible RSP RSP 6 Forme de d coupe flexible directe pour RSP Les formes de d coupe flexible directe pour RSP doivent...

Страница 140: ...orcer avec les bandes adh sives four nies Fig 3 Remarque Ne pas coller de filets RSP ou de t les de perforations bords des t les de perforation sur la prise marqu e de pinces Consigne lors le montage...

Страница 141: ...e et la plaque de d coupe directe Conseil On obtient des rapports d impression diff rents dans la machine imprimer dus cer tains types de papiers ou la direction longitudinale ou transversale il est...

Страница 142: ...ort de gants de s curit accessoire RSP pour monter et d monter les t le de protection RSP pour cylindre de marge Nous recommandons notre outil de d tachement accessoire RSP pour d monter simplement et...

Страница 143: ...c le ruban adh sif fourni au d but et la fin de l impression en cas d arr t prolong de l imprimante contr ler l adh rence avant la mise en service de l imprimante Fig 2 R gler la distance entre le cyl...

Страница 144: ...uspendre la plaque de base RSP dans l arbre arri re du cylindre du blanchet avec 25 Nm sur l arbre de serrage en utilisant une cl dynamom trique V rifier la position correcte du marquage avant Fig 3 A...

Страница 145: ...sitionnement RSP d une forme de d coupe flexible directe pour RSP Le RSP System 2 0 doit uniquement tre utilis avec une charni re de fermeture ferm e m me en mode manuelle Toujours serrer les vis de f...

Страница 146: ...de la charni re et fermer la charni re de fermeture en serrant Fig 3a l aide de l outil de d v rouillage RSP barre charni re v rifier que la partie sup rieure de la charni re de fermeture soit bien e...

Страница 147: ...147 Manuel d utilisation...

Страница 148: ...xation avant dans les pinces de maintien de l arbre de serrage Appuyer contre la force de ressort des pinces de maintien dans le sens centre du canal et vers le bas jusqu ce que le rail tendeur s encl...

Страница 149: ...a plaque de base RSP Ouvrir la vis de serrage du cylindre du blanchet de 3 tours avec la cl douille Fig 4 Appuyer vers le bas sur les boulons ressort l aide du mandrin jusqu ce que la plaque de base R...

Страница 150: ...nsion de la tension du blanchet de vernissage sur la plaque de vernissage en polyester jusqu ce que le marquage soit sur le trait rouge Fig 1 Fixer les supports des feuilles de positionnement ARH00023...

Страница 151: ...cas contraire ajuster les supports Fixer la plaque de d coupe registre dans le bord avant du rail de registre et fermer l excentrique de serrage Fig 2b Contr ler la fixation de la plaque de d coupe r...

Страница 152: ...ixer 2 feuilles d habillage RSP aux intervalles de 0 45 mm sur la barre d ajustage et de maintien Veiller ce qu aucune feuille d habillage ne soit coll e sur le cylindre porte blanchet tant donn que s...

Страница 153: ...Enficher la barre de maintien dans les al sages du canal du cylindre Mettre la plaque de base en plastique avec la barrette de fixation dans le support de la barre de calage avant Caler la t le de d...

Страница 154: ...et l accrocher dans la machine Fig 2 Veiller ce qu aucune feuille d habillage ne soit coll e sur le cylindre porte blanchet tant donn que sinon il faut enlever les feuilles d habillage qui y sont coll...

Страница 155: ...ne feuille d habillage ne soit coll e sur le cylindre porte blanchet tant donn que sinon il faudra enlever les feuilles d habillage qui y sont coll es des sus Pousser la t le de d coupe de rep rage da...

Страница 156: ...ctionner Fa onnage en ligne pour le groupe de vernissage dans les commandes Positionner le cylindre de vernissage Appuyez deux fois de suite sur le bouton S lectionner le point de commande La LED du b...

Страница 157: ...veau sur le bouton positionner Le cylindre de vernissage tourne en position de serrage pour le bord arri re de la plaque de vernissage Ouvrez le serrage au niveau du bord arri re Basculez l aide au mo...

Страница 158: ...ec des supports suppl mentaires utiliser uniquement les plaques de base destin es la feuille de positionnement ou la plaque de d coupe registre Remarque Il faut activer le changement de plaques avec p...

Страница 159: ...bouton La glissi re de serrage de la fin d impression se ferme et la feuille de positionnement se tend 2 B Mettre la plaque de d coupe registre de la plaque de base RSP KBA Rapida 105 106 730 mm d une...

Страница 160: ...tectrice de contrepression Montage de la plaque de base Enlever le blanchet Caler la feuille d habillage calibr e sur le bord avant du cylindre porte blanchet Fig 1 pour ce faire respecter l informati...

Страница 161: ...habil lage de 0 50 mm ne doit tre utilis qu en liaison avec une t le de d coupage RSP directe et il remplace ici l habillage de 0 30 ou de 0 20 mm Fig 6 Les informations et les donn es se rapportent d...

Страница 162: ...a feuille d habillage calibr e sur le bord avant du cylindre porte blanchet pour ce faire respecter l information ci dessous ainsi que le sch ma Fig 3 et 4 Caler la plaque de base RSP avec la t te d i...

Страница 163: ...habil lage de 0 50 mm ne doit tre utilis qu en liaison avec une t le de d coupage RSP directe et il remplace ici l habillage de 0 30 ou de 0 20 mm Fig 4 Les informations et les donn es se rapportent d...

Страница 164: ...ression 0 35 mm d si les rouleaux baladeurs encreurs et de mouillage sont arr t s Apr s que la plaque de base RSP et la feuille de positionnement RSP soient correctement tendues et la feuille de la t...

Страница 165: ...n premier temps les vis t te plate de la charni re de fermeture arri re desserrer ensuite et si besoin d caler les vis t te plate correspondantes de la char ni re de fermeture avant Fig 1 Serrer nouve...

Страница 166: ...s que la forme RSP ait t labor e avec pr cision l imprimante l arr t est mise manuellement sur pression D tacher la feuille de protection sup rieure TOP de la contrepartie de rainage RSP Fig 1 Coller...

Страница 167: ...e contrepartie de rainage RSP est coll int gralement et la feuille de protection est retir e compl tement du verso du contrepartie de rainage RSP En cas de rainage r gler la distance entre le cylindre...

Страница 168: ...base Ne pas tirer RSP System 2 0 au dessus du niveau de cordon de cylindre D termination de l paisseur d impression du cylindre en fonction de la profondeur de p n tration du cylindre de blanchet File...

Страница 169: ...xemple Profondeur de p n tration du cylindre de blanchet paisseur totale de la plaque de base RSP avec une forme mon t e de feuille de posi tionnement RSP paisseur totale de la plaque de base RSP avec...

Страница 170: ...700 30 pce 0 2 1 0 700 30 pce 0 2 1 2 700 30 pce 0 3 0 7 700 30 pce 0 3 0 8 700 30 pce 0 3 1 0 700 30 pce 0 3 1 2 700 30 pce 0 3 1 3 700 30 pce Mod le Off Center OCC pour double rainage Fig 2 H La Lo...

Страница 171: ...1 4 0 8mm 6m Perfo 16 tpi 0 8 0 8mm 6m Perfo 18 tpi 0 7 0 7mm 6m Perfo 35 tpi 0 3 0 4mm 6m Perfo 50 tpi 0 2 0 3mm 6m 4 Filets coupant RSP Fig 2 D signation VE Filet coupant 6m 5 Filets raineur RSP Fig...

Страница 172: ...pi ce Gants de s curit 1 paire Cisaille onglet S 80 1 pi ce S 80 lame de rechange 1 pi ce CITO TAPE bleu 0 03 mm 40 m 6 0 mm 3 rouleaux CITO TAPE rouge 0 05 mm 30 m 6 0 mm 3 rouleaux Meuleuse avec po...

Страница 173: ...Enveloppes longitudinal transversal 12tpi 16tpi Cartes longitudinal transversal 8tpi 12tpi Enveloppes rabattant longitudinal par rapport au pli 35tpi transversal par rapport au pli 12tpi Enveloppes de...

Страница 174: ...0 20mm 0 3 1 0mm 0 2 1 0mm 0 25mm 0 3 1 0mm 0 2 1 0mm 0 30mm 0 3 1 2mm 0 2 1 2mm 0 35mm 0 50mm 0 3 1 3mm Remarque Les valeurs indiqu es pr c demment sont des orientations et donc al atoires Voici les...

Страница 175: ...e d coupe flexible directe pour RSP Feuille d impression s che Feuille d impression avec de l encre Uniquement les filets coupant RSP et ou perfo 0 50mm 0 45mm Filet raineur RSP et filets cou pant RSP...

Страница 176: ...lisse est utilis e Utiliser la t le de protection RSP pour cylindre de marge pour la machine avec dispositif de retournement Mise en service du RSP System 2 0 Probl me Cause possible Solution Emprein...

Страница 177: ...let raineur RSP R1 utilis e en d pit du d coupage de la perforation simultan e Utiliser outil de rainure R2 Absence de d coupe rainage perforation au d but de la feuille d impression D but de traiteme...

Страница 178: ...CITO SYSTEM GmbH Haimendorfer Str 37 46 90571 Schwaig bei N rnberg Germany Phone 49 911 95885 0 Fax 49 911 95885 500 info cito de www cito de...

Страница 179: ...a CITO GROUP Company RSP System 2 0 Il sistema per cordonare tagliare fare il mezzo taglio perforare sulla vostra macchina da stampa offset Istruzioni per l uso VERSIONE ITALIANA NR190528 IT...

Страница 180: ...ressione RSP 186 Fase 2 tensionamento dalla piastra base RSP 188 Fase 3 serraggio del foglio millimetrato RSP ovvero della fustelle flessibili dirette RSP 189 4 Istruzioni per l installazione di RSP S...

Страница 181: ...re i cilindri applicatori assolutamente vietato mettere in funzione RSP System 2 0 anche in modalit intermittenza se la cerniera di chiusura non chiusa Smontare la piastra di stampa Smontare il cilind...

Страница 182: ...o del ciclo di stampa Printstart per il posizionamento della piastra base RSP sulla linea di stampa iniziale del cilindro porta caucci 2 Foglio millimetrato RSP a Foglio millimetrato RSP di dimensiona...

Страница 183: ...standard di costruzione RSP Per incollare le fustelle flessibili RSP utilizzare la pellicola adesiva speciale dell altez za necessaria 6 Fustelle flessibili dirette RSP Le fustelle flessibili dirette...

Страница 184: ...mezzo dei nastri adesivi forniti in dotazione Fig 3 Attenzione non incollare le linee di lavorazione o le fustelle flessibili RSP i bordi del la fustelle flessibili RSP nel lato pinza contrassegnato N...

Страница 185: ...rato e sulla fustella flessibile diretta Suggerimento con determinati tipi di carta o durante la lavorazione longitudinale e trasversale si verificano diverse condizioni di stampa all interno della ma...

Страница 186: ...pressione RSP si consiglia di indossare gli appositi guanti di protezione accessori RSP Per uno smontaggio sicuro e veloce delle lamiere di protezione in contropressione RSP si consiglia di utilizzare...

Страница 187: ...one con il nastro adesivo in dotazione e in caso di prolungata inattivit veri ficarne l aderenza prima di rimettere la macchina nuovamente in funzione Fig 2 Regolare il cilindro gommato e il cilindro...

Страница 188: ...on piccoli movimenti in avanti Agganciare la piastra base RSP all albero tenditore posteriore e tenderla con una coppia di serraggio di 25 Nm utilizzando una chiave dinamo metria Controllare nuovament...

Страница 189: ...ad una distanza sufficiente 0 35 mm assolutamente vietato mettere in funzione RSP System 2 0 anche in modalit intermittenza se la cerniera di chiusura non chiusa Serrare le viti sempre con un serragg...

Страница 190: ...a posteriore e chiudere la cerniera di chiusura comprimendo Fig 3a Verificare con lo sblocca cerniera RSP se la parte superiore della cerniera di chiu sura e tutti i ganci di arresto sono scattati cor...

Страница 191: ...191 Istruzioni per l uso...

Страница 192: ...canale e verso il basso opponendosi alla forza elastica dei morsetti finch la barra e l albero non sono inseriti correttamente in posizione Posizionare il bordo anteriore della piastra base RSP su Pr...

Страница 193: ...olla verso il basso servendosi dell apposita spina finch la piastra base RSP si sgancia dall albero tenditore posteriore Fig 5 Rimuovere la piastra base RSP dall albero tenditore posteriore Attenzione...

Страница 194: ...a in poliestere finch la marcatura si trova sulla linea rossa Fig 1 Fissare il set di supporto per fogli millimetrati ARH00023 dello spessore di 0 90 mm negli appositi dispositivi di bloccaggio e chiu...

Страница 195: ...i registro cos montato al bordo anteriore della barra di registro e chiudere l eccentrico di serraggio Fig 2b Verificare il bloccaggio del lamierino di registro Agganciare la piastra base con le tacch...

Страница 196: ...ci di serraggio anteriore e posteriore Fissare 2 fogli di supporto RSP da 0 45 mm ciascuno nel listello di regolazione e arresto Fare attenzione che nessuno dei fogli sia attaccato al cilindro porta c...

Страница 197: ...egolare opportunamente i fogli Infilare il listello di arresto nei fori del canale del cilindro Inserire la piastra base in plastica con il binario tenditore nell apposito supporto anteriore Agganciar...

Страница 198: ...na Fig 2 Fare attenzione che nessuno dei fogli sia attaccato al cilindro porta caucci altri menti rimuovere gli eventuali fogli attaccati Infilare il foglio millimetrato cos predisposto nel dispositiv...

Страница 199: ...i sia attaccato al cilindro porta caucci altri menti rimuovere gli eventuali fogli attaccati Inserire il lamierino di registro nel dispositivo di serraggio anteriore e fare atten zione che sia corrett...

Страница 200: ...erniciatura sull unit di comando Posizionare il cilindro porta caucci di verniciatura Premere brevemente per due volte consecutive il pulsante Seleziona il punto di comando Il LED del pulsante si illu...

Страница 201: ...Posiziona Il cilindro porta caucci di verniciatura ruota nella posizione di serraggio del bordo posteriore della lastra di verniciatura Aprire il dispositivo di serraggio sul bordo posteriore Girare...

Страница 202: ...essere azionato con ulteriori supporti deve essere sempre impiegata la rispettiva piastra base per fogli millimetrati o fustelle flessibili di registro Indicazione Sul quadro di controllo e degli str...

Страница 203: ...aggio di fine stampa si chiude e il foglio millimetrato viene bloccato 2 B Infilare la lastra base RSP KBA Rapida 105 106 730 mm per fustella flessibile di registro con uno spessore di 2 4 mm dietro a...

Страница 204: ...ella lamiera di protezione del cilindro di contropressione Montaggio della piastra base Rimuovere il tessuto gommato Agganciare i fogli di supporto al cilindro porta caucci Fig 1 prestando attenzio ne...

Страница 205: ...l supporto di 0 50 mm solo in combinazione con una lamiera di stampa diretta RSP che in tal caso sostituisce il supporto di 0 30 o 0 20 mm Fig 6 Le istruzioni e i dati fanno riferimento alla macchina...

Страница 206: ...uovere il tessuto gommato Agganciare i fogli di supporto al cilindro porta caucci prestando attenzione alle istruzioni e ai disegni sotto riportati Fig 3 e 4 Agganciare la piastra base RSP con il lato...

Страница 207: ...l supporto di 0 50 mm solo in combinazione con una lamiera di stampa diretta RSP che in tal caso sostituisce il supporto di 0 30 o 0 20 mm Fig 4 Le istruzioni e i dati fanno riferimento alla macchina...

Страница 208: ...d il sollevatore di vernice il cilindro umidificatore e inchiostratore siano disinseriti Dopo aver teso correttamente la piastra base RSP e la foglio millimetrato RSP e dopo l appli cazione della lam...

Страница 209: ...stringere le viti a testa piatta della cerniera di chiusura posteriore quindi serrare le corrispondenti viti a testa piatta della cerniera di chiusura ante riore e spostare secondo necessit Fig 1 Str...

Страница 210: ...e a macchina ferma sulla funzione di stampa Staccare la pellicola protettiva superiore TOP dalla striscia di controsolcatore RSP Offset Fig 1 Incollare la striscia offset con il lato di controsolcator...

Страница 211: ...rosolcatore RSP Offset viene completamente incollata e la pellicola protettiva completamente staccata dalla parte posteriore della striscia di controsolcatore RSP Offset Quando si effettua la sola cor...

Страница 212: ...gola fondamentale NON utilizzare RSP System 2 0 oltre l altezza dell anello di rotolamento Determinazione dell intensit di carico dei cilindri in funzione del sottosquadro del cilindro porta caucci Fi...

Страница 213: ...calibrato 2 30mm 2 30mm 2 00mm nessun foglio di soste gno 2 60mm 2 30mm 2 00mm 0 30 e 0 20mm manroland 2 80mm 2 30mm 2 00mm 0 50mm 3 00mm 2 30mm 2 00mm 0 70mm 3 20mm 2 30mm 2 00mm 0 90mm La vostra mac...

Страница 214: ...30 Pz 0 2 1 2 700 30 Pz 0 3 0 7 700 30 Pz 0 3 0 8 700 30 Pz 0 3 1 0 700 30 Pz 0 3 1 2 700 30 Pz 0 3 1 3 700 30 Pz Versione Off Center OCC per scanalature doppie Fig 2 H P L mm Contenuto 0 3 1 0 700 30...

Страница 215: ...m Perfo 12 tpi 1 4 0 8mm 6m Perfo 16 tpi 0 8 0 8mm 6m Perfo 18 tpi 0 7 0 7mm 6m Perfo 35 tpi 0 3 0 4mm 6m Perfo 50 tpi 0 2 0 3mm 6m 4 Linee di taglio RSP Fig 2 Denominazione Contenuto linea di taglio...

Страница 216: ...one del cilindro di pressione RSP 1 pezzo Guanti di protezione 1 paio Forbice manuale per smussi S 80 1 pezzo Lama di ricambio S80 1 pezzo CITO TAPE blu 0 03 mm 40 m 6 0 mm 3 rotoli CITO TAPE rosso 0...

Страница 217: ...ersale rispetto alla perforazione 12tpi 16tpi Biglietti longitudinale e trasversale rispetto alla perforazione 8tpi 12tpi Buste con linguetta per forazione linguetta nel la piegatura trasversale rispe...

Страница 218: ...mm 0 30mm 0 3 1 2mm 0 2 1 2mm 0 35mm 0 50mm 0 3 1 3mm Nota I valori sopra indicati sono da intendersi come valori indicativi approssimativi per stam pati standard e pertanto non sono da intendersi in...

Страница 219: ...fogli asciutti Su fogli appena stampati Solo linee di taglio e o linee di perfora zione 0 50mm 0 45mm Linee di taglio e o linee di perforazione combinate con linee di cordonatura 0 27mm 0 23mm Lavora...

Страница 220: ...ntro pressione liscio Utilizzare la lamierini di protezio ne del cilindro di pressione RSP per macchine con tamburo voltafogli Messa in funzione del RSP System 2 0 Problema Possibile causa Soluzione I...

Страница 221: ...contemporanea Utilizzare il linee di cordonatura RSP R2 Nessuna fustellatura cordonatura perfora zione all inizio del foglio Inizio della lavorazione entro circa 13 mm dal bordo di testa del foglio P...

Страница 222: ...11 95885 500 info cito de www cito de CITO Italia Srl Sede principale Localit Noghere Nuova Z I S P 13 di Caresana 34015 Muggia TS Tel 39 040 232346 Fax 39 040 5706390 info cito italia com www cito it...

Страница 223: ...a CITO GROUP Company RSP System 2 0 Nab z jednoduch a flexibiln e en pro rylov n v sek a perforaci ve va ofsetov tisk rn N vod k pou it NR190528 CS ESK VERZE...

Страница 224: ...v ho ochrann ho plechu 230 2 Krok Upevn n z kladn desky 232 3 Krok Upevn n RSP milimetrov f lie a v sekov ho plechu 233 4 Instala n instrukce syst mu RSP 2 0 236 4 1 Heidelberg SM 52 tiskov jednotka a...

Страница 225: ...ou zadn z v s n dv ka zav en Nepou vejte automatick myc syst m Vypn te lakovac v lec Vyjm te tiskovou formu Vyjm te lakovac v lec Nastavte vzd lenost mezi p enosn m v lcem a tlako v m v lcem na 0 35 m...

Страница 226: ...d ausspannen 1 2 3 a b a b c d c c 1 RSP z kladn deska a speci ln lut z kladn deska b zaji ovac kol ky pro milimetrovou f lii nebo v sekov plech c zazna en startu tisku na z kladn m v lci printstart 2...

Страница 227: ...b t vyroben p esn podle standard RSP Pro upevn n magnetick ch v sekov ch no pros me pou ijte na i speci ln lep c p sku v po adovan v ce ce 6 RSPV sekov plechy direct fit Jsou zav eny p mo na RSP 2 0 z...

Страница 228: ...p ipevn te je p ilo enou lepic p skou obr 3 Upozorn n Ani no ovina ani v sekov plech nesm b t p ilepeny k okraji grajfy Typy p i mont i V p pad rylov n je pot eba u t standartn rylovac n R1 V p pad r...

Страница 229: ...plechu direct fit Tip P i pou it ur it ho druhu pap ru resp p i pod ln m nebo hlop n m ezu vznikaj ve va em stroji r zn tlaky p i pr niku no oviny do pap ru Podlepen m p n no oviny sou asn s v lcem v...

Страница 230: ...hrann ho plechu pou ijte bezpe nostn rukavice RSP p slu enstv Pro bezpe n a jednoduch odpojen syst mu RSP pou ijte n bal ek snadn demont i RSP p slu enstv 1 Krok Mont RSP protitlakov ho ochrann ho ple...

Страница 231: ...a zapnete zkontrolujte p ilnavost obr 2 Nastavte vzd lenost mezi z kladn deskou a tlakov m v lcem na 0 35 mm Upozorn n Ochrann plech nesm b t pou it v tisk rn ch Heidelberg s PerfectJackets V p pad hr...

Страница 232: ...tu s kalibra n mi podlo kami dokud nen zadn uzamykateln st p stupn Za pou it momentov ho kl e velikosti 25 Nm upevn te do zadn sti uzamykateln h dele z kladn desku Znovu zkontrolujte zda je zna en Pr...

Страница 233: ...35 mm kdykoliv chcete zm nit milimetrovou f lii RSP v sekov plech direct fit Syst m RSP 2 0 pou vejte v dy kdy jsou zadn z v sn dv ka zav en rouby p itahujte roubov kem velikosti 1 2 Nm K uvoln n a p...

Страница 234: ...dn sti z v su pomoc roubov ku p ipevn te milimetrovou f lii nebo v sekov plech obr 3a Zkontrolujte zda jsou v echny p slu n h ky v horn sekci z v su po dn sepnuty Nyn za pomoc roubov ku ve v klenku za...

Страница 235: ...235 N vod k pou it...

Страница 236: ...ch dr ek upev ovac h dele Upev ovac li tu zatla te sm rem dol v opa n m sm ru proti dr c m dr k m upev ovac h dele P isu te p edn okraj z kladn desky na PrintStart Nastavte a nainstalujte mezi z kladn...

Страница 237: ...desku ze zadn sti upev ovac li ty obr 5 z kladn desku vyjm te ze zadn sti upev ovac li ty upozorn n s pou it m roubov ku znovu p it hn te hlavn upev ovac roub p isu te z kladn desku sm rem k za tku ti...

Страница 238: ...nap nac h dele pry ov ho potahu Pou it s foli Upozorn n P edp t napnut lakovac ho potahu nastavte na polyesterovou lakovac desku dokud se zna ka nenach z na erven rce obr 1 Sadu podlo ek milimetrov fo...

Страница 239: ...zp sobte Registra n lisovac plech upevn te v p edn hran registra n li ty a zav ete up nac excentr obr 2b Kontrola upnut registra n ho lisovac ho plechu Zav ste z kladn desku za smy ky do d rov n regis...

Страница 240: ...dn chyt P ipevn te 2 RSP kalibra n podlo ky ob ky 0 45 mm do upev ovac li ty Ujist te se e dn obalov archy nejsou p ipevn ny k z kladn mu v lci pokud je to nezbytn p izp sobte obal Upev ovac li tu vsa...

Страница 241: ...je to nezbytn p izp sobte kalibra n podlo ky Upev ovac li tu vsa te do otvor kter jsou um st ny v dr ce v lce Do p edn sti upev ovac li ty vlo te plastovou z kladn desku Zav ste v sekov plech do p ed...

Страница 242: ...pev ovac li ty a zav ste ji do tisk rny obr 2 Ujist te se e dn obalov archy nejsou p ipevn ny k z kladn mu v lci pokud je obalov arch p ilepen odstra te jej P it hn te p imontovanou milimetrovou f lii...

Страница 243: ...st te se e dn obalov archy nejsou p ipevn ny k z kladn mu v lci pokud je obalov arch p ilepen odstra te jej P it hn te v sekov plech do p edn ho upev ovac ho za zen Dbejte na spr vn dota en v sekov ch...

Страница 244: ...lakovac jednotku Um st te v lec s lakovac m potahem do polohy Stiskn te dvakr t kr tce za sebou tla tko Zvolit kontroln bod LED dioda tla tka se rozsv t Kontroln bod je vybr n Otev ete ru n kryt v lce...

Страница 245: ...n Znovu stiskn te tla tko Najet do polohy V lec s lakovac m potahem se oto do up nac polohy pro zadn okraj lakovac desky Otev ete sev en na zadn m okraji Vkl dac pom cku oto te z str n m kol kem pomoc...

Страница 246: ...Syst m nesm b t provozov n s dopl kov mi podlo kami Pro milimetrovou f lii nebo v sekov plech mus b t v dy pou ita pouze p slu n z kladn deska Upozorn n Na dic m stanovi ti mus b t aktivov na v m na d...

Страница 247: ...m rn nejm n 4 mm Stiskn te tla tko Nap nac li ta konec tisku se zav e a milimetrov f lie se napne 2 B RSP z kladn desku KBA Rapida 105 106 pro v sekov plech register 730 mm s tlou kou 2 4 mm nasu te z...

Страница 248: ...n te desku Zav ste kalibrovanou podlo ku na za tek v lce obr 1 n sledujte instrukce podle n rtu n e obr 5 a 6 Zav ste roh za tku tisku na RSP z kladn desce do p edn roz en h dele z kladn ho v lce Nyn...

Страница 249: ...mm nebo 0 2 mm Instrukce a data obsa en v tomto manu lu koresponduj se standardn mi stroji s kou dr ky 2 6 mm bez f lie p ipevn n k z kladn mu v lci V dy zkontrolujte jestli jsou v echny hodnoty stejn...

Страница 250: ...rovanou podlo ku na za tek v lce n sledujte instrukce podle n rtu n e obr 3 a 4 Zav ste roh za tku tisku na RSP z kladn desce do p edn roz en h dele z kladn ho v lce Nyn oto te roz enou h del z kladn...

Страница 251: ...pad toto nahrazuje obal ky 0 3 mm nebo 0 2 mm obr 4 Instrukce a data obsa en v tomto manu lu koresponduj se standardn mi stroji s kou dr ky 2 6 mm bez f lie p ipevn n k z kladn mu v lci V dy zkontrolu...

Страница 252: ...po dku Za tek tisku na tlakov m v lci je nastaven na 0 35 mm d P vod inkoustu barevn k a inkoustov v lce jsou vypnuty V okam iku kdy je z kladn deska sepnut spr vn s milimetrovou f lii a je nainstalo...

Страница 253: ...n ploch roub um st n v zadn m zamykateln h deli pot uvoln te odpov daj c ploch roub na p edn uzamykateln h deli a nastavte ji do po adovan ho sm ru obr 1 Pot op t dot hn te plo n roub na p edn zamykat...

Страница 254: ...rylovac n obr 1 Upevn te kan lek a pot odstra te ochranou p sku ze zadn sti ofsetov ho rylova c ho kan lku obr 2 Pomalu p isu te v lec dozadu tak aby se p enosn v lec a tlakov v lec to ili ve stej n...

Страница 255: ...astavte vzd lenost mezi tlakov m v lcem a z kladn m v lcem na 0 35 mm Pomalu p isu te sm rem dop edu rylovac hranu tak a se na pap e desce ud l mal zna ka Pot nastavte po adovanou pozici no e P eneste...

Страница 256: ...podlo ky p i zapojen syst mu RSP 2 0 Z kladn pravidlo Nikdy nemontujte syst m RSP 2 0 nad rove nosn ho v lce Nastaven tlou tky podlo ky z vis na typu zak zky RSP n RSP v sekov plech RSP milimetrov f l...

Страница 257: ...podlo ek 2 30mm 2 30mm 2 00 mm dn 2 60mm 2 30mm 2 00mm 0 30 a 0 20mm manroland 2 80mm 2 30mm 2 00mm 0 50mm 3 00mm 2 30mm 2 00mm 0 70mm 3 20mm 2 30mm 2 00mm 0 90mm v stroj D le it pozn mka V n kter ch...

Страница 258: ...30 ks 0 2 1 0 700 30 ks 0 2 1 2 700 30 ks 0 3 0 7 700 30 ks 0 3 0 8 700 30 ks 0 3 1 0 700 30 ks 0 3 1 2 700 30 ks 0 3 1 3 700 30 ks Off center obr 2 v d mm po et 0 3 1 0 700 30 ks 0 3 1 2 700 30 ks 0...

Страница 259: ...6m Perfo 12 tpi 1 4 0 8mm 6m Perfo 16 tpi 0 8 0 8mm 6m Perfo 18 tpi 0 7 0 7mm 6m Perfo 35 tpi 0 3 0 4mm 6m Perfo 50 tpi 0 2 0 3mm 6m 4 RSP v sekov n obr 2 Popis po et sekac no e 6m 5 RSP v sekov n obr...

Страница 260: ...rukavice 1 p r S 80 n ky 1 ks S 80 N hradn epelka 1 ks CITOTAPE modr 0 03 mm 40 m 6 0 mm 3 role CITOTAPE erven 0 05 mm 30 m 6 0 mm 3 role Manu ln zabru ova ka s nab jec bateri a speci ln m adapt rem 1...

Страница 261: ...nebo neleskl Ob lky Svisle vodorovn 12tpi 16tpi Karti ky Svisle vodorovn 8tpi 12tpi Ob lky s patkou perforace v klapce Svisle k p ehybu 35tpi Vodorovn k p ehybu 12tpi Celof nov ob lky Svisle vodorovn...

Страница 262: ...mm 0 3 1 0mm 0 2 1 0mm 0 25mm 0 3 1 0mm 0 2 1 0mm 0 30mm 0 3 1 2mm 0 2 1 2mm 0 35mm 0 50mm 0 3 1 3mm Pozn mka Hodnoty zm n n v e jsou jen hrub m odhadem p i pou it standartn ch materi l a nejsou zavaz...

Страница 263: ...jako p klad Pou it s RSP v sekov m plechem In dry ink In fresh ink Pouze v sek perforace 0 50mm 0 45mm Pouze v sek perforace s kombinac rylov n 0 27mm 0 23mm P i pou it RSP no Pouze v sek perforace 0...

Страница 264: ...erfektoru Po te n instalace syst mu RSP 2 0 Probl m Mo n p ina e en Otisk v seku na tlakov m v lci Nen nainstalov n ochrann plech Nainstalujte ochrann plech Po kozen plastov ho materi lu z kladn desky...

Страница 265: ...pr vn rylov n P i perforaci a v seku pou ita nespr vn rylovac no ovina R1 Pou ijte rylovac no ovinu R2 Nen vid t dn rylov n nebo v sek Za tek tisku mus b t nastaven s odsazen m 13 mm od okraje Tisk ne...

Страница 266: ...CITO SYSTEM GmbH Haimendorfer Str 37 46 90571 Schwaig bei N rnberg Germany Phone 49 911 95885 0 Fax 49 911 95885 500 info cito de www cito de...

Отзывы: