background image

iDP3310 User's Manual

32

CITIZEN

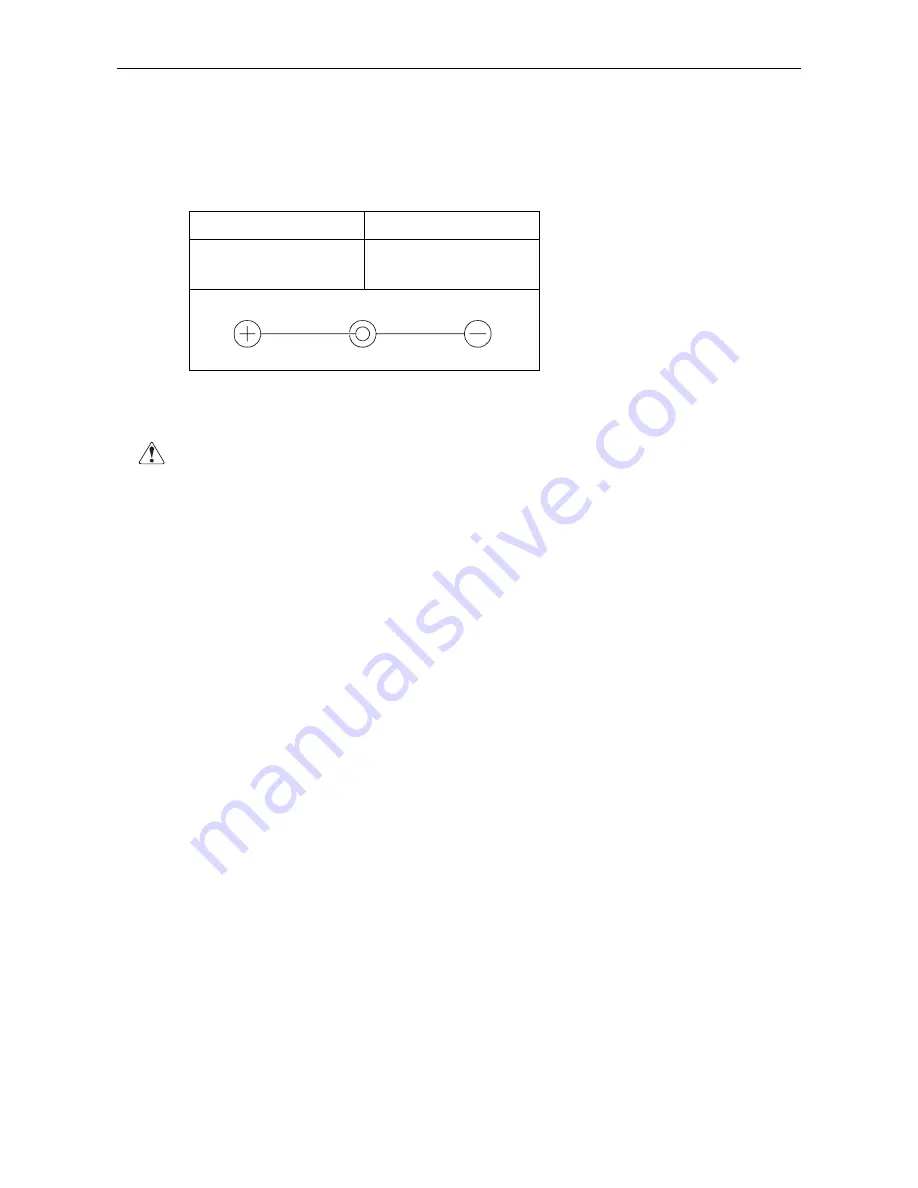
8.2  Power Supply Connector Specifications

This is a power connector from an exclusive AC adapter.

Connector’s Pin Configuration

No.

Function

1
2

+17V

GND

1

2

Jack used

: HEC0470-01-640(HOSHIDEN) or equivalent

Applicable plug

: JXP series Type-A (I.D. 2.45 mm, O.D. 5.5 mm) (HOSHIDEN) or equivalent

CAUTION:

Be sure to use the specified power supply.  Use of unspecified one may lead to a
trouble or breakage.

Do not connect the power supply with different polarities.

Содержание iDP-3310

Страница 1: ...SERIAL THERMAL PRINTER MODEL iDP3310...

Страница 2: ...the extension cord ampere rating Also make sure that the total of all products plugged into the wall outlet does not exceed 15 amperes Never push objects of any kind into this product through cabinet...

Страница 3: ...Verl ngerungskabel mu der Stromst rke aller daran angeschlossenen Ger te entsprechen Keine Gegenst nde in die Geh useschlitze schieben Drucker darf nur da gewartet werden wo im Handbuch angegeben ffne...

Страница 4: ...case the user at his own expense will be required to take whatever measures may be necessary to correct the interference CAUTION Use shielded cable for this equipment Sicherheitshinweis Die Steckdose...

Страница 5: ...outside the responsibility of this company 6 Do not carry out operations other than those explained in this User s manual since doing so may become a cause of accidents or breakdowns 7 Because data is...

Страница 6: ...f hazard and damages that can occur if the given instructions are neglected or the equipment is incorrectly operated WARNING Negligence of this precaution may result in death or serious injury CAUTION...

Страница 7: ...spill any liquid or spray any chemical containing liquid over the equipment If any liquid is spilled on it turn off the power disconnect the power cable and power cord from the plug socket and so on...

Страница 8: ...p or put any object on the cable Never connect a grounding cable to a gas pipe There is a danger of explosion When connecting or disconnecting the grounding cable be sure to disconnect the power plug...

Страница 9: ...plastic tape etc Never try to pull the paper forcibly by hand Also be careful not to get the paper caught by the printer cover when opening closing it To avoid injury and prevent damage from occurring...

Страница 10: ...ortion can not be cleared out by the soft cloth Absolutely do not use thinners trichlene benzine or ketone group solvents or chemical soaked cleaning cloths Clean the printer with a soft brush if the...

Страница 11: ...ndication on the Operation Panel 15 4 7 2 Error Details 15 4 8 Self Printing Function 16 4 9 Paper Auto Loading Function 16 4 10 Paper Jam and Shear in Printing 17 5 DIP SWITCH SETTING 18 5 1 Location...

Страница 12: ...r s Pin Configuration 31 8 1 2 Drive Circuit 31 8 2 Power Supply Connector Specifications 32 9 MAINTENANCE AND SERVICE 33 10 PRINT CONTROL FUNCTIONS 34 10 1 Commands List 34 10 2 Command Sets 35 10 3...

Страница 13: ...ruckpapiers Rolle 66 4 5 Entfernen des restlichen Papiers 68 4 6 Beseitigung von Papierstaus 68 4 7 Papierende und Alarm 69 4 7 1 Fehleranzeige am Bedienfeld 69 4 7 2 Fehlermeldungen 69 4 8 Selbstdruc...

Страница 14: ...per loading due to auto loading function 3 High speed printing and quiet printing due to thermal printing 4 High reliability due to long life of printer head and simple design 5 Input buffer incorpora...

Страница 15: ...nter on a flat and stable table Do not install this printer near a heater or in direct sunlight Do not use this printer in locations with high temperature high humidity or heavy dirt In case of the Pr...

Страница 16: ...R F 120 D Model Name Exclusive AC Adapter Types and Power Cords 33AD U 120V 2 core cord 33AD E 230V 2 core cord Drawer Kick Out Connector None Without drawer Connector D With drawer Connector AC adap...

Страница 17: ...bytes Paper end detection Equipped Stop printing when the paper runs out Drawer Kick Out Connector 1 drawer Option Paper Auto Loading Automatically feeds the when the paper is inserted International C...

Страница 18: ...valent Core 12mm Inner diameter CAUTION Print quality may vary if you use paper other than specified In such case change print density by dip switch setting See 5 Dip Switch Setting Do not paste the p...

Страница 19: ...iDP3310 User s Manual 6 CITIZEN 2 3 3 Head and Cutter Layout...

Страница 20: ...iDP3310 User s Manual 7 CITIZEN 3 OUTER APPEARANCE AND COMPONENT PARTS 3 1 Outer Appearance and Component Parts...

Страница 21: ...itch Press this switch when you want to feed the paper The paper is fed while it is being pressed Test printing will be performed if you turn on the power while holding down this switch 5 Power connec...

Страница 22: ...ic shock or wire breakage Unplug the AC Power Supply Cord from the plug socket and do not use the equipment during a thunderstorm A lightening strike might cause fire or electric shock Do not put the...

Страница 23: ...inter and the host side 2 Locate the up and down side of the cable terminal And connect it to the interface connector 3 Fix the cable terminal Serial interface Tighten screws Parallel interface Turn t...

Страница 24: ...ocate the up and down side of the drawer kick out cable connector and put it into the drawer kick out connector on the rear side of the printer CAUTION Do not connect the drawer solenoid other than sp...

Страница 25: ...etachable Do not try to further open beyond the stop position Do not insert paper roll with its end frayed or bent 3 Confirming winding directions of paper roll put it on the paper hook of the upper c...

Страница 26: ...t the position of paper roll pulling paper guide to the front side In case the paper is crooked remove the paper carefully and insert again or pull the paper carefully to adjust or keep pressing FEED...

Страница 27: ...off the power switch and open the printer cover 2 Cut the paper completely with manual cutter on the upper cover 3 Remove the paper completely Pull out the paper carefully do not pull out roughly Do...

Страница 28: ...occurs when the printing paper runs out or has not been inserted Insert it as described in 4 4 Inserting the Printing Paper Rolled The ERROR lamp will be turned off if it is properly inserted The BUS...

Страница 29: ...Loading Function If new printing paper is inserted into the paper inlet of the printer it will be fed by several lines automatically In order to prevent the printing paper from being bent insert it s...

Страница 30: ...e printer is printing or stopping 3 When the printing paper is held and cannot be fed 4 When the printer is locked temporarily by foreign substances in operating the printing head If there is a shear...

Страница 31: ...the arrow indicated direction 4 Set the DIP switches 5 After setting the switches put back the cover and screw it CAUTION Watch out for the edges of the DIP switch cover The screw used is M2 x 3mm Nev...

Страница 32: ...7 buts ON DS2 2 Parity Not provided Provided ON DS2 3 Odd even Odd Even OFF DS2 4 Unused OFF DS2 5 BAUD RATE ON DS2 6 BAUD RATE ON DS2 7 BAUD RATE See the table below OFF DS2 8 Unused OFF DS2 is avai...

Страница 33: ...a reprint command DC3 is received reprinting will be performed 2 seconds after printing all the data Reprinting is not performed unless the reprint command is received The buffer is cleared after repr...

Страница 34: ...pplicable connectors Printer side 57RE 40360 AMPHENOL or equivalent Cable side 57 30360 AMPHENOL or equivalent 6 2 Connector s Pin Configuration No Signal Name No Signal Name 1 2 3 4 5 6 7 8 9 10 11 1...

Страница 35: ...er ACK An 8 bit data request signal Pulse signal output at the end of the BUSY signal Negative logic BUSY The signal to indicate BUSY state of the printer Input new data for LOW Positive logic FAULT T...

Страница 36: ...C MOS level HIGH level 4 0V at minimum LOW level 1 0V at maximum 2 Output signal level All the output signals are at C MOS level HIGH level 4 5V at mimimum LOW level 0 1V at maximum 3 I O Conditions...

Страница 37: ...a from the host can be received When it being HIGH data can not be received 6 3 5 Buffering The BUSY signal is available as a control signal for transferring the data to the input buffer See the page...

Страница 38: ...selectable Stop bit 1 bit or more 4 Signal polarity RS 232C Mark Logic 1 3 to 12V Space Logic 0 3 to 12V 5 Receiving Data RD signal RS 232C Mark 1 Space 0 6 Data receiving control DTR signal Mark Data...

Страница 39: ...itted Data 4 4 DSR Input Data Set Ready D Sub Connector Mini DIN Connector Cautions 1 An RS 232C signal is based on the EIA RS 232C 2 When the data is not being transferred the received data should be...

Страница 40: ...nting data can be loaded in the input buffer Further BUSY can take place on supply of power during test printing during on line or on resetting 3 TD If a command is received which requests the printer...

Страница 41: ...t is not taken as the start bit Without taking it as an error detection of a start bit is carried out once again 2 Data Bit Parity Bit Data bit and parity bit are sampled at 1 2 start bit for time len...

Страница 42: ...nceled 3 Overrun error On detection of an overrun error the data are canceled 7 3 4 Data Receiving Control If the DTR signal is a Space the data can be received from the host side but if it is a Mark...

Страница 43: ...3 6 Electrical Characteristics 1 RS 232C Circuit Input RD DSR Printer Side Host Side Output DTR TD Equivalent MAX232 DTR Mark 8V At Busy TD Mark 8V 1 Space 8V At Ready Space 8V 0 Equivalent MAX232 RD...

Страница 44: ...tor s Pin Configuration No Signal Function 1 FG Frame Ground 2 DRAWER 1 Drawer drive signal 3 4 VDR Drawer drive power 5 6 Connector used TM5RJ3 66 HIROSE or equivalent Applicable connector TM3P 66P H...

Страница 45: ...s Pin Configuration No Function 1 2 17V GND 1 2 Jack used HEC0470 01 640 HOSHIDEN or equivalent Applicable plug JXP series Type A I D 2 45 mm O D 5 5 mm HOSHIDEN or equivalent CAUTION Be sure to use t...

Страница 46: ...er or at the following address Northern America Other Areas CBM America Corporation Japan CBM Corporation Service Center Information Systems Division 365 Van Ness Way CBM Bldg 5 68 10 Nakano Suit 510...

Страница 47: ...n lines 1BH62H n 3BH 44 ESC c Initialize 1BH63H 44 ESC d Request Printer Status 1BH64H 45 ESC e n Set Right Margin 1BH65H n 3BH 45 ESC f n Set Line Attribute 1BH66H n 3BH 46 ESC g Graphic Mode Activa...

Страница 48: ...is received the contents of the buffer will be printed automatically In the P 250 mode the default delimits at the 42nd character and printing is performed only after the LF command is received 2 iDP5...

Страница 49: ...nd when accompanied by an argument See Also Describes the related commands for use Sample Program Describes a coding example in the QUICK BASIC This example is only for your reference and differs depe...

Страница 50: ...l be ignored immediately after one line buffer full printing In the P 250 mode and P 900R mode printing will not be performed until this command is received See Also ESC a ESC b CR CR iDP 562 Function...

Страница 51: ...e 42 column mode This command prints the data in the print buffer and feeds the paper by one page Caution In the 40 and 42 column modes note that paper feed is also counted as one page worth of lines...

Страница 52: ...received as a command accessory code or data it will have a function DC2 ALL Function Specify Underline Code 12 H Outline This command specifies an underline It is invalid when the DSW1 6 are set to...

Страница 53: ...e or 42 column mode it will be ignored Default The P 200 mode or 40 column mode is effected immediately after power on See Also GS GS P 250 P 900R 42ch Function Execute P 200 Mode iDP 562 40 column Mo...

Страница 54: ...s valid until the US command normal width mode or CAN command is received In the P 200 mode this attribute will be reset to the normal width at the beginning of each line every time the line is fed Se...

Страница 55: ...double width characters If the line has only one character worth of position printing will be performed in normal width This attribute remains valid until the SI command normal width mode or CAN comma...

Страница 56: ...Function Set Line Height Code 1B H 61 H n 3B H Range 7 n 255 30 H n 39 H Outline This command defines a height of each print line A dot line is 1 77 inch It sets a line feed rate to n 77 inch A param...

Страница 57: ...of lines x Line height 77 Caution Be sure to add 3B H to the end of the parameter If 0 or 256 or more is specified for the parameter this command will be ignored See Also ESC a Program Example When ej...

Страница 58: ...anical error the data may not be received See Also ESC a ESC e n P 250 P 900R Function Set Right Margin Code 1B H 65H n 3B H Range 1 n 42 30 H n 39 H Outline In the P 250 mode and P 900R mode this com...

Страница 59: ...O SI RS US ESC h n ALL Function Select Character Set Code 1B H 68H n 3B H Range 0 n 10 30 H n 39 H Outline This command selects the character sets of the countries listed below depending on the n valu...

Страница 60: ...ode and P 900R mode ESC x ALL Function Select P 900R Mode Code 1B H 78 H Outline The command or function following this command works as the P 900R mode Caution This command can be canceled by the FS...

Страница 61: ...ank lines in total If n 20 is set the number of printable lines will be 14 Caution This command is ignored in the P 200 mode P 250 mode and P 900R mode Default n 66 66 lines per page See Also ESC 0 FF...

Страница 62: ...Set 1 in the corresponding bit to print and 0 not to print The following table lists the bit image modes selected by m Vertical Direction Horizontal Direction m Mode Dots Dot Density Dot Density Max D...

Страница 63: ...ed the data will all be printed and 2 seconds later it will be reprinted If this command is not received the data will not be reprinted Command switch repeat print mode 1 DSW1 7 DSW1 8 OFF If the comm...

Страница 64: ...iDP3310 User s Manual 51 CITIZEN 11 CHARACTER CODES TABLE 11 1 P 250 P 900R mode...

Страница 65: ...iDP3310 User s Manual 52 CITIZEN 11 2 iDP 562 mode...

Страница 66: ...iDP3310 User s Manual 53 CITIZEN 11 3 International Character Codes Table All Common...

Страница 67: ...iDP3310 User s Manual 54 CITIZEN APPENDIX 1 BLOCK DIAGRAM...

Страница 68: ...iDP3310 User s Manual 55 CITIZEN APPENDIX 2 OUTER DIMENTION...

Страница 69: ...iDP3310 User s Manual 56 CITIZEN German...

Страница 70: ...eb in falschen Betriebsumgebungen verursacht werden 6 Keine Arbeiten ausf hren die nicht ausdr cklich in dieser Bedienungsanleitung beschrieben sind Durch unsachgem e Arbeiten k nnen Unf lle und Sch d...

Страница 71: ...achsch den die durch eine Mi achtung der Bedienungshinweise oder durch die unsachgem e Handhabung des Ger ts entstehen k nnen WARNUNG Die Mi achtung dieser Vorsichtsma regel kann zu K rperverletzungen...

Страница 72: ...n Bei versehentlichem Na werden das Ger t sofort ausschalten das Stromanschlu kabel abziehen das Netzkabel von der Steckdose trennen usw und an einen Fachh ndler wenden Das Ger t niemals eigenh ndig z...

Страница 73: ...de und Stromausf lle die Folge sein Dar ber hinaus nicht fest auf das Netzkabel treten oder schwere Gegenst nde darauf abstellen Erdungskabel niemals an ein Gasrohr anschlie en da hierbei Explosionsge...

Страница 74: ...klebt ist Niemals das Papier gewaltsam mit der Hand ziehen Auch darauf achten das Papier beim Offnen Schlie en nicht im Drucker einzuklemmen Zum Vermeiden von Verletzungen oder Sachsh den Ber hren Sie...

Страница 75: ...n und auswringen Auf keinen Fall fl chtige organische L sungsmittel wie Terpentin Trichlen Benzol oder Keton verwenden oder chemisch impr gnierte Reinigungslappen Wenn der Druckkopf durch Papierstaub...

Страница 76: ...trischen Schl gen f hren kann Bei einem Gewitter immer den Netzstecker abziehen das Ger t nicht verwenden Bei Blitzeinschlag k nnen starke Spannungsschwankungen auftreten die bei angeschlossenem Ger t...

Страница 77: ...kal ausgerichtet an die Schnittstellenbuchse anchlie en 3 Den Kabelanshlu stecker vertikal ausgerichtet an die Schnittstellenbuchse anschlie en Serienshnittstelle Die Schrauben festziehen Parallelschn...

Страница 78: ...Ausschubmechanismus Kabelstecker vertikal ausgerichtet in die Geldschubladen Ausschubmechanismusbuchse an der R ckseite des Druckers einstecken VORSICHT Keine anderen Vorrichtungen wie z B eine Telefo...

Страница 79: ...Druckpapierrolle korrekt ausgerichtet fest auf den Papierhaken der oberen Abdeckung aufsetzen 4 Den Drucker einschalten 5 Das Papierende gerade in die Papiereinzug ffnung einf hren durch einen Pfeil a...

Страница 80: ...e Druckerabdeckung schlie en und die Papiervorschubtaste FEED zum Ausrichten des Papiers dr cken Die Druckerabdeckung niemals w hrend des Druckens ffnen da hierdurch papierstaus usw entstehen k nnen N...

Страница 81: ...nung sauber abschneiden 3 Die gesamte Druckpapierrolle herausnehmen Anschlie end das gestaute Papier langsam und vorsichtig herausziehen Niemals ruckartig am Papier ziehen und darauf achten den Druckk...

Страница 82: ...nzeige dieser Fehlermeldung ist wie unter 4 4 Einlegen des Druckpapiers Rolle beschrieben Papier einzulegen Sofern das Papier korrekt eingelegt wurde erlischt anschlie end das ERROR L mpchen Die Signa...

Страница 83: ...Papiervorschubfunktion Nach Einf hren von neuem Druckpapier in die Papiereinzug ffnung wird das Papier automatisch mehrere Zeilen weitertransportiert Das Druckpapier gerade in die Papiereinzug ffnung...

Страница 84: ...Druckapier festgehalten wird und nicht vorgeschoben weden kann 4 Wenn die Druckfunktion vor bergehend unterbrochen wurde weil Fremdk rper den Druckkopf blockieren Ein Rei en im Druckbetrieb macht sich...

Страница 85: ...4 Die DIP Schalter einstellen 5 Nach dem Einstellen der Schalter die Abdeckung wieder ansetzen und festschrauben VORSICHT Die Abdeckung ist mit Schrauben der Gr e M2 x 3 mm befestigt Zur Befestigung d...

Страница 86: ...2 Parit t Nein Ja ON DS2 3 Ungerade Gerade Ungerade Gerade OFF DS2 4 Deaktiviert OFF DS2 5 Baudrate ON DS2 6 Baudrate ON DS2 7 Baudrate Siehe untenstehende Tabelle OFF DS2 8 Deaktiviert OFF Der DIP S...

Страница 87: ...Information Systems Division CBM Bldg 5 68 10 Nakano Nakano ku Tokyo 164 0001 Japan Head Office Tel 81 3 5345 7540 Fax 81 3 5345 7541 01 980625 3000 0255 0092 3000 Printed in Japan...

Отзывы: