background image

48

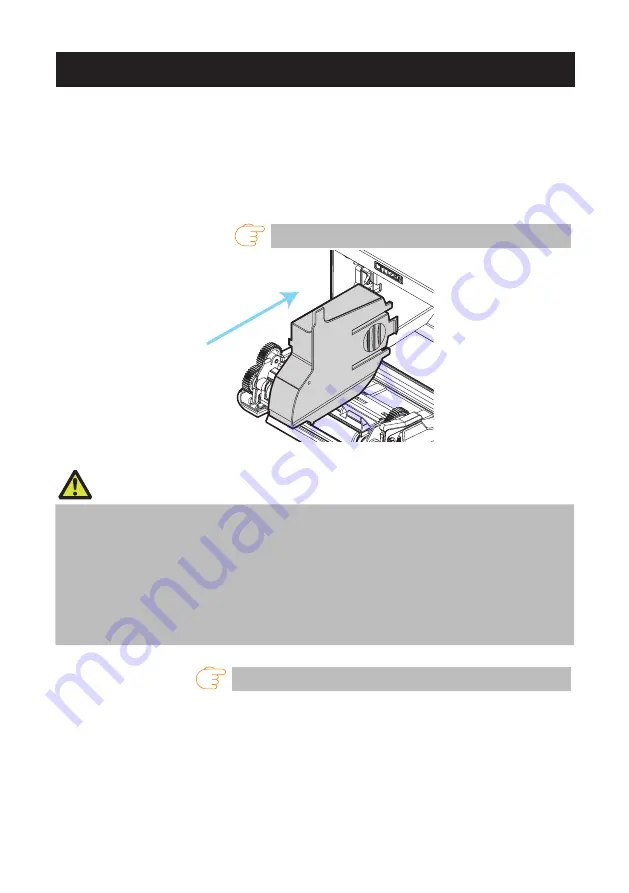
3.12  58-mm Width Roll Paper Partition

1.  Turn off the power.
2.  Push down the cover open lever to open the paper cover.
3.  Mount the supplied partition to the groove. When using the 80-mm width roll paper, 

remove the partition.

4.  Change the print area width while referring to “Manual Setting of Memory Switches” in 

Section 5.3.

  Refer to 5.3  Manual Setting of Memory Switches 

 CAUTION

 When using 58-mm width media, be sure to mount the partition.

 When opening the paper cover, be careful not to touch the entrance of the blade of the auto 

cutter.

 The print head is very hot immediately after printing. Be careful not to touch it with your 

hands.

 Do not touch the print head with bare hands or metal objects.

 When using 58-mm wide paper, use the printer as a dedicated printer for that paper size.  

The printer may not correctly feed paper or print if it is switched to 80-mm wide paper after 
using 58-mm wide paper.


  Refer to PRECAUTIONS IN HANDLING THE PRINTER 

Содержание CT-S751

Страница 1: ...LINE THERMAL PRINTER MODEL CT S751 User s Manual...

Страница 2: ...vista por la sobre residuos de aparatos el ctricos y electr nicos RAEE vigente nicamente en la Uni n Europea Ge Fr Sp It Se desiderate gettare via questo prodotto non mescolatelo ai rifiuti generici d...

Страница 3: ...area is likely to cause interference in which case the user at his ownexpense will be required to take whatever measures may be necessary to correct theinterference CAUTION Use shielded cable for thi...

Страница 4: ...attributable to incorrect operation handling or improper operating environments that are not specified in this manual Data is basically for temporary use and not stored for an extended period of time...

Страница 5: ...e is a registered trademark of DENSO WAVE INCORPORATED Ethernet is a registered trademark of Fuji Xerox Corporation Bluetooth is a registered trademark of Bluetooth SIG Inc CITIZEN is a registered tra...

Страница 6: ...of hazard and damage that could occur if the printer is improperly operated by ignoring the instructions indicated by the warning symbols Be sure to read this information carefully WARNING Neglecting...

Страница 7: ...the printer Dropping a metallic foreign object into the printer may cause printer fail ure fire or electric shock Should it occur immediately turn the printer off unplug it from the supply outlet and...

Страница 8: ...te cores or other anti noise devices Avoid using the printer with a device that is a strong source of noise The printer may have an adverse effect on nearby radio or TV transmis sions There may also b...

Страница 9: ...power cord to overheat catch fire or the circuit breaker to trip Do not allow anything to rest on the power cord Do not place the printer where the power cord may be stepped on Do not subject the powe...

Страница 10: ...during printing Avoid operating the printer without paper properly loaded Avoid the use of paper not complying with specifications May result in poor print quality Avoid using torn pieces of paper or...

Страница 11: ...smoke an odd smell or unusual noise while printing immediately abort the current print session and unplug the printer from the electric outlet DAILY MAINTENANCE Observe the following precautions for...

Страница 12: ...Connecting the Cash Drawer 42 3 9 Precautions for Installing the Printer 44 3 10 Adjusting the Paper Near end Sensor 45 3 11 Loading Paper 46 3 12 58 mm Width Roll Paper Partition 48 3 13 Mounting th...

Страница 13: ...LAN or wireless LAN model USB host function capable of controlling peripheral devices included wired LAN or Bluetooth USB host model Printer status and errors indicated by five LEDs Built in drawer ki...

Страница 14: ...with your printer NAME QUAN TITY ILLUSTRATION Printer 1 AC Adapter 37AD5 1 AC power cord 1 Partition 1 Cable clamp 1 1 L shaped USB cable 2 1 Cable cover 1 Sample paper roll 1 roll Quick Start Guide 2...

Страница 15: ...may not be available 1 4 Basic Specifications Item Specifications Model CT S751 Print method Line thermal dot print method Print widths 72 mm 576 dots 68 25 mm 546 dots 64 mm 512 dots 52 5 mm 420 dots...

Страница 16: ...supply port Max 2 1 A Cash drawer kick out Supports 2 cash drawers Input buffer 4 K bytes 45 bytes Supply voltage DC 24 V 5 Power consumption Approximately 50 W average 2 W or less standby 0 2 W or l...

Страница 17: ...r open lever Use to open the paper cover 3 POWER button Hold down two or three seconds to switch power on or off 4 FEED button Press this button to feed paper In case of a cutter error press the FEED...

Страница 18: ...rmalities are detected COVER LED Green Lights or flashes when an open paper cover is detected May also light or flash when other abnormalities are detected SERVICE LED Orange Flashes when an unrecover...

Страница 19: ...the end of the paper is near 3 Button to change paper near end sensor Change the position of the paper near end sensor to match the paper being used Refer to 3 10 Adjusting the Paper Near end Sensor 4...

Страница 20: ...can be stored in memory Settings remain stored in the memory even if the printer is turned off USB linked power OFF When MSW6 3 of memory switch is set to ON When the printer is connected to PC by USB...

Страница 21: ...cut paper may be torn off in the next printing process which may cause a problem Auto side shift MSW8 6 This function dissipates heat load during frequent heat generation by a vertical ruled line or o...

Страница 22: ...t Use an AC power source that does not also supply power to equipment that generates elec tromagnetic noise Pulling on the AC power cord may damage it cause a fire electric shock or break a wire If a...

Страница 23: ...firmly into the interface port of the host computer CAUTION When disconnecting the cable always hold the connector Place the interface cable so that people do not trip on it Do not connect multiple i...

Страница 24: ...ays hold the connector Place the interface cable so that people do not trip on it Do not connect multiple interfaces at the same time Be careful not to insert the USB cable into the cash drawer kick o...

Страница 25: ...ne con nected to the connector on the main unit side Bluetooth status LED Status Description LED Status Detection standby Discoverable Standing by for detection and connection Connection standby Conne...

Страница 26: ...ettings depends on whether SSP secure simple pairing is enabled on the host PC If SSP is enabled on the host PC pairing can be achieved without additional operations If SSP is disabled on the host PC...

Страница 27: ...hen you want Bluetooth communication to cut off after printing is complete When there are multiple iOS devices printing on the same printer Under such conditions disable auto reconnection Enabling and...

Страница 28: ...aces can control peripheral devices connected via a USB port Connecting a Peripheral Device 1 Turn off the power 2 Connect the cable of a peripheral device to this port CAUTION A peripheral device can...

Страница 29: ...t a peripheral device The connected peripheral device can be controlled 2 For host computer communication Connect with a host computer The printer and host computer will communicate via USB Refer to 3...

Страница 30: ...tooth devices Confirm that Bluetooth is enabled on the host PC before searching for Bluetooth devices This product will show up as CT S751_XX XX is last 2 digits of unique BD address when it is detect...

Страница 31: ...if you detect devices again with the host PC When deleting pairing information press and hold the panel button for at least three seconds and after the buzzer sounds press it four more times If succe...

Страница 32: ...lf Test Panel button operation Use the panel button on the rear of the Bluetooth board to operate this board Panel button USB port BT device search MSW13 5 settings 1 Press and hold the panel button t...

Страница 33: ...nts the interface board state Print example 1 Board firmware version 2 Address of equipped Bluetooth module 3 Bluetooth name 4 Response profile in Bluetooth transmission 5 Bluetooth setting state 6 Na...

Страница 34: ...ff the power 2 Confirm the orientation of the interface cable and connect it to the port 3 Connect the other connector to a hub router or similar device CAUTION When disconnecting the cable always hol...

Страница 35: ...Connecting a USB Device The function assigned to each USB port differs Connect the USB device to be connected to the correct place in reference to the fol lowing figure 1 2 3 Ethernet USB host model 4...

Страница 36: ...on the printer Operation of this board will start about 20 seconds later Printing LAN setup information Press the panel button Entering setting mode Hold down the panel button A buzzer will sound once...

Страница 37: ...connec tion No network connection Lit Unlit Board is connected with a printer Connected by wired LAN Lit Flashing 1 second cycle Getting an IP address from the DHCP server over wired LAN Wired LAN op...

Страница 38: ...rd with a web browser and change board settings Starting up Web Manager 1 Start up a web browser 2 In the address field input the board s IP address and then press Enter HOME Screen This is the Web ma...

Страница 39: ...settings User Name Input a board administrator user name Initial setting admin Password Input the administrator user password Initial setting admin Login button After inputting an administrator user...

Страница 40: ...other device to the USB power supply port Connecting a USB Device The function assigned to each USB port differs Connect the USB device to be connected to the correct place in reference to the fol low...

Страница 41: ...3 7 USB Power Supply Port CAUTION This port does not support USB data communication Power may not be able to be supplied depending on the USB device to be used In this case use the device s dedicated...

Страница 42: ...CAUTION Connect only the cash drawer kick out cable to this connector Do not connect a telephone line Signals cannot be output from the cash drawer kick out connector while printing Hold the connector...

Страница 43: ...l Status can be tested by commands 4 Drive circuit Cash drawer kick out connector Cash drawer open close switch Shielded Printer Cash drawer CAUTION Cash drawers 1 and 2 cannot be operated at the same...

Страница 44: ...position CAUTION Do not use the printer under the following conditions Avoid locations subject to vibration or instability Locations that are very dirty or dusty Avoid locations where the printer is n...

Страница 45: ...ous diameters of the paper roll used Unit mm Sensor position Paper roll outer diameter when near end is detected Exterior interior diameter of core of paper roll used 1 Approximately 22 0 18 12 2 Appr...

Страница 46: ...hat you do not pinch your fingers in the gap below the bottom of the lever 3 Load the paper roll so that the printable side of the paper is facing up as shown by arrow A 4 Pull a few centimeters of pa...

Страница 47: ...ts Always use the specified types of paper rolls Confirm that the paper roll is set correctly If the paper is skewed and not coming straight out of the paper cover open it and straighten the paper Alw...

Страница 48: ...UTION When using 58 mm width media be sure to mount the partition When opening the paper cover be careful not to touch the entrance of the blade of the auto cutter The print head is very hot immediate...

Страница 49: ...49 3 13 Mounting the Cable Cover Align the claws of the cable cover with the grooves in the printer main unit and then insert them 1 1 Cable cover...

Страница 50: ...appear in the printouts when you are printing graphics or gradated text which require large amounts of data USB interfaces may be susceptible to the effects of electromagnetic interference from the h...

Страница 51: ...3 Wait a few minutes until the print head cools 4 Use a cotton swab dampened with ethyl alcohol to wipe off any dirt and dust that is on the print head and platen 2 1 1 Print head 2 Platen CAUTION Wh...

Страница 52: ...h down the cover open lever to open the paper cover 3 Remove any jammed paper including any scraps of paper Remove the paper roll that is loaded in the holder also 4 Reload the paper roll and close th...

Страница 53: ...ld the FEED button and turn on the power 2 Hold the FEED button down for about one second until the buzzer sounds Release the button to start self test The printer will print its model name version me...

Страница 54: ...ver 3 The printer will print HEX dump print mode followed by the received data printed in hexadecimal numbers and some characters How to stop hexadecimal dump printing Do one of the following to stop...

Страница 55: ...uple of centimeters and then close the cover Printing restarts A command must be sent to restart printing depending on the memory switch setting Cutter error If the auto cutter cannot move because of...

Страница 56: ...4 Unlit Unlit Unlit Yes 2 Cutter locked Unlit Unlit Unlit Yes Low voltage error Unlit No High voltage error Unlit Unlit Unlit No System error Unlit Unlit Unlit No Memory error Unlit Unlit Unlit No Pri...

Страница 57: ...ng for Which Printing Speed Changes When printing for which the printing speed changes is performed white lines may be printed or paper may not be fed depending on the printing conditions To prevent t...

Страница 58: ...58 5 OTHER 5 1 External Views and Dimensions Unit mm 108 125 165...

Страница 59: ...Paper Mills HP220AB 1 P220AB Koehler KT48 FA Unit mm Max printing width 72 Paper width 80 Unit mm 0 1 Paper width 58 0 1 Printing surface Printing width 83 or less 65 85 m 48 384 dot 5 5 4 D d 4 Paper...

Страница 60: ...r 3 Press the FEED button three and close the paper cover The printer enters memory switch quick setting mode The selectable item Model and the selection are printed Selectable item Selection Model CI...

Страница 61: ...2 Character Space CITIZEN CT S310 58 mm WaitData Invalid 384 dots 80 mm WaitData Invalid 576 dots EPSON T88 58 mm 0 dot WaitData Invalid 360 dots 0 dot 1 dot WaitData Invalid 390 dots 1 dot 80 mm 0 d...

Страница 62: ...W 1 Memory SW 2 Memory SW 11 or Memory SW 13 Save To Memory Memory SW 1 Press the FEED button until the number for the memory switch you want to change is printed 5 Press the FEED button for at least...

Страница 63: ...button for at least two seconds The changed memory switch settings are saved and a list of them is printed The printer exits individual setting mode when printing is finished Memory switch initializat...

Страница 64: ...Invalid Valid MSW2 3 Spool Print Invalid Valid MSW2 4 Full Col Print LineFeed WaitData MSW2 5 Resume aft PE Next Top MSW2 6 Reserved Fixed MSW2 7 Reserved Fixed MSW2 8 PNE Sensor Valid Invalid MSW3 1...

Страница 65: ...tting value MSW7 1 Baud Rate 9600 bps 1200 bps 2400 bps 4800 bps 9600 bps 19200 bps 38400 bps 57600 bps 115200 bps MSW7 2 Data Length 8bits 7bits 8bits MSW7 3 Stop Bit 1bit 1bit 2bits MSW7 4 Parity NO...

Страница 66: ...CP932 Japan SJIS X0213 Japan GB18030 China KS Hangul South Korea EUC Hangul South Korea BIG5 HKSCS MSW10 1 Print Density 100 70 75 80 85 90 95 100 105 110 115 120 125 130 135 140 MSW10 2 Print Speed L...

Страница 67: ...CT S751_UM_101_EN PMC 1906 June 2019...

Отзывы: