
Initial configuration
Configuration using the front panel
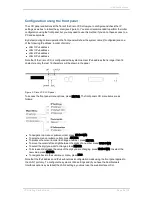
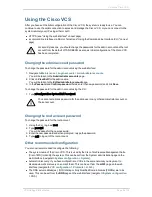
The LCD panel and buttons at the front of the Cisco VCS allow you to configure and check the IP
settings as well as to reboot the system (see Figure 3). You are not recommended to perform the initial
configuration using the front panel, but you may need to use this method if you do not have access to a
PC and serial cable.
By default, during normal operation the front panel will show the system name (if configured) and one
of the following IP address, in order of priority:
n
LAN 1 IPv4 address
n
LAN 1 IPv6 address
n
LAN 2 IPv4 address
n
LAN 2 IPv6 address
Note that if the Cisco VCS is configured with a system name or IPv6 address that is longer than 16
characters, only the last 16 characters will be shown in the panel.
Figure 3: Cisco VCS LCD panel
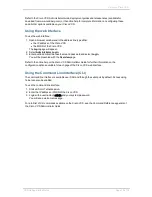
To access the front panel menu options, press
ENTER
. The front panel LCD menu items are as
follows:
n
To navigate to a menu or submenu item, press
UP/DOWN
.
n
To select a menu or submenu item, press
ENTER
.
n
To produce the cursor in order to change a number, press
ENTER
.
n
To move the cursor left and right between the digits of a number, press
UP/DOWN
.
n
To select the digit you want to change, press
ENTER
.
n
To increase or decrease the value of the digit you are changing, press
UP/DOWN
; to select the
new value, press
ENTER
.
n
To navigate back to the submenu or menu, press
ESC
.
Note that the IPv4 address and IPv4 subnet mask configuration made using the front panel applies to
the LAN 1 port only. To configure the system’s IPv6 settings and (if you have the Dual Network
Interfaces option key installed) the LAN 2 settings, you must use the web interface or CLI.
VCS Getting Started Guide
Page 8 of 12


