5-80 Cisco 7010 Hardware Installation and Maintenance
Replacing Internal Components
Warning
Before accessing the chassis interior, turn OFF the system power and unplug the power
cord. When the power is ON, high current is exposed on the fan tray and backplane.
Replacing the Power Supply
Follow these steps to replace the power supply:
Step 1
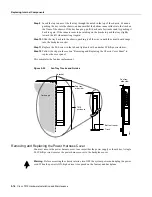
Before inserting a power supply, remove the cable retention clip from the AC input port (on
the interface processor end); otherwise it can catch on the floor of the chassis during the
installation. Pinch the sides together until they clear the jackscrews. (See Figure 5-28.)
Step 2
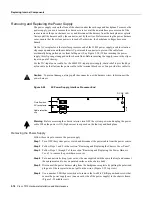
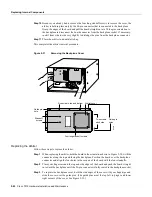
To replace a power supply, hold the supply as shown in Figure 5-29c and slide it into the
bottom of the chassis. Use the handles to push the supply all the way into the chassis until
the ears on both sides are flush against the chassis frame. (See Figure 5-29b.)
Step 3
Use a number 2 Phillips screwdriver to replace the two M-4 Phillips pan-head screws to
secure the two power supply ears to the chassis frame.
Step 4
Reconnect the power harness plug to the backplane receptacle. The harness plug and
backplane receptacle are polarized with notches at the top of both guide tabs (top and
bottom) on the plug. Ensure that the plug is fully seated in the receptacle.
Step 5
Follow Steps 6 through 10 in the section “Removing and Replacing the Power Harness
Cover” to replace the power harness cover.
Step 6
Follow Steps 3 through 6 in the section “Removing and Replacing the Chassis Cover Panel”
to replace the chassis cover panel.
Step 7
On the interface processor side of the AC-input power supply, replace the cable retention
clip on the AC-input port by pinching the sides together and letting the ends snap out into
holes in the jackscrews. (See Figure 5-28.)
For the DC-input power supply, refer to the section “Connecting Power” in the chapter
“Installation” and follow the steps for connecting the DC-input power cable leads.
This completes the power supply replacement procedure.
Replacing the Arbiter
The arbiter provides switching and traffic control assistance to the SP (or SSP). Replace the arbiter
board only if it fails.
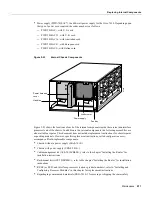
The arbiter is a printed circuit board mounted to the noninterface processor side of the backplane,
behind the backplane cover. (See Figure 5-23.) On the back (backplane side) of the arbiter are four
standoffs and a 96-pin connector that plugs directly into the backplane. When the backplane cover
is in place, four standoff screws extend through the backplane cover, through each corner of the
arbiter, and into the standoffs to keep both the arbiter and cover in place.
You must remove the backplane cover to access the arbiter, and you must remove the power harness
cover and the fan tray before you can remove the backplane cover.
Содержание TelePresence Server 7010
Страница 10: ...x Cisco 7010 Hardware Installation and Maintenence ...
Страница 14: ...iv Cisco 7010 Hardware Installation and Maintenance Document Conventions ...
Страница 112: ...2 52 Cisco 7010 Hardware Installation and Maintenance Initial Configuration Information Page ________ ...
Страница 148: ...3 36 Cisco 7010 Hardware Installation and Maintenance Using the Flash Memory Card ...
Страница 158: ...4 10 Cisco 7010 Hardware Installation and Maintenance Troubleshooting the Processor Subsystem ...
Страница 242: ...5 84 Cisco 7010 Hardware Installation and Maintenance Replacing Internal Components ...
Страница 258: ...A 16 Cisco 7010 Hardware Installation and Maintenance MIP Interface Cable Pinouts ...
Страница 270: ...B 12 Cisco 7010 Hardware Installation and Maintenance Interface Processor LEDs ...
Страница 274: ...C 4 Cisco 7000 Hardware Installation and Maintenance ...
Страница 287: ...Index 13 ...


