background image


2-5

Cisco SFS 3012R Multifabric Server Switch Hardware Installation Guide

OL-11187-01

Chapter 2      Installing and Booting the Cisco SFS 3012R Server Switch

    Mounting the Cisco SFS 3012R Server Switch on a Rack

Step 3

Attach the shelf rails to either side of the Cisco SFS 3012R Server Switch chassis as follows:

a.

Unpack the shelf assembly kit (ordered and shipped separately).

b.

Identify the shelf rails labeled TS360/SFS 3012.

c.

Attach the rails to the chassis with the four screws provided, as shown in 

Figure 2-1

.

Step 4

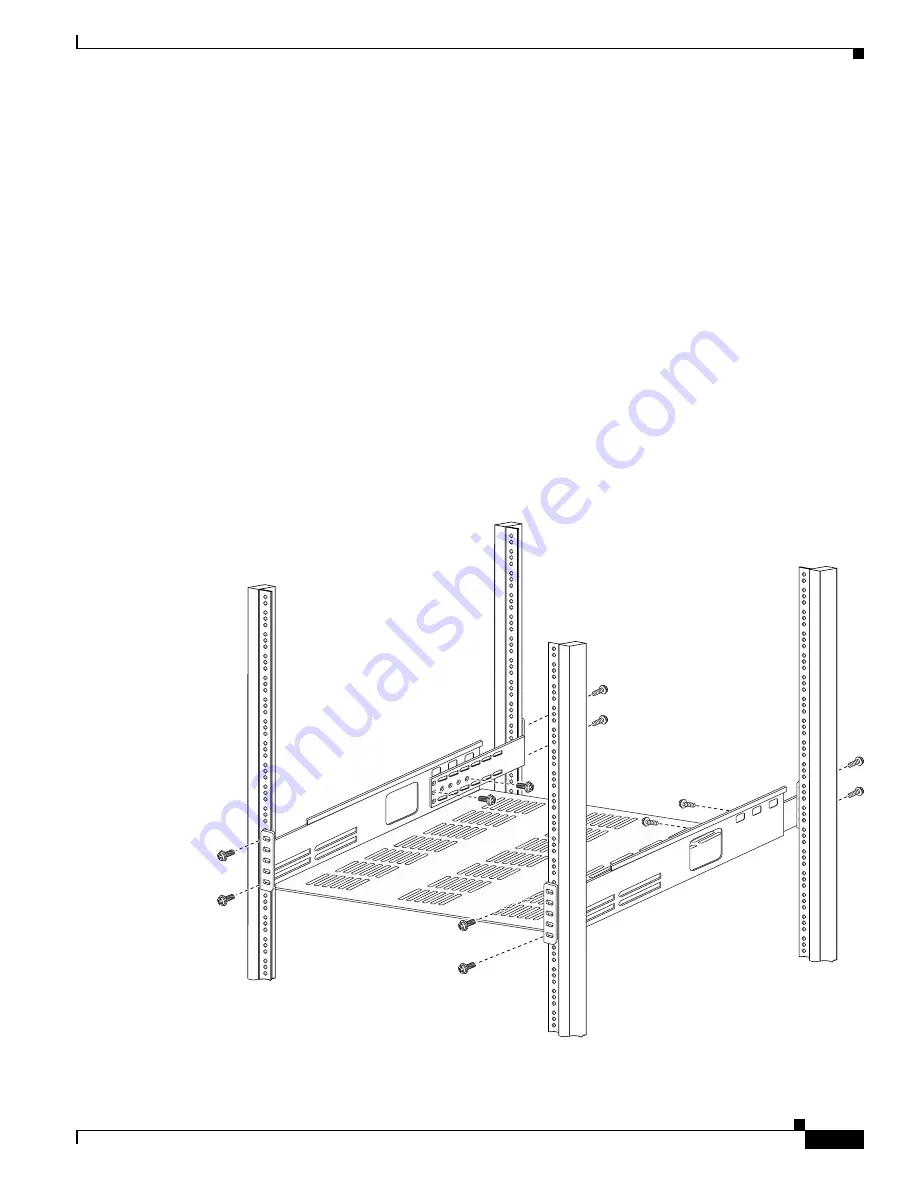
Mount the shelf onto the rack, as shown in 

Figure 2-2

, using the procedure outlined below. (For 

additional details about the shelf installation procedure, see “Install the Shelf Kit” in the 

Cisco SFS 7008 

InfiniBand and Cisco 3012 Multifabric Server Switches Optional Shelf Kit, Contents and Installation 
Guide

, which ships with the shelf assembly.)

a.

Unpack the shelf assembly, and remove the extension brackets.

b.

Verify that the shelf position provides sufficient clearance for the Cisco SFS 3012R Server Switch 
and all cables. 

c.

Use four screws that fit your rack (not included) to attach the extension brackets to the rack posts at 
the rack end at which the bezel end of the chassis will sit. Each bracket must wrap around the inside 
of the rack post and attach by its flange to the side of the rack post that faces away from the rack.

d.

Slide the shelf onto the installed extension brackets until the shelf flange makes contact with the 
rack posts at the rack end at which the cable end of the chassis will sit.

Figure 2-2

Attaching the Shelf to the Rack

180734

Содержание SFS 3012R

Страница 1: ... Inc 170 West Tasman Drive San Jose CA 95134 1706 USA http www cisco com Tel 408 526 4000 800 553 NETS 6387 Fax 408 526 4100 Cisco SFS 3012R Multifabric Server Switch Hardware Installation Guide Release 2 8 0 Text Part Number OL 11187 01 ...

Страница 2: ...quipment may be limited by FCC regulations and you may be required to correct any interference to radio or television communications at your own expense You can determine whether your equipment is causing interference by turning it off If the interference stops it was probably caused by the Cisco equipment or one of its peripheral devices If the equipment causes interference to radio or television...

Страница 3: ...uct Alerts and Field Notices xvii Obtaining Technical Assistance xvii Cisco Technical Support Documentation Website xvii Submitting a Service Request xviii Definitions of Service Request Severity xviii Obtaining Additional Publications and Information xix C H A P T E R 1 Cisco SFS 3012R Server Switch Overview 1 1 Introduction 1 1 Features 1 2 Performance 1 2 Unified Fabric 1 2 Transparent Topology...

Страница 4: ... A P T E R 3 Installing and Removing Server Switch Field Replaceable Units FRUs 3 1 Installing a Controller Module 3 2 Adding or Replacing Ethernet or Fibre Channel Gateways 3 3 Installing an InfiniBand Switch Module 3 4 Removing an InfiniBand Switch Module 3 7 Installing a Power Supply Module 3 7 Removing a Power Supply Module 3 9 Installing a Blower Module 3 9 Removing a Blower Module 3 11 C H A...

Страница 5: ...Ds 5 4 Controller LEDs 5 5 InfiniBand LEDs 5 7 InfiniBand Switch Module LEDs 5 7 InfiniBand Port LEDs 5 8 Fibre Channel LEDs 5 9 Fibre Channel Gateway LEDs 5 9 Fibre Channel Port LEDs 5 10 Ethernet Gateway LEDs 5 11 Ethernet Gateway LEDs 5 12 Ethernet Port LEDs 5 12 A P P E N D I X A Specifications and Compliance A 1 General Specifications A 1 Electrical Specifications A 2 Certifications Regulator...

Страница 6: ...Contents vi Cisco SFS 3012R Multifabric Server Switch Hardware Installation Guide OL 11187 01 ...

Страница 7: ...he chassis Chapter 2 Installing and Booting the Cisco SFS 3012R Server Switch Provides step by step procedures for installing and booting the Cisco SFS 3012R Server Switch Chapter 3 Installing and Removing Server Switch Field Replaceable Units FRUs Provides installation and removal instructions for field replaceable units FRUs such as controller modules expansion modules InfiniBand switch modules ...

Страница 8: ...races and separated by vertical bars Braces can also be used to group keywords and or arguments for example interface interface type x y z Optional alternative keywords are grouped in brackets and separated by vertical bars string A nonquoted set of characters Do not use quotation marks around the string or the string will include the quotation marks screen font Terminal sessions and information t...

Страница 9: ...ng to locate its translation in the translated safety warnings that accompanied this device SAVE THESE INSTRUCTIONS Waarschuwing BELANGRIJKE VEILIGHEIDSINSTRUCTIES Dit waarschuwingssymbool betekent gevaar U verkeert in een situatie die lichamelijk letsel kan veroorzaken Voordat u aan enige apparatuur gaat werken dient u zich bewust te zijn van de bij elektrische schakelingen betrokken risico s en ...

Страница 10: ... SICUREZZA Questo simbolo di avvertenza indica un pericolo La situazione potrebbe causare infortuni alle persone Prima di intervenire su qualsiasi apparecchiatura occorre essere al corrente dei pericoli relativi ai circuiti elettrici e conoscere le procedure standard per la prevenzione di incidenti Utilizzare il numero di istruzione presente alla fine di ciascuna avvertenza per individuare le trad...

Страница 11: ...cia encontrará el número que le ayudará a encontrar el texto traducido en el apartado de traducciones que acompaña a este dispositivo GUARDE ESTAS INSTRUCCIONES Varning VIKTIGA SÄKERHETSANVISNINGAR Denna varningssignal signalerar fara Du befinner dig i en situation som kan leda till personskada Innan du utför arbete på någon utrustning måste du vara medveten om farorna med elkretsar och känna till...

Страница 12: ...mero da declaração fornecido ao final de cada aviso para localizar sua tradução nos avisos de segurança traduzidos que acompanham o dispositivo GUARDE ESTAS INSTRUÇÕES Advarsel VIGTIGE SIKKERHEDSANVISNINGER Dette advarselssymbol betyder fare Du befinder dig i en situation med risiko for legemesbeskadigelse Før du begynder arbejde på udstyr skal du være opmærksom på de involverede risici der er ved...

Страница 13: ...xiii Cisco SFS 3012R Multifabric Server Switch Hardware Installation Guide OL 11187 01 Preface Conventions ...

Страница 14: ...onal information about the Cisco SFS 3012R Server Switch and related products and interfaces refer to the following publications Regulatory Compliance and Safety Information for the Cisco SFS 7000P SFS 7008P and SFS 3012R Switches Cisco SFS 7000 Series Product Family Command Reference Cisco SFS 7000 Series Product Family Element Manager User Guide ...

Страница 15: ...html Product Documentation DVD The Product Documentation DVD is a library of technical product documentation on a portable medium The DVD enables you to access installation configuration and command guides for Cisco hardware and software products With the DVD you have access to the HTML documentation and some of the PDF files found on the Cisco website at this URL http www cisco com univercd home ...

Страница 16: ...eally Simple Syndication PSIRT RSS feed Information about how to subscribe to the PSIRT RSS feed is found at this URL http www cisco com en US products products_psirt_rss_feed html Reporting Security Problems in Cisco Products Cisco is committed to delivering secure products We test our products internally before we release them and we strive to correct all vulnerabilities quickly If you think tha...

Страница 17: ...ce The Cisco Technical Support Documentation website on Cisco com features extensive online support resources In addition if you have a valid Cisco service contract Cisco Technical Assistance Center TAC engineers provide telephone support If you do not have a valid Cisco service contract contact your reseller Cisco Technical Support Documentation Website The Cisco Technical Support Documentation w...

Страница 18: ... provides recommended solutions If your issue is not resolved using the recommended resources your service request is assigned to a Cisco engineer The TAC Service Request Tool is located at this URL http www cisco com techsupport servicerequest For S1 or S2 service requests or if you do not have Internet access contact the Cisco TAC by telephone S1 or S2 service requests are those in which your pr...

Страница 19: ...s URL http www cisco com go guide Cisco Marketplace provides a variety of Cisco books reference guides documentation and logo merchandise Visit Cisco Marketplace the company store at this URL http www cisco com go marketplace Cisco Press publishes a wide range of general networking training and certification titles Both new and experienced users will benefit from these publications For current Cis...

Страница 20: ...ch Hardware Installation Guide OL 11187 01 Preface Obtaining Additional Publications and Information World class networking training is available from Cisco You can view current offerings at this URL http www cisco com en US learning index html ...

Страница 21: ...itch Chassis page 1 4 Cisco SFS 3012R Server Switch Components page 1 5 Introduction The Cisco SFS 3012R Server Switch provides data center managers with a high performance low latency interconnect that runs Fibre Channel and Ethernet traffic transparently over an InfiniBand backplane Figure 1 1 displays the front of the Cisco SFS 3012R Server Switch with the bezel attached Figure 1 1 Cisco SFS 30...

Страница 22: ...availability Transparent Topology Based on the Transparent Topology architecture the Cisco SFS 3012R Server Switch creates virtual IP and Fibre Channel interfaces on every server allowing existing IP and storage area network SAN resources to seamlessly extend to server clusters Using Fibre Channel gateways SAN management technologies can access each individual node enabling critical storage manage...

Страница 23: ...ity to Fibre Channel networks You can also aggregate uplinks for greater bandwidth and redundancy Scalability You can populate the cable end of the Cisco SFS 3012R Server Switch with additional Fibre Channel gateways Ethernet gateways and a second InfiniBand switch module to increase the port count of your server switch A second InfiniBand switch module adds 12 InfiniBand ports Each additional Fib...

Страница 24: ... of the Cisco SFS 3012R Server Switch are numbered 1 to 14 from left to right The horizontal slots at the bottom of the cable end of the chassis are numbered 15 to 16 from top to bottom Field replaceable units FRUs with interfaces populate the cable end of the chassis FRUs such as power supplies and blower modules populate the front of the chassis behind the bezel as shown in Figure 1 4 180740 1 3...

Страница 25: ...s include the following Controller modules Input output I O gateways Fibre Channel and Ethernet InfiniBand switch modules Power supplies Blower modules Controller Modules Controller modules manage the Cisco SFS 3012R Server Switch and provide Ethernet and Serial Console port access to the server switch You can install controller modules in slots 1 and 14 of the Cisco SFS 3012R Server Switch Figure...

Страница 26: ...s The Command Line Interface CLI prompts users to synchronize the controllers When the master controller fails or reboots the standby controller automatically takes over as the new master All I O modules InfiniBand switch modules Fibre Channel gateways and Ethernet gateways reboot when a failover occurs Users can force a fail over with the Element Manager graphic user interface GUI or with the CLI...

Страница 27: ...annel gateways connect the Cisco SFS 3012R Server Switch and InfiniBand connected hosts to IP and Fibre Channel networks All gateways are dual connected to the redundant InfiniBand backplane of the Cisco SFS 3012R Server Switch Figure 1 6 displays an Ethernet gateway Figure 1 7 displays a Fibre Channel gateway Figure 1 6 Ethernet Gateway Expansion Module 3 1 2 180751 1 Ethernet ports 3 Ethernet ga...

Страница 28: ...uide OL 11187 01 Chapter 1 Cisco SFS 3012R Server Switch Overview Cisco SFS 3012R Server Switch Components Figure 1 7 Fibre Channel Gateway Expansion Module 4 2 1 3 180750 1 Fibre Channel port 1 3 Ejector handle 2 Fibre Channel port 2 4 Fibre Channel gateway status LEDs ...

Страница 29: ...iBand attached hosts and other switches in the InfiniBand network The Cisco SFS 3012R Server Switch supports one or two InfiniBand switch modules The 12 port InfiniBand switch expansion module is shown in Figure 1 8 The switch module provides the following 4x InfiniBand connections to each of the 12 gateway slots 12 InfiniBand ports per switch module Figure 1 8 InfiniBand Switch Module 1 InfiniBan...

Страница 30: ...side and right hand side of the front bezel end of the Cisco SFS 3012R Server Switch as shown in Figure 1 4 Redundant power supplies support hot swaps When your server switch includes only one power supply you can add a second power supply while the chassis runs If you have two power supplies installed you can remove either one of them without removing power from the chassis Figure 1 9 shows a pow...

Страница 31: ...ntain the internal temperature of your server switch You do not need to turn off power to the chassis to replace a blower module You access the blower module from the front bezel end of the Cisco SFS 3012R Server Switch chassis as shown in Figure 1 4 Each blower module contains two blowers so a fully functional system has four functional blowers Three blowers must be functional for continuous oper...

Страница 32: ...1 12 Cisco SFS 3012R Multifabric Server Switch Hardware Installation Guide OL 11187 01 Chapter 1 Cisco SFS 3012R Server Switch Overview Cisco SFS 3012R Server Switch Components ...

Страница 33: ...mponents page 2 3 Mounting the Cisco SFS 3012R Server Switch on a Rack page 2 4 Attaching a Serial Console Cable to a PC or Terminal page 2 8 Booting the Cisco SFS 3012R Server Switch and Configuring Basic Connectivity page 2 8 Connecting InfiniBand Hosts page 2 10 Managing the Cisco SFS 3012R Server Switch page 2 12 Safety Warning During this procedure wear grounding wrist straps to avoid ESD dam...

Страница 34: ...ified personnel should be allowed to install replace or service this equipment Statement 1030 Warning Ultimate disposal of this product should be handled according to all national laws and regulations Statement 1040 Warning This equipment must be installed and maintained by service personnel as defined by AS NZS 3260 Incorrectly connecting this equipment to a general purpose outlet could be hazard...

Страница 35: ... the port count of your Cisco SFS 3012R Server Switch Step 5 Prepare a management workstation not included such as a PC running terminal emulation software not included and a straight through M F DB 9 serial cable included Installing Cisco SFS 3012R Server Switch Components We recommend that you install all Ethernet or Fibre Channel gateway modules before you mount the Cisco SFS 3012R Server Switc...

Страница 36: ...ing or servicing this unit in a rack you must take special precautions to ensure that the system remains stable The following guidelines are provided to ensure your safety This unit should be mounted at the bottom of the rack if it is the only unit in the rack When mounting this unit in a partially filled rack load the rack from the bottom to the top with the heaviest component at the bottom of th...

Страница 37: ...Shelf Kit in the Cisco SFS 7008 InfiniBand and Cisco 3012 Multifabric Server Switches Optional Shelf Kit Contents and Installation Guide which ships with the shelf assembly a Unpack the shelf assembly and remove the extension brackets b Verify that the shelf position provides sufficient clearance for the Cisco SFS 3012R Server Switch and all cables c Use four screws that fit your rack not included...

Страница 38: ...ition the shelf to align the holes in the rack mounting brackets with the rack holes f Secure the extension brackets to the shelf with the screws provided The screw heads must face inside the shelf Step 5 Slide the Cisco SFS 3012R Server Switch onto the shelf as shown in Figure 2 3 Engage the shelf rails with the shelf guides and continue sliding the chassis until the rack mounting brackets on the...

Страница 39: ... the Cisco SFS 3012R Server Switch Mounting the Cisco SFS 3012R Server Switch on a Rack Step 7 Use 4 standard rack screws not included to secure the rack mounting brackets to the rack posts as shown in Figure 2 4 Figure 2 4 Securing the Chassis to the Rack Step 8 Firmly tighten the shelf screws at the cable end 180736 ...

Страница 40: ... is present on the backplane when the system is operating Use caution when servicing Statement 1034 To configure basic connectivity you must power on the server switch and configure it from a terminal or workstation through the serial console port To configure basic Ethernet connectivity you can apply a static IP address to the Cisco SFS 3012R Server Switch or you can configure the chassis to obta...

Страница 41: ...SFS 3012R config if mgmt ethernet ip address 10 10 0 22 255 255 255 0 Step 6 Set the default gateway of the management port as shown in this example SFS 3012R config if mgmt ethernet gateway 10 10 0 1 Step 7 Enable the management port with the no shutdown command SFS 3012R config if mgmt ethernet no shutdown Step 8 Save the configuration to preserve it between reboots SFS 3012R config if mgmt ethe...

Страница 42: ...gmt ethernet command to determine your IP address as shown in the following example SFS 3012R show interface mgmt ethernet Mgmt Ethernet Information mac address 00 05 ad 00 1e 1c auto negotiate enabled admin status up oper status up ip addr 172 29 230 60 mask 255 255 0 0 gateway addr 172 29 230 1 addr option static You can now establish a Telent session to your Cisco SFS 3012R Server Switch or ent...

Страница 43: ...d Cable with Pull Connector Note If your host does not provide enough free space around a given InfiniBand port verify that your InfiniBand cable connector engages fully Wiggle your connector back and forth to be sure that both sides of the connector have locked firmly into place To remove a cable with a pinch connector pinch both sides of the back of the connector as shown in Figure 2 7 and pull ...

Страница 44: ...S 3012R Server Switch You can manage the Cisco SFS 3012R Server Switch with the following methods Command Line Interface CLI a text based interface accessible through a direct serial connection Telnet over IP or SSH over IP Element Manager GUI A graphical interface installed on a workstation accessible over IP Chassis Manager GUI A graphical interface that you access with a web browser Refer to th...

Страница 45: ...moving a Blower Module page 3 11 The components of the Cisco SFS 3012R Server Switch support the scalability and high availability of the server switch The sections in this chapter discuss how to use install remove and swap FRUs to maximize the potential of your Cisco SFS 3012R Server Switch You can install the following components in your chassis Controller modules I O gateways Fibre Channel and ...

Страница 46: ... approved ground wrist strap Step 2 Remove the blanking panel if one resides in the slot Step 3 Remove the controller module from any packaging Step 4 Extend the ejector lever on the module completely Step 5 Insert the controller module into slot 1 left most or slot 14 right most so that the ejector lever sits on the bottom left hand side of the module as shown in Figure 3 1 Step 6 Push the contro...

Страница 47: ...ur gateway For details refer to the install command in the Cisco SFS 7000 Series Product Family Command Reference Chapter 4 Viewing and Updating the Software Image provides instructions for viewing and updating the software image To update a single gateway use the standard installation procedure but do not reboot the chassis You can simply enable and disable the individual gateway to activate the ...

Страница 48: ...ing and Updating the Software Image to update or verify the software image on the gateway module Note All cable connections to Ethernet gateways must use shielded RJ45 CAT5 Ethernet cables Installing an InfiniBand Switch Module To install an InfiniBand switch module perform the following steps Step 1 Ground yourself using an approved ground wrist strap Step 2 Remove the blanking panel if one resid...

Страница 49: ...ch Field Replaceable Units FRUs Installing an InfiniBand Switch Module Step 6 Press the switch module firmly into the slot so the fasteners begin to close as shown in Figure 3 3 Figure 3 3 Inserting a Switch Module Step 7 Close both fastener levers simultaneously and completely Figure 3 4 Closing Switch Ejector Levers 180768 133776 ...

Страница 50: ...ormal 7 fc2port2G fc2port2G up up normal 8 fc2port2G fc2port2G up up normal 14 controller controller up up standby 15 ib12port4x ib12port4x up down wrong image 16 ib12port4x ib12port4x up up normal Card Boot Information Pr boot boot boot slot stage status image 1 done success TopspinOS 2 8 0 build068 7 done success TopspinOS 2 8 0 build068 8 done success TopspinOS 2 8 0 build068 14 done success To...

Страница 51: ...age to the module Step 4 Facing the cable end of the Cisco SFS 3012R Server Switch chassis unfasten both screws on the InfiniBand switch module Loosen the screws until you are sure the module is no longer attached to the chassis Do not attempt to remove the screws from the module Step 5 Open both ejector levers simultaneously and pull the switch module toward you Step 6 Either replace the module i...

Страница 52: ...er supply module from any packaging Step 4 Insert the power supply into an open slot such that the pull handle sits toward the outside of the chassis away from the blower module The arrow on top of the power supply or underneath the power supply must always point to the outside of the chassis Note The power supplies should be inserted in opposite directions of each other Step 5 Press the power sup...

Страница 53: ...rom the power supply Step 3 Disengage the power supply by pulling it toward you Step 4 Slide the power supply out of the chassis Step 5 Either replace the power supply immediately or fasten a blanking panel to the empty chassis bay to ensure appropriate cooling Note The blanking panel is a flat sheet of metal with the same dimensions as the power module faceplate Caution Never operate the device w...

Страница 54: ...ling a Blower Module Step 3 Insert the blower module into an open slot until it is fully seated so that the captive screw sits at the top of the module as shown in Figure 3 6 Figure 3 6 Inserting a Power Supply Step 4 Tighten the captive screw on the front panel to secure the module to the chassis as shown in Figure 3 7 Figure 3 7 Securing a Blower Module 180763 180764 ...

Страница 55: ...sing an approved ground wrist strap Step 2 Unfasten the captive screw Step 3 Pull the blower module toward you until it completely disengages from the chassis Step 4 Insert a replacement blower module into the empty chassis bay to ensure appropriate cooling Note Each blower module contains two blowers for a total of four blowers The system can tolerate one out of four blowers failing When you remo...

Страница 56: ...3 12 Cisco SFS 3012R Multifabric Server Switch Hardware Installation Guide OL 11187 01 Chapter 3 Installing and Removing Server Switch Field Replaceable Units FRUs Removing a Blower Module ...

Страница 57: ...ns of software installed on different slots To update an individual Fibre Channel or Ethernet gateway perform the steps as described here but you do not need to reboot the chassis After the copy and installation you can enable and disable an individual gateway to activate the new image You can view and update the software image using the CLI or with the Element Manager Viewing the Software Image V...

Страница 58: ...Interpret the display as follows a Look for the primary image source field for each slot The slots are identified in Figure 1 3 on page 1 4 b Determine whether or not any slot has a software image version primary image source that is older then the others This slot will need its image updated c Compare your most recent image with the most recent image available Check the Cisco com site or your ftp...

Страница 59: ...at you need to install If it is then you do not need to download it again c Determine whether any uninstalled file is obsolete An obsolete file is a candidate for deletion Viewing the Software Image Version with the Element Manager GUI Use the Element Manager GUI to view the software version s on the chassis as follows Step 1 Launch Element Manager Step 2 View the software version of the controlle...

Страница 60: ... 2 Viewing Current Image of an Individual Module c View the Current Image Source field If you find a module that has a different image from the others you can update a single module by re installing the image on the chassis but reboot only the module that needs to be updated Updating the Software Image This section provides instructions on how to update the software image using either the CLI or E...

Страница 61: ...sswd remote system filename img slot number of the controller image filename img This example shows the copy operation SFS 3012R copy ftp bob mypassword 10 0 0 5 Topspin 360 TopspinOS 2 1 0 build497 img image Topspin 360 2 1 0 build497 img TopspinOS 2 1 0 build497 img Step 2 Activate the image After downloading the image file to the chassis controller you must install it for it to become active Th...

Страница 62: ...ystem configuration has been modified Save yes default no cfg yes Proceed with reload confirm SFS 3012R Step 6 Following reboot use the show card inventory command to view the new primary image for all cards and verify the update Updating the Software Image with the Element Manager GUI Use Element Manager to update the software image as follows Step 1 Launch the Element Manager GUI Step 2 Select M...

Страница 63: ... the Remote SCP Server radio button if you will download from an SCP server c Enter the name or IP address of the FTP server from which to copy the file in the Server Name or IP Address field d Enter the network name of a recognized user in the User Name field e Enter the password for the specified user in the Password field f Enter the path and name of the image file on the FTP server in the File...

Страница 64: ...an oper status of Up Activate the image as follows a Click on the desired img file in the File Management window b Click the Install button c Click Yes to the warning asking if you wish to proceed Note If you do not have enough available memory to install an additional image delete an old image See the Deleting an Image with the Element Manager GUI section on page 4 10 Step 6 Specify the new boot ...

Страница 65: ...figuration as the image source the for the next reboot These files are identified by the CLI show card inventory command as last image source primary image source These files are specified by the Element Manager as Current Image Version Image Source for Next Reboot Caution Do not delete the last loaded image or the image specified during boot configuration as the image source for the next reboot D...

Страница 66: ... Software Image Deleting an Image with the Element Manager GUI Delete a software image with Element Manager as follows Step 1 Select Maintenance File Management Step 2 Click on the img file that you want to delete as shown in Figure 4 5 Figure 4 5 Deleting an Image File Step 3 Click the Delete button Step 4 Click Yes in the Delete file dialog box ...

Страница 67: ... 9 Ethernet Gateway LEDs page 5 11 LEDs on your Cisco SFS 3012R Server Switch and installed components indicate hardware status The sections in this chapter explain the LED indications for the chassis and the components in the chassis LED indicators exist on the following components Power supplies Blowers Controller modules InfiniBand switch modules Fibre Channel gateways Ethernet gateways Cisco S...

Страница 68: ...ch system status LED appears on the top left corner of the front bezel end of the server switch You can view the system status LED with the bezel on or off as shown in Figure 5 1 Table 5 1 describes system status LED indications Figure 5 1 Location of System LED 1 180752 1 System status LED Table 5 1 System Status LED Indications LED State Indication Solid green Chassis runs with no errors Solid y...

Страница 69: ...as shown in Figure 5 2 Table 5 2 and Table 5 3 interpret the power supply LEDs Figure 5 2 Power Supply LEDs 1 DC power supply LED 2 AC power supply LED 180765 1 2 Table 5 2 AC Power Supply LED LED State Indication Solid green AC input present Off AC input absent Table 5 3 DC Power Supply LED LED State Indication Solid green DC outputs from the power supply fall within regulated limits Off DC outpu...

Страница 70: ...s LED on the bezel end of the Cisco SFS 3012R Server Switch as shown in Figure 5 3 Each blower LED is a dual color green yellow LED Table 5 4 explains Blower module LED indications Figure 5 3 Blower Module LEDs 1 Blower 1 the right blower status LED 2 Blower 2 the left blower status LED 1 180757 2 Table 5 4 Blower LED Indications LED State Indication Solid green Blower runs with no errors Solid ye...

Страница 71: ...ow 2 Controller status LED yellow 5 Power status LED green 3 Blower status LED green 6 Power status LED yellow Table 5 5 Controller Status LEDs Controller LED States Indication Green on yellow off Controller module runs with no errors Green off yellow on Controller module has a problem that requires user intervention Green off yellow off No power to the controller module Table 5 6 Blower Status LE...

Страница 72: ...f Power supplies run with no errors Green off yellow on Power supplies have a problem that requires user intervention See Power supply LEDs on the front of the chassis for additional details Green off yellow off No power to the chassis 1 Port Link LED 2 Port Activity LED Table 5 8 Management Ethernet LED Indications LED State Indication Port Link LED off No physical link Port Link LED solid Succes...

Страница 73: ...switch module includes two LEDs one green and one yellow at one side of the interface end of the module as shown in Figure 5 6 Table 5 9 explains InfiniBand switch module LED indications 180767 1 2 3 4 1 InfiniBand switch module LED green 3 InfiniBand port logical link status LED 2 InfiniBand switch module LED yellow 4 InfiniBand port physical link status LED Table 5 9 Infiniband Switch Module LED...

Страница 74: ... A logical link is established when the subnet manager makes a sweep A logical link must be established if you are to use the port The bottom LED indicates a physical link has occurred A physical link requires that the drivers on the attached InfiniBand host have been installed and are running Table 5 10 explains InfiniBand port LED indications Table 5 10 Management Ethernet LED Indications LED St...

Страница 75: ...nd Fibre Channel Port LEDs Fibre Channel Gateway LEDs The Fibre Channel gateway provides one yellow LED and one green LED Table 5 11 lists and describes the LED indications 180755 1 2 3 4 1 Fibre Channel gateway LED yellow 3 Fibre Channel port status LED 2 Fibre Channel gateway LED green 4 Fibre Channel port activity LED Table 5 11 Gateway LED Indications LED States Indication Yellow on green off ...

Страница 76: ...hannel port activity LED Table 5 12 Interpreting the Fibre Channel Port Status LEDs LED State Indication Off Optic module or cable is not attached Solid yellow A cable is attached but the port is offline Slow pulsing yellow 2 second intervals Fiber installed and port is disabled as the result of diagnostics or port access is denied through CLI or Element Manager Fast pulsing yellow half second int...

Страница 77: ...ws the location of the Ethernet gateway LEDs and the Ethernet port LEDs Figure 5 8 Location of Ethernet Gateway and Ethernet Port LEDs The Ethernet gateway provides one yellow LED and one green LED Table 5 14 and Table 5 15 list and describe the LED indications 180756 3 4 1 2 1 Ethernet gateway LED yellow 3 Ethernet port status LED 2 Ethernet gateway LED green 4 Ethernet port activity LED ...

Страница 78: ...ns Ethernet port LED indications Table 5 14 Ethernet Gateway LED Indications LED States Indication Yellow on green off Auxiliary power has reached the gateway Green on yellow off Gateway runs successfully Green on yellow on An error has occurred Table 5 15 Ethernet Port LED Indications LED State Indication Status LED off No physical link Status LED solid Successful physical link Activity LED off N...

Страница 79: ...t Non Operating Alt 0 35 000 ft Operating Humidity Range 20 to 80 Non condensing Non Operating Humidity Ranges 5 to 95 Non condensing Operating Humidity Gradient Maximum per 60 min 10 Non Operating Humidity Gradient 0 1 maximum per 60 min Operating Shock 5G 11ms half sine wave Non Operating Shock 10G 11ms half sine wave Operating Vibration Sinusoidal 5G 5 to 300Hz 15 minute dwell Non Operating Vib...

Страница 80: ...cted Emissions per FCC Part 15 subpart B USA and ICES 003 Canada Safety UL60950 3rd ed USA and CSA 22 2 No 60950 2000 Canada EMC Class A Radiated and Conducted Emissions per EN 55022 Harmonics and Flicker tests per EN 61000 3 2 3 and Radiated and Conducted Immunity tests per EN 55024 Safety EN60950 Declaration of Conformity to EN60950 EN55022 and EN55024 plus the CE mark on the device EMC Class A ...

Страница 81: ... 1 1 to 1 3 installing 2 1 to 2 12 LEDs 5 1 to 5 12 managing 2 12 rack mounting 2 4 to 2 7 configure basic connectivity 2 8 connectivity basic 2 8 console 2 8 console cable 2 8 controller modules features of 1 5 installing 3 2 to 3 3 LEDs 5 5 location of 1 4 slot numbers for 1 4 D DHCP 2 9 dir image command 4 2 documentation cisco com xv conventions viii DVD xv feedback xvi obtaining xv ordering x...

Страница 82: ...or 2 11 pull connector 2 12 InfiniBand hosts connecting 2 10 to 2 12 InfiniBand switch modules features of 1 9 installing 3 4 to 3 6 LEDs 5 7 location of 1 4 port LEDs 5 8 removing 3 7 slot numbers for 1 4 verifying software for 3 6 install command 4 5 installing the chassis in a rack 2 4 IP address dynamic 2 9 static 2 9 L LEDs blower module 5 4 controller module 5 5 Ethernet gateway 5 11 Etherne...

Страница 83: ...serial console cable 2 8 service requests severity definitions of xviii submitting xviii shelf assembling and installing 2 5 show card command 3 6 show card inventory command 4 2 slot numbers location and use 1 4 software image deleting with CLI 4 9 deleting with Element Manager 4 10 updating with CLI 4 5 updating with Element Manager 4 6 to 4 9 viewing with CLI 4 2 viewing with Element Manager 4 ...

Страница 84: ...Index IN 4 Cisco SFS 3012R Multifabric Server Switch Hardware Installation Guide OL 11187 01 ...

Отзывы: