background image

To replace the chassis cover, place the cover evenly on the top of the device and use the screws to secure it
to the device.

Note

Replacing the Power Supply

These are the steps to replace the power supply:

1.

Disconnect the power cord from the power supply.

2.

Remove the bezel. The bezel is secured with snap latches. To remove the bezel, hold the top and bottom,
and pull the bezel.

3.

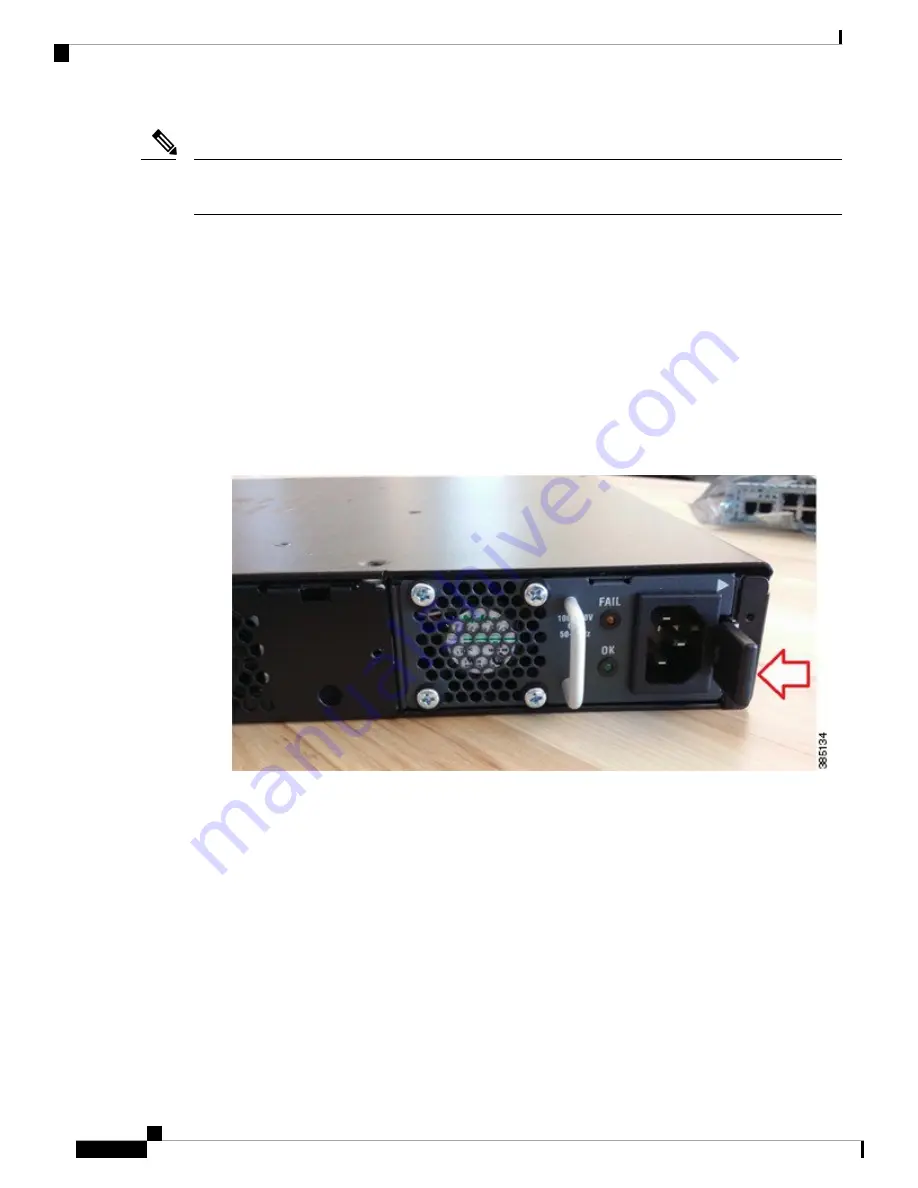
The latch that secures the power supply to the device is on the right. Press the latch to the left and pull
out the power supply using the handle.

Figure 11: Power Supply Latch and Handle

4.

Insert the replacement power supply.

5.

Replace the bezel.

Installing Drive Bays

There are two drive bays. You can use one of them, both of them, or none. Refer to

Hardware Features -

Replaceable and Upgradable Units, on page 12

to know the types of storage module that each of this bay can

hold. If you had not ordered drives, the slots are closed with a blank cover as shown in the image.

These are the steps to install a drive in a drive bay:

1.

The drive bays are in the front panel of the device. The bays are closed with a cover if there are no drives
in the slots.

Cisco 5400 Enterprise Network Compute System Hardware Installation Guide

30

Installing and Upgrading FRUs

Replacing the Power Supply

Содержание Cisco 5400 ENCS

Страница 1: ...tem Hardware Installation Guide First Published 2017 03 02 Last Modified 2018 04 20 Americas Headquarters Cisco Systems Inc 170 West Tasman Drive San Jose CA 95134 1706 USA http www cisco com Tel 408 526 4000 800 553 NETS 6387 Fax 408 527 0883 ...

Страница 2: ... Increase the separation between the equipment and receiver Connect the equipment into an outlet on a circuit different from that to which the receiver is connected Consult the dealer or an experienced radio TV technician for help Modifications to this product not authorized by Cisco could void the FCC approval and negate your authority to operate the product The Cisco implementation of TCP header...

Страница 3: ... Front Panel 1 Chassis Bezel Side 2 Chassis Internal View 3 Safety Warnings 3 Hardware Features Standard 7 Hardware Features Replaceable and Upgradable Units 12 Models 14 Preparing for Installation 17 C H A P T E R 2 Safety Recommendations and Warnings 17 Safety with Electricity 17 Site Requirements 18 Mounting Requirements 20 Power Guidelines and Requirements 20 Network Cabling Specification 21 R...

Страница 4: ...emoving a NIM 35 Supported RAID Controllers and Required Cables 37 C H A P T E R 5 RAID Card Firmware Compatibility 38 ENCS MRAID Controller Considerations 38 Support Matrix For ENCS MRAID Controller 38 Drive Types and Sizes Supported 39 ENCS MRAID Drive and Predictive Failure Behavior 39 Setting the Preferred Boot Device Order for ENCS MRAID 39 Mixing Drive Types in RAID Groups 39 Disks Replaceme...

Страница 5: ...RAID Disk Group Rebuild 45 For More Information 45 Cisco 5400 Enterprise Network Compute System Hardware Installation Guide v Contents ...

Страница 6: ...Cisco 5400 Enterprise Network Compute System Hardware Installation Guide vi Contents ...

Страница 7: ...ocumentation Cisco Enterprise Network Function Virtualization Infrastructure Software NFVIS Configuration Guide API Reference for Cisco Enterprise Network Function Virtualization Infrastructure Software Obtaining Documentation and Submitting a Service Request For information on obtaining documentation using the Cisco Bug Search Tool BST submitting a service request and gathering additional informa...

Страница 8: ...Cisco 5400 Enterprise Network Compute System Hardware Installation Guide viii Preface Obtaining Documentation and Submitting a Service Request ...

Страница 9: ...ssing and a host of other computing and networking activities into a compact one Rack Unit RU box This high performance unit achieves this goal by providing the infrastructure to deploy virtualized network functions while at the same time acting as a server that addresses processing workload and storage challenges Cisco 5400 Series Enterprise Network Compute System Chassis Chassis Front Panel Figu...

Страница 10: ...terface Module NIM 9 Ethernet management port for CIMC 12 Drive bay 1 11 Serial console port for CIMC 13 Chassis Bezel Side Figure 2 Bezel View of the Cisco 5400 ENCS Modular power supply 2 Fan vents 1 Removable bezel 3 Cisco 5400 Enterprise Network Compute System Hardware Installation Guide 2 Overview of the Cisco 5400 Enterprise Network Compute System Chassis Bezel Side ...

Страница 11: ... You are in a situation that could cause bodily injury Before you work on any equipment be aware of the hazards involved with electrical circuitry and be familiar with standard practices for preventing accidents Use the statement number provided at the end of each warning to locate its translation in the translated safety warnings that accompanied this device Statement 1071SAVE THESE INSTRUCTIONS ...

Страница 12: ...ielded management Ethernet CON and AUX cables on the router must be used Warning Power cable and AC adapter When installing the product please use the provided or designated connection cables power cables AC adaptors Using any other cables or adapters could cause a malfunction or a fire Electrical Appliance and Material Safety Law prohibits the use of certified cables that have the UL shown on the...

Страница 13: ...d fibers or connectors Do not stare into beams or view directly with optical instruments Statement 1051 Warning Class I CDRH and Class 1M IEC laser products Statement 1055 Warning Invisible laser radiation may be emitted from the end of the unterminated fiber cable or connector Do not view directly with optical instruments Viewing the laser output with certain optical instruments for example eye l...

Страница 14: ...near WAN ports When detaching cables detach the end away from the unit first Statement 1026 Warning Before opening the unit disconnect the telephone network cables to avoid contact with telephone network voltages Statement 1041 Warning Do not use this product near water for example near a bath tub wash bowl kitchen sink or laundry tub in a wet basement or near a swimming pool Statement 1035 Warnin...

Страница 15: ...CPU including the NFVIS software that runs there using a traditional serial terminal The terminal should be configured for 9600 8 N 1 Serial Console port for CIMC This serial port provides a connection to initially configure the CIMC using a traditional serial terminal The terminal should be configured for 9600 8 N 1 The speed and duplex configurations are dependent on the peer configuration If th...

Страница 16: ...f the corresponding ports This table maps the blink frequency of a LED to the speed of the corresponding port Speed Blink Frequency No link No blink 10Mbps 1 blink 100Mbps 2 blinks 1000Mbps 3 blinks Front Panel LED Status Cisco 5400 Enterprise Network Compute System Hardware Installation Guide 8 Overview of the Cisco 5400 Enterprise Network Compute System Hardware Features Standard ...

Страница 17: ...dicates port speed 1 blink 10 Mbps link speed 2 blink 100 Mbps link speed 3 blink 1000 Mbps link speed Blinking green BMC management port speed LED 4 Ethernet cable present and link established Green BMC management port link LED 5 Blink frequency indicates port speed 1 blink 10 Mbps link speed 2 blink 100 Mbps link speed 3 blink 1000 Mbps link speed Blinking green Management port speed LED 6 Ether...

Страница 18: ...P is not detected or at fault Amber Blink frequency indicates port speed 3 blink 1000 Mbps link speed Blinking green WAN port SFP speed LED 11 HDD present Green HDD status LED 12 HDD is in rebuilt state Blinking green HDD is in a fault state Amber HDD is in a PFA alert state Blinking amber The hard drive is reading or writing data Blinking green HDD activity LED 13 Cisco 5400 Enterprise Network Co...

Страница 19: ...re working Blue Temperature status 3 One or two temperature sensors are not working Amber Normal system operations Blue System status 4 A fault has been detected in the system Amber System power is ok Blue System power 5 System is powering up Blinking amber PSU on and providing power Blue Power supply with PoE status 6 PSU is on but in power failure condition Amber Cisco 5400 Enterprise Network Co...

Страница 20: ...oE power supply option This means the LAN ports of this device cannot provide Power over Ethernet PoE The ENCS5408 K9 and ENCS5412 K9 devices support both the PoE and non PoE power supply options If you want to upgrade from a non POE power supply to a POE power supply you can do that by replacing the power supply unit The reverse is also possible replacing a POE power supply with a non POE power s...

Страница 21: ... 3 9 1 ISRv 16 10 1 NIM VA B DSL NIM VAB A NIM VAB M NFVIS 3 9 1 ISRv 16 9 1 NIM 1GE CU SFP GE NIM 2GE CU SFP For more information on how to configure the voice module NIMs refer Configuring the Cisco Fourth Generation T1 E1 Voice and WAN Network Interface Module Drive bays There are two drive bays You can choose to use one of them both of them or none of them The types of storage modules that eac...

Страница 22: ...RAID card is installed in the Internal Service Processor ISP module of the motherboard RMA Return Material Authorization RMA Support allows you to move M 2 SSD memory disk drives RAID card NIM and power supply from one system to another system while keeping the configuration and data This feature is supported of like to like systems and the two systems must have the same versions of firmware In ca...

Страница 23: ...t all other hardware features standard replaceable and upgradable are common across all models Note Table 6 Service Spares Product ID ENCS5406P K9 ENCS5408P K9 ENCS5412P K9 Service spares are chassis with no memory or disk Note Cisco 5400 Enterprise Network Compute System Hardware Installation Guide 15 Overview of the Cisco 5400 Enterprise Network Compute System Models ...

Страница 24: ...Cisco 5400 Enterprise Network Compute System Hardware Installation Guide 16 Overview of the Cisco 5400 Enterprise Network Compute System Models ...

Страница 25: ...Keep the chassis area clean and dust free during and after installation Keep the chassis in a safe place when you remove the chassis cover Do not wear loose clothing that could get caught in the chassis Wear safety glasses when working under conditions that might be hazardous to your eyes Do not perform any action that creates a hazard to people or makes the equipment unsafe Safety with Electricit...

Страница 26: ...rk interface Use caution when installing or modifying telephone lines Remove power cables from all installed power supplies before opening the chassis Always follow these electrostatic discharge ESD prevention procedures when removing and replacing modules Ensure that the router chassis is electrically connected to ground Wear an ESD preventive wrist strap ensuring that it makes good skin contact ...

Страница 27: ...any for site modifications Always follow your local and national wiring rules If you turn off your system wait at least 30 seconds before turning it on again to avoid system component damage Temperature humidity altitude and vibration can affect the performance and reliability of the router After installation ensure that the site maintains the environmental characteristics shown in this table Maxi...

Страница 28: ...clearance around the rack for maintenance Allow at least one rack unit of vertical space between devices Enclosed racks must have adequate ventilation Ensure that the rack is not congested because each device generates heat An enclosed rack should have louvered sides and a fan to provide cooling air Heat generated by equipment near the bottom of the rack can be drawn upward into the intake ports o...

Страница 29: ... Screws that fit your rack Wire crimper for chassis grounding to be used along with the ground lug kit One AWG 6 cable for the ground lug kit The ground lug is for chassis grounding and is NEBS compliant Note In addition depending on the type of modules you plan to use you might need the following equipment to connect a port to an external network Cables for connection to the WAN and LAN ports dep...

Страница 30: ...Cisco 5400 Enterprise Network Compute System Hardware Installation Guide 22 Preparing for Installation Required Tools and Equipment ...

Страница 31: ...n more than one container When you unpack the containers check the packing list to ensure that you have received all the items on the list Only unpack the product when you are ready to install it This will help prevent accidental damage LocatingtheProductID SerialNumber VersionIDandCommon Language Equipment Identifies CLEI The serial number SN product ID PID version ID VID and Common Language Equi...

Страница 32: ...llowing ways Front mounting Brackets attached at the front of the chassis with the front panel facing forward Back mounting Brackets attached at the back of the chassis with the back panel facing forward Center front mounting Brackets attached in the center front of the chassis with the front panel facing forward Center back mounting Brackets attached in the center back of the chassis with the bac...

Страница 33: ...l the chassis on the rack as shown in Figure 8 You will need two screws to attach each bracket to the rack so you will need four screws in total to attach the device to the rack The screws for attaching the device to the rack are not provided with the kit Cisco 5400 Enterprise Network Compute System Hardware Installation Guide 25 Installing the Device Rack Mounting the Chassis ...

Страница 34: ... the brackets to the device using the screws and plastic spacers provided with the mounting kit As shown in Figure 9 two screws and two plastic spaces should be used to attach each bracket to the chassis 2 Fix the router to the wall using the brackets that you attached to the device The screws for attaching the device to the wall are not provided with the kit Depending on the type of wall wood bri...

Страница 35: ... minutes 3 Verify the power status of the system by looking at the system power status LED The power status LED blinks in amber color during initial boot up and in solid amber when the system reaches the standby power mode Initial Server Setup Local Connection Procedure 1 Ensure that the device is powered on Cisco 5400 Enterprise Network Compute System Hardware Installation Guide 27 Installing the...

Страница 36: ... the setup and continue to boot Remote Connection Procedure 1 Plug in your terminal server to the Serial CIMC port Refer to Front panel of Chassis 2 Telnet into the console and perform the necessary configuration using corresponding commands You can also configure the IP address for the Ethernet CIMC port Use CIMC to configure the box For more details see Initial Setup for UCS C Series Servers Cis...

Страница 37: ...moving and Replacing the Chassis Cover These are the steps to remove the chassis cover 1 Confirm the router is turned off and disconnected from the power supply or power supplies 2 Place the chassis on a flat surface 3 Remove the screws at top of the chassis cover 4 Remove the screws at the sides of the device See Figure 11 5 Lift the chassis cover once you have removed all the screws Figure 10 Re...

Страница 38: ...ure 11 Power Supply Latch and Handle 4 Insert the replacement power supply 5 Replace the bezel Installing Drive Bays There are two drive bays You can use one of them both of them or none Refer to Hardware Features Replaceable and Upgradable Units on page 12 to know the types of storage module that each of this bay can hold If you had not ordered drives the slots are closed with a blank cover as sh...

Страница 39: ...comes with different storage capacities These are the steps to upgrade the M 2 memory module 1 Remove the chassis cover 2 Locate the M 2 storage module Refer to the Chassis Internal View on page 3 section to identify and locate the module 3 Remove the old storage module by unscrewing the screw that secures the hardware and removing out the storage module 4 Plug in the new storage module in the sam...

Страница 40: ...rization notch on the connecting edge to prevent incorrect insertion Figure 14 DIMM Showing Polarization Notch These are the steps to install a DIMM 1 Remove the chassis cover 2 Locate the DIMM module on the device Cisco 5400 Enterprise Network Compute System Hardware Installation Guide 32 Installing and Upgrading FRUs Installing and Removing a DIMM ...

Страница 41: ...pen position 4 Orient the DIMM so that the polarization notch lines up with the polarization key on the connector 5 Insert the DIMM into the connector Cisco 5400 Enterprise Network Compute System Hardware Installation Guide 33 Installing and Upgrading FRUs Installing and Removing a DIMM ...

Страница 42: ...on to identify and locate the DIMM module 3 Pull the latches away from the DIMM at both ends to lift the DIMM slightly Pull the DIMM out of the socket Figure 17 Removing a DIMM 4 Place the DIMM in an antistatic bag to protect it from ESD damage 5 Replace the chassis cover Cisco 5400 Enterprise Network Compute System Hardware Installation Guide 34 Installing and Upgrading FRUs Installing and Removi...

Страница 43: ...nt panel Loosen the screws that secure the NIM Gently pull out the NIM from the slot ENCS supports hot swap or OIR Online Insertion and Removal for NIM So you can insert and remove the NIM when ENCS is running however before removing the NIM ensure that the NIM is shut down gracefully Code extract that shows the graceful shutdown of a NIM CSR 8 hw module subslot 0 2 stop Proceed with stop of modul...

Страница 44: ...Cisco 5400 Enterprise Network Compute System Hardware Installation Guide 36 Installing and Upgrading FRUs Installing and Removing a NIM ...

Страница 45: ... MRAID card does not require additional cable to connect hard drives and RAID card The flex cable connected to the mainboard can be used to connect to RAID card RAID Card LED Indicator When RAID card is installed the LED indicator in the front bezel should turn in solid green RAID Card Firmware Compatibility on page 38 ENCS MRAID Controller Considerations on page 38 Support Matrix For ENCS MRAID C...

Страница 46: ...or your Cisco IMC release for instructions on downloading and using the utility to bring server components to compatible levels HUU Guides ENCS MRAID Controller Considerations Stripe Size Limitation When No Flash Backed Write Cache is Present This controller does not have a FBWC the only stripe size available is 64 KB Write Cache Policy for ENCS MRAID Controller This controller does not have SCPM ...

Страница 47: ...re If the drive is part of a RAID volume with a spare the software performs an auto copy backup and then marks the drive failed BAD with the fault LED on the drive solid amber Setting the Preferred Boot Device Order for ENCS MRAID The default boot device is internal SSD disks connected to RAID card are only used as external datastores for VM images Refer to BIOS Boot order procedures to select the...

Страница 48: ...drives in a RAID group Use the same capacity for each drive in the RAID group Never mix HDDs and SSDs in the same RAID group Never mix SAS and SED SAS Disks Replacement Considerations For the best compatibility with NFVIS follow these guidelines When replace a faulty unit make sure the replacement unit does not have existing partitions Do not swap the drives between Slot 0 and Slot 1 Do not swap o...

Страница 49: ...s JBOD in the Actions field Step 5 Reboot NFVIS to use the new installed drive Step 6 For existing ENCS with external drives inserted but no RAID card installed the drives will be set to JBOD mode without further configuration after RAID card installed RAID 1 Mode After both drives are in Unconfigured Good state use the following steps to create virtual disk under WebGUI Before you begin To enable...

Страница 50: ...Read Write default Read Policy No Read Ahead default Cache Policy Direct IO default Disk Cache Policy Unchanged default Size xxxxxxx auto filled by GUI Click on Virtual Drive Info tab in mid pane to verify virtual drive is in Optimal state and health is Good Step 5 Secured RAID Group Configuration ENCS MRAID controller support Full Disk Encryption FDE feature in hardware level when using supported...

Страница 51: ... SAS 3108 R Serial Number Firmware Package Build 24 12 1 0039 Product ID LSI Logic Battery Status BBU Not Supported NVRAM Size 32 KB Memory Size 0 MB Flash Memory Size 16 MB Cache Memory Size 0 MB Boot Drive 0 Boot Drive is PD false TTY Log Status Not Downloaded Controller is Secured 1 JBOD Secured Mode When controller security feature is enabled we can verify and configure SED drive To verify dri...

Страница 52: ...rmware D703 Coerced Size 1143455 MB Type HDD Block Size 512 Link Speed 12 0 Gb s Locator LED false FDE Capable 1 FDE Enabled 1 FDE Secured 1 FDE Locked 0 FDE Locked Foreign Config 0 RAID 1 Secured Mode To enable FDE on RAID 1 virtual disk the steps are similar to previous RAID 1 virtual disk creation the only difference is on Step 4 when Create Virtual Drive from Unused Physical Drives pop up appe...

Страница 53: ...e information about using the utilities For basic information about RAID and for using the utilities for the RAID controller cards that are supported in Cisco servers see the Cisco UCS Servers RAID Guide Full Avago Technologies LSI documentation is also available For hardware SAS MegaRAID Avago Technologies LSI 12 Gb s MegaRAID SAS Software User s Guide Rev F For embedded software MegaRAID LSI Emb...

Страница 54: ...Cisco 5400 Enterprise Network Compute System Hardware Installation Guide 46 Supported RAID Controllers and Required Cables For More Information ...

Отзывы: