background image

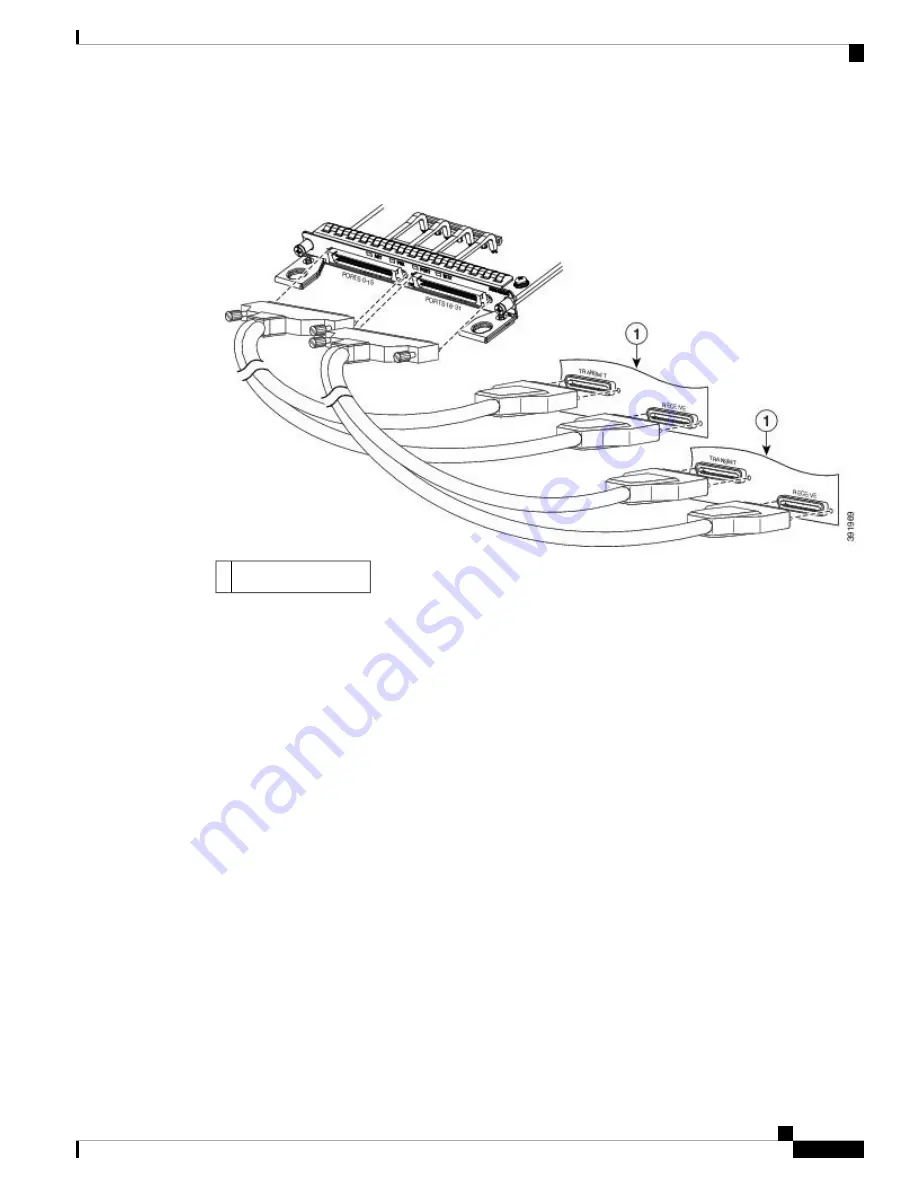
The figure below shows how the cable is connected between the 32 x T1/E1 interface module and the patch
panel.

Figure 35: Cable Installation between 32 x T1/E1 Interface and Patch Panel

Patch panel interfaces

1

T1/E1 Pinouts

For information about the pinout of the cable connecting the T1/E1 interface to the rear of the patch panel,
see the T1/E1 Port Pinout .

RJ45 Cable Pinouts

T1 lines from individual subscribers are attached to RJ45 connectors on the front of the 24-port patch panel.
Each RJ45 port accommodates an individual T1 subscriber line.

For the T1/E1 ports, see the T1/E1 Port Pinout .

RJ48 Cable Pinouts

T1 lines from individual subscribers are attached to RJ45 connectors on the front of the 24-port patch panel.
Each RJ45 port accommodates an individual T1 subscriber line.

For the T1/E1 ports, see the T1/E1 Port Pinouts (RJ-48) section.

Connecting Cables to the Patch Panel

If you are connecting two T1/E1 interfaces to each other, you must cable both interfaces’ patch panels together
using a T1 cross-over cable or a T1 straight-through cable. Use shielded cables. The type of cable you use
(cross-over or straight-through) depends on how the T1/E1 interfaces are cabled to their patch panels:

• If both T1/E1 interfaces are connected to their patch panels in the same manner (TX to Transmit and RX

to Receive, or TX to Receive and RX to Transmit), use a T1 cross-over cable to connect the patch panels.

Installing the Cisco ASR 907 Router

55

Installing the Cisco ASR 907 Router

T1/E1 Pinouts

Содержание ASR 907

Страница 1: ... is important to prepare for the installation by Preparing the site site planning and reviewing the installation plans or method of procedures MOP Unpacking and inspecting the Cisco ASR 907 Router Gathering the tools and test equipment required to properly install the Cisco ASR 907 Router For more instructions on how to prepare for the installation of the Cisco ASR 907 Router see Preparing for Ins...

Страница 2: ...with filter A907 FAN F cannot be mounted using the mounting screws that are supported for fan tray This is not an issue with the FAN tray filter blank panel A907 FAN F B We recommend that you use the short screws provided in the following rack mount kits to avoid interference of the air filter during rack mounting and while replacing the fan tray with the fan tray filter A907 FAN E 19 rack mount k...

Страница 3: ...sis between the mounting posts Step 2 Align the mounting holes in the bracket and optional cable guide with the mounting holes in the equipment rack Do not use interface module and power supply ejector handles to lift the chassis using the handles to lift the chassis can deform or damage the handles Installing the Chassis to support the Japanese JIS Rack Standard Caution Figure 2 Installing the Ch...

Страница 4: ...Figure 3 Installing the Chassis to support the Japanese JIS Rack Standard Installing the Cisco ASR 907 Router 4 Installing the Cisco ASR 907 Router Installing the Router Chassis in the Rack ...

Страница 5: ... side 12 24 x 3 4 inch or 10 32 x 3 4 inch screws through the holes in the bracket and into the threaded holes in the equipment rack posts Step 4 Use a tape measure and level to verify that the chassis is installed straight and level Installing Plenum A907 F2B AIR U Assembly and Chassis in the Rack Procedure Step 1 Position the air baffle and the side plate to the plenum Secure the air baffle usin...

Страница 6: ...e the cable brackets to the rack using a torque of 11 5 in lb 1 3 N m See figure below For a 19 inch rack installation the rack has to have a flat post Note Installing the Cisco ASR 907 Router 6 Installing the Cisco ASR 907 Router Installing Plenum A907 F2B AIR U Assembly and Chassis in the Rack ...

Страница 7: ...p 3 Repeat Step 1 and Step 2 to complete the plenum assembly on the other side of the plenum base Installing the Cisco ASR 907 Router 7 Installing the Cisco ASR 907 Router Installing Plenum A907 F2B AIR U Assembly and Chassis in the Rack ...

Страница 8: ...e 7 Different Adapters Figure 8 Plenum Installation on Various Racks Step 6 Position the plenum assembly to the rack and secure the cable brackets to the rack using a torque of 11 5 in lb 1 3 N m See figure below For a 19 inch rack installation the rack has to have a flat post Note Installing the Cisco ASR 907 Router 8 Installing the Cisco ASR 907 Router Installing Plenum A907 F2B AIR U Assembly a...

Страница 9: ...Figure 9 Plenum Assembly to 21 inch Rack Installing the Cisco ASR 907 Router 9 Installing the Cisco ASR 907 Router Installing Plenum A907 F2B AIR U Assembly and Chassis in the Rack ...

Страница 10: ... mounting the air plenum on the rack Procedure Step 1 Position the chassis so that the rear of the chassis is at the front of the plenum See the figure below Step 2 Slide the chassis into the plenum so that the front of the chassis is in flush with the mounting rails and brackets Installing the Cisco ASR 907 Router 10 Installing the Cisco ASR 907 Router Installing the Chassis in the Air Plenum ...

Страница 11: ...e below The mounting brackets and cable mounting brackets are assembled together We recommend that the brackets are installed before the chassis is installed in the Air Plenum Note To install the optional cable management brackets perform these steps Procedure Step 1 Position the cable management brackets against the front of the chassis and align the four screw holes as shown in the figure below ...

Страница 12: ... power or turn on the power to the Cisco ASR 907 Router you must provide an adequate chassis ground earth connection to your router This section describes how to ground the Cisco ASR 907 Router chassis The router provides two locations for attaching a 2 hole grounding lug according to the rack mounting brackets you use to install the router Installing the Cisco ASR 907 Router 12 Installing the Cis...

Страница 13: ...ls appropriate to the wire you are using Before making connections to the Cisco ASR 907 Router ensure that you disconnect the power at the circuit breaker Otherwise severe injury to you or damage to the router may occur Caution This equipment must be grounded Never defeat the ground conductor or operate the equipment in the absence of a suitably installed ground conductor Contact the appropriate e...

Страница 14: ...ing tool to strip the ground wire to 0 5 inch 0 02 inch 12 7 mm 0 5 mm As shown in the figure below Figure 14 Stripping a Ground Wire Step 2 Slide the open end of your 2 hole ground lug over the exposed area of the ground wire Step 3 Using a crimping tool as specified by the ground lug manufacturer crimp the ground lug to the ground wire as shown in figure below Figure 15 Crimping a Ground Lug ont...

Страница 15: ... to install the fan tray in the chassis Procedure Step 1 Orient the fan tray so that the captive screws are on the left side of the fan tray s front panel The figure below shows how to orient the fan tray Figure 16 Installing the Fan Tray Step 2 Guide the fan tray into the chassis until it is fully seated The fans are exposed on the left side of the fan tray Keep your fingers clothing and jewelry ...

Страница 16: ...antray html For information about connecting cables to the fan tray alarm port see Connecting the Fan Tray Alarm Port For a summary of the LEDs on the fan tray see LED Summary For more information about air flow guidelines see Air Flow Guidelines Removing and Replacing the Dust Filter The chassis is shipped with a blank fan filter cover To install the dust filter Procedure Step 1 Remove the blank ...

Страница 17: ...ark environment Surroundings that adversely affect the dust filter are high heat humidity at high temperatures and ultraviolet light Note Dust Filter Maintenance A periodic health check of the filter every 3 months based on the level of dust in the environment helps in avoiding over clogging of the filters and provides a better life This product s filter is used as a single use component If the pr...

Страница 18: ...ce body parts or objects in the fan tray slot when installing or removing the fan tray module Exposed circuitry is an energy hazard Note The router can stay active for up to 60 seconds if the temperature is up to 30º C However in the event of an overtemperature alarm the router can shut down in less than 60 seconds In the event of a critical temperature alarm the router shuts down immediately Caut...

Страница 19: ...the handle The fans are exposed on the left side of the fan tray Keep your fingers clothing and jewelry away from the fans Always handle the fan tray by the handle Caution Step 3 Pull the fan tray toward you no more than 1 inch to disengage it from the power receptacle on the midplane as shown in the figure below Installing the Cisco ASR 907 Router 19 Installing the Cisco ASR 907 Router Removing a...

Страница 20: ... the fan tray with one hand and keep your other hand on the fan tray handle Note This completes the steps for removing the fan tray from the chassis The chassis must not be allowed to operate without functioning fans for more than 60 seconds Note To install the new fan tray follow the steps in Installing the Fan Tray RSP Installation Follow these steps on handling an RSP module in the Cisco ASR 90...

Страница 21: ... a second RSP module in the slot below it be careful not to damage the EMI gasket of the bottom RSP module against the ejector levers of the top RSP during insertion Caution Step 5 While pressing down simultaneously close both the ejector levers to fully seat the module in the backplane connector The ejector levers are fully closed when they are flush with the module faceplate Step 6 Tighten the t...

Страница 22: ... Invisible laser radiation may be emitted from disconnected fibers or connectors Do not stare into beams or view directly with optical instruments Statement 1051 Warning To remove an RSP module perform the following steps Procedure Step 1 Disconnect any cables attached to the ports on the module Step 2 Verify that the captive installation screws on all the modules in the chassis are tight This ste...

Страница 23: ...mines if there is sufficient power for the module 2 Scans the backplane for configuration changes 3 Initializes the newly inserted module In addition the system notes any removed modules and places those modules in the administratively shutdown state 4 Places any previously configured interfaces on the module back to the state they were in when they were removed Any newly inserted interfaces are p...

Страница 24: ...the edges of the IM carrier between the upper and lower edges of the router slot Step 3 Carefully slide the IM carrier into the router slot until the IM carrier makes contact with the backplane See the figure below Figure 22 Installing the IM Carrier Interface Module Installation The following sections describe the various tasks of associated with interface module installation on the Cisco ASR 907...

Страница 25: ...Module Step 4 ITighten the locking thumbscrews on both sides of the interface module The recommended maximum torque is 5 5 in lb 62 N m Step 5 Connect all the cables to each interface module What to do next Do not use interface module and power supply ejector handles to lift the chassis using the handles to lift the chassis can deform or damage the handles Caution Close all unused RJ 45 SFP XFP an...

Страница 26: ...ion The Cisco ASR 907 Router does not support hot swapping an interface module with another module of a different type For example you cannot swap an SFP Gigabit Ethernet module with a copper Gigabit Ethernet module without disrupting router operation Note If the TDM interface module is swapped with the Gigabit Ethernet module in the same slot or vice versa the router must be reloaded Note If you ...

Страница 27: ...thernet QSFP Interface Module 2X40GE 8 16 port 1 Gigabit Ethernet SFP SFP 1 port 10 Gigabit Ethernet SFP 2 port 1 Gigabit Ethernet CSFP Interface Module 1 port OC48 STM 16 or 4 port OC 12 OC 3 STM 1 STM 4 12 Port T1 E1 4 Port T3 E3 CEM Interface Module No support 16 x T1 E1 Interface Module 32 x T1 E1 Interface Module 8 X T1 E1 Interface Module 1 Port OC 192 or 8 Port Low Rate CEM Interface Module...

Страница 28: ...er Supply The Cisco ASR 907 Router router provides the choice of two different power supplies 1200 W DC power 40 8VDC to 72VDC The DC power supply uses 3 position terminal block style connector with positive latching securing and labeled connections for 48V GRD 48V The terminal block connector is of suitable size to carry the appropriate AWG wire size to handle the input current of the power suppl...

Страница 29: ...e DC Power Supply Specifications table to estimate the power requirements and heat dissipation of a Cisco ASR 907 Router based on a given configuration of the router Determining power requirements is useful for planning the power distribution system needed to support the router Power Connection Guidelines This section provides guidelines for connecting the Cisco ASR 907 Router power supplies to th...

Страница 30: ...g Each chassis power supply should have its own dedicated branch circuit The circuit breaker should be sized according to the power supply input rating and local or national code requirements The AC power receptacles used to plug in the chassis must be the grounding type The grounding conductors that connect to the receptacles should connect to protective earth ground at the service equipment Inst...

Страница 31: ...ace your other hand underneath the power supply as shown in the figure below Slide the power supply into the power supply bay Make sure that the power supply is fully seated in the bay Figure 24 Installing the DC Power Supply Step 5 Tighten the captive installation screws of the power supply The recommended maximum torque is 5 5 in lb 62 N m If you are installing a redundant DC power supply repeat...

Страница 32: ... 3 Use a wire stripping tool to strip the ends of each of the two wires coming from the DC input power source as recommended by the lug manufacturer Stripping more than the recommended amount of wire can leave behind exposed wire from the terminal block after installation Note Step 4 Identify the positive and negative feed positions for the terminal block The recommended wiring sequence is as in t...

Страница 33: ...wrap allows for some slack in the wire Activating the DC Power Supply Perform the following procedure to activate the DC power supply Procedure Step 1 Remove the tape from the circuit breaker switch handle and restore power by moving the circuit breaker switch handle to the On position Step 2 Verify power supply operation by checking if the power supply front panel LEDs are in the following states...

Страница 34: ...r supply has been removed or replaced Caution When you install the unit the ground connection must always be made first and disconnected last Statement 1046 Warning Before performing any of the following procedures ensure that power is removed from the DC circuit Statement 1003 Warning Only trained and qualified personnel should be allowed to install replace or service this equipment Statement 103...

Страница 35: ...s part of the building installation Install only in accordance with national and local wiring regulations Warning Installing the AC Power Supply Module for A900 PWR1200 A 1200 W Follow these steps to install the power supply module Procedure Step 1 Ensure that the system earth ground connection has been made For ground connection installation instructions see theInstalling the Chassis Ground Conne...

Страница 36: ...nsure protective grounding continuity Warning Recommended Power Cables We recommend the following power cables for Cisco ASR 907 routers Table 2 Power Cable PIDs for A900 PWR1200 A 1200 W Description PID US AC Power Cord for Cisco ASR 900 NEMA 5 20 PWR CAB AC USA520 Power Cord for AC V2 Power Module USA NEMA L6 20P PWR CAB AC USA Installing the Cisco ASR 907 Router 36 Installing the Cisco ASR 907 ...

Страница 37: ...RANDED 250 0 V 16 0 A PWR CAB AC ARG Activating the AC Power Supply Follow these steps to activate the AC power supply Procedure Step 1 Plug the power cord into the power supply Step 2 Connect the other end of the power cord to an AC input power source Step 3 Verify power supply operation by checking that the power supply LEDs are in the following states INPUT OK LED is green OUTPUT FAIL LED is gr...

Страница 38: ...1074 Warning Follow these steps to remove and replace the AC power supply Procedure Step 1 Disconnect the power cord from the power source Do not touch the metal prongs on the power cord when it is still connected to the power supply Step 2 Remove the power cord from the power connection on the power supply Do not touch the metal prongs embedded in the power supply Step 3 Loosen the captive instal...

Страница 39: ...e router the RS232 port is disabled Note Connecting to the Serial Port using Microsoft Windows This procedure shows how to connect to the serial port using Microsoft Windows Install the USB device driver before establishing a physical connection between the router and the PC by using the USB Console cable plugged into the USB serial port Otherwise the connection will fail For more information see ...

Страница 40: ... with the DB 9 connector or USB Type A to the terminal or PC If your terminal or PC has a console port that does not accommodate a DB 9 connector you must provide an appropriate adapter for that port Step 3 To communicate with the router start a terminal emulator application such as Microsoft Windows HyperTerminal This software should be configured with the following parameters 9600 baud 8 data bi...

Страница 41: ...the Cisco ASR 907 Router USB 5 pin mini USB Type B to USB Type A console cable 2 USB Type A console port 1 USB Type A 3 Installing the Cisco ASR 907 Router 41 Installing the Cisco ASR 907 Router Connecting to the Serial Port using Microsoft Windows ...

Страница 42: ... usbmodem1a21 9600 To disconnect the OS X USB console from the Terminal window enter Ctrl a followed by Ctrl Connecting to the Console Port using Linux This procedure shows how to connect a Linux system USB port to the console using the built in Linux Terminal utility Procedure Step 1 Open the Linux Terminal window Step 2 Connect the Linux USB port to the router Step 3 Enter the following commands...

Страница 43: ...ick Install Step 5 The InstallShield Wizard Completed window appears Click Finish Step 6 Connect the USB cable to the PC and router USB console ports The EN LED for the USB console port turns green and within a few moments the Found New Hardware Wizard appears Follow the instructions to complete the installation of the driver The USB console is ready for use Installing the Cisco Microsoft Windows ...

Страница 44: ...nts a pop up window stating Installing device driver software appears Following the instructions to complete the installation of the driver Step 7 The USB console is ready for use Uninstalling the Cisco Microsoft Windows USB Driver This section provides instructions for how to uninstall the Cisco Microsoft Windows USB device driver Uninstalling the Cisco Microsoft Windows XP and 2000 USB Driver Us...

Страница 45: ...rs Click Next Step 3 When the Program Maintenance window appears select the Remove radio button Click Next Step 4 When the Remove the Program window appears click Remove If a User Account Control warning appears click Allow I trust this program to proceed Note Step 5 When the InstallShield Wizard Completed window appears click Finish Connecting to the Auxiliary Port When a modem is connected to th...

Страница 46: ...ter Step 3 Connect the DB 25 end of the modem adapter to the modem Step 4 Make sure that your modem and the router auxiliary port are configured for the same transmission speed up to 115200 bps is supported and for mode control with data carrier detect DCD and data terminal ready DTR operations Installing the Cisco ASR 907 Router 46 Installing the Cisco ASR 907 Router Connecting to the Auxiliary P...

Страница 47: ...ng The addition of Primary Protectors is not sufficient protection in order to connect these interfaces metallically to OSP wiring Warning Installing and Removing SFP and XFP Modules The Cisco ASR 907 Router supports a variety of SFP and XFP modules including optical and Ethernet modules For information on how to install and remove SFP and XFP modules see the documentation for the SFP or XFP modul...

Страница 48: ... completes the USB Flash memory installation procedure Connecting Timing Cables The following sections describe how to connect timing cables to the Cisco ASR 907 Router When installing the cabling to the RSPs we recommend that you leave a service loop of extra cabling sufficient to allow for fan tray removal Note Connecting Cables to the BITS Interface The following steps describe how to connect a...

Страница 49: ... Interface The following sections describe how to connect cables from the Cisco ASR 907 Router to a GPS unit for input or output timing of frequency A Y cable is required to connect to a primary and backup RSP in order to ensure that the router continues to transmit timing signals in the event of a network failure For a mini coax connection this Y cable can be part number CAB BNC 7INY 7 inch BNC Y...

Страница 50: ... comply with the Telcordia GR 1089 NEBS standard for electromagnetic compatibility and safety connect the ToD ports only to intra building or unexposed wiring or cable The intrabuilding cable must be shielded and the shield must be grounded at both ends The intra building port s of the equipment or subassembly must not be metallically connected to interfaces that connect to the OSP or its wiring T...

Страница 51: ...ure 30 Installing the GNSS Module in the RSP Inserting the GNSS Module 2 Screw on the GNSS Module 1 Connecting Ethernet Cables The Cisco ASR 907 Router interface modules support RJ45 or SFP Ethernet ports For instructions on how to connect cables to Ethernet SFP ports see Connecting Cables to SFP Modules The RJ45 port supports standard straight through and crossover Category 5 unshielded twisted p...

Страница 52: ...ep 2 Connect one end of the cable to the Gigabit Ethernet port on the router Step 3 Connect the other end to the BTS patch or demarcation panel at your site Connecting Cables to SFP Modules For information on connecting cables to Cisco optical and Ethernet SFP interfaces see http www cisco com en US partner products hw modules ps5455 prod_installation_guides_list html Connecting T1 E1 Cables The p...

Страница 53: ...ector to secure the cable to the interface The other end of the cable has two 50 pin Telco connectors that attach to the rear of a 24 port RJ45 patch panel Both connectors are identical one is for Transmit TX and the other is for Receive RX The figure below shows how the cable is connected between the 16 x T1 E1 interface module and the patch panel Installing the Cisco ASR 907 Router 53 Installing...

Страница 54: ...two patch cables Each patch cable has a 68 pin connectors that connects with each connector port on the front panel of the 32 x T1 E1 interface module Use the thumbscrews on either side of the connectors to secure the cable to the interface The other end of the cable has two 50 pin Telco connectors that attach to the rear of a 24 port RJ45 patch panel Both connectors are identical one is for Trans...

Страница 55: ...ibers are attached to RJ45 connectors on the front of the 24 port patch panel Each RJ45 port accommodates an individual T1 subscriber line For the T1 E1 ports see the T1 E1 Port Pinouts RJ 48 section Connecting Cables to the Patch Panel If you are connecting two T1 E1 interfaces to each other you must cable both interfaces patch panels together using a T1 cross over cable or a T1 straight through ...

Страница 56: ...re isolation from the exposed OSP cabling The addition of Primary Protectors is not sufficient protection in order to connect these interfaces metallically to OSP wiring Warning Patch Panel Pinout Given below are the pinout information for the regular crossover and the straight through cable patch panel Table 3 Pinout Details Straight through Crossover Pin Transmit Tip Receive Tip 1 Transmit Ring ...

Страница 57: ...ule 42 inches cable length and 6 5 inches stub length even slot T1 E1 Cable M 1 16 port cable for TDM CEM Interface Module 42 inches cable length and 10 inches stub length even slot T1 E1 Cable L 3 CABLE 16TDM R1EL3 16 port cable for TDM CEM Interface Module 42 inches cable length and 7 5 inches stub length even slot T1 E1 Cable L 2 16 port cable for TDM CEM Interface Module 42 inches cable length...

Страница 58: ... cables for TDM CEM Interface Module 42 inches cable length and 10 inches stub length odd slot T1 E1 Cable S 3 CABLE 16TDM R1OL1 3 x 16 port cables for TDM CEM Interface Module 62 inches cable length and 10 inches stub length odd slot T1 E1 Cable M 3 CABLE 16TDM R1OL2 3 x 16 port cables for TDM CEM Interface Module 78 inches cable length and 10 inches stub length odd slot T1 E1 Cable L 3 CABLE 16T...

Страница 59: ...Step 1 Remove the larger M4 rack mount screws as indicated in the Rack Mount Screws figure below from both sides To secure the brackets follow the instructions in Step 3 Step 2 Remove the patch panel rack mount brackets from the accessory kit and position them beside the patch panel Step 3 Position the brackets against the patch panel sides and align with the screw holes Secure the rack mount brac...

Страница 60: ...re 38 Patch Panel Rear View with Brackets Step 4 Position the cable management guides against the mounting brackets on the patch panel see the figure below Installing the Cisco ASR 907 Router 60 Installing the Cisco ASR 907 Router Installing Patch Panel ...

Страница 61: ...brackets with the screws The recommended maximum torque is 28 in lb 3 16 N m Step 6 Position the patch panel with brackets and guide onto the rack and secure with screws provided The recommended maximum torque is 28 in lb 3 16 N m see the figure below Installing the Cisco ASR 907 Router 61 Installing the Cisco ASR 907 Router Installing Patch Panel ...

Страница 62: ...Figure 41 Patch Panel Front View with Brackets and Guides Installed on Rack Installing the Cisco ASR 907 Router 62 Installing the Cisco ASR 907 Router Installing Patch Panel ...

Страница 63: ...ts and Guides Installed on Rack Install 3G Patch Panel You can choose to either set up the Cisco ASR 903 3G patch panel on a rack or wall mount it Installing the Cisco ASR 907 Router 63 Installing the Cisco ASR 907 Router Install 3G Patch Panel ...

Страница 64: ...y the ground lug manufacturer crimp the ground lug to the ground wire Step 2 Use a 6 AWG ground wire to connect the other end to a suitable grounding point at your site Figure 43 Patch Panel Grounding Single Installing the Cisco ASR 907 Router 64 Installing the Cisco ASR 907 Router Install Rack Brackets ...

Страница 65: ... the rear of the chassis between the mounting posts If the rear of the patch panel is at the front of the rack insert the front of the chassis between the mounting posts Step 4 Align the mounting holes in the bracket with the mounting holes in the equipment rack Installing the Cisco ASR 907 Router 65 Installing the Cisco ASR 907 Router Install Rack Brackets ...

Страница 66: ...Figure 45 Installing the Patch Panel Single in a 19 inch Rack Installing the Cisco ASR 907 Router 66 Installing the Cisco ASR 907 Router Install Rack Brackets ...

Страница 67: ...Figure 46 Installing the Patch Panel Dual in a 19 inch Rack Installing the Cisco ASR 907 Router 67 Installing the Cisco ASR 907 Router Install Rack Brackets ...

Страница 68: ...Figure 47 Installing the Patch Panel Single in a 21 inch Rack Installing the Cisco ASR 907 Router 68 Installing the Cisco ASR 907 Router Install Rack Brackets ...

Страница 69: ...Figure 48 Installing the Patch Panel Dual in a 21 inch Rack Installing the Cisco ASR 907 Router 69 Installing the Cisco ASR 907 Router Install Rack Brackets ...

Страница 70: ...Figure 49 Installing the Patch Panel Single in a 23 inch Rack Installing the Cisco ASR 907 Router 70 Installing the Cisco ASR 907 Router Install Rack Brackets ...

Страница 71: ...oth single and double 3G interface module patch panels Set up 3G Patch Panel on Rack To install the optional cable management brackets perform these steps Procedure Step 1 Position the cable management brackets against the front of the chassis and align the screw holes as shown in the figure Step 2 Secure the cable management brackets with the screws The recommended maximum torque is 10 in lb 1 12...

Страница 72: ...Figure 51 Attaching 19 inch Brackets to Patch Panel Single Installing the Cisco ASR 907 Router 72 Installing the Cisco ASR 907 Router Set up 3G Patch Panel on Rack ...

Страница 73: ...Figure 52 Installing 19 inch Brackets on to Rack Single Installing the Cisco ASR 907 Router 73 Installing the Cisco ASR 907 Router Set up 3G Patch Panel on Rack ...

Страница 74: ...Figure 53 Attaching 19 inch Brackets to Patch Panel Dual Installing the Cisco ASR 907 Router 74 Installing the Cisco ASR 907 Router Set up 3G Patch Panel on Rack ...

Страница 75: ...Figure 54 Installing 19 inch Brackets on to Rack Dual Installing the Cisco ASR 907 Router 75 Installing the Cisco ASR 907 Router Set up 3G Patch Panel on Rack ...

Страница 76: ...Figure 55 Attaching 21 inch Brackets to Patch Panel Single Installing the Cisco ASR 907 Router 76 Installing the Cisco ASR 907 Router Set up 3G Patch Panel on Rack ...

Страница 77: ...Figure 56 Installing 21 inch Brackets on to Rack Single Installing the Cisco ASR 907 Router 77 Installing the Cisco ASR 907 Router Set up 3G Patch Panel on Rack ...

Страница 78: ...Figure 57 Attaching 21 inch Brackets to Patch Panel Dual Installing the Cisco ASR 907 Router 78 Installing the Cisco ASR 907 Router Set up 3G Patch Panel on Rack ...

Страница 79: ...Figure 58 Installing 21 inch Brackets on to Rack Dual Installing the Cisco ASR 907 Router 79 Installing the Cisco ASR 907 Router Set up 3G Patch Panel on Rack ...

Страница 80: ...Figure 59 Attaching 23 inch Brackets to Patch Panel Single Installing the Cisco ASR 907 Router 80 Installing the Cisco ASR 907 Router Set up 3G Patch Panel on Rack ...

Страница 81: ...Figure 60 Installing 23 inch Brackets on to Rack Single Installing the Cisco ASR 907 Router 81 Installing the Cisco ASR 907 Router Set up 3G Patch Panel on Rack ...

Страница 82: ...Figure 61 Attaching 23 inch Brackets to Patch Panel Dual Installing the Cisco ASR 907 Router 82 Installing the Cisco ASR 907 Router Set up 3G Patch Panel on Rack ...

Страница 83: ...begin You must first install the mounting brackets and cable guides on to the patch panel before you mount it on the wall You can use the same rack mount brackets 700 113653 01 for wall mount Installing the Cisco ASR 907 Router 83 Installing the Cisco ASR 907 Router Wall Mount 3G Patch Panel ...

Страница 84: ...s from the accessory kit and position them beside the device You can install the brackets as shown in the figure Note Figure 63 Wall Mount Single Installing the Cisco ASR 907 Router 84 Installing the Cisco ASR 907 Router Wall Mount 3G Patch Panel ...

Страница 85: ...ll Before mounting the device ensure that all unused holes at the sides of the device are protected with screws Caution Step 4 Use a tape measure and level to verify that the device is installed straight and on level Patch Panel Dimensions Following are the various patch panel dimensions Installing the Cisco ASR 907 Router 85 Installing the Cisco ASR 907 Router Patch Panel Dimensions ...

Страница 86: ...Figure 65 Patch Panel Without Brackets Installing the Cisco ASR 907 Router 86 Installing the Cisco ASR 907 Router Patch Panel Dimensions ...

Страница 87: ...Figure 66 Patch Panel With Brackets Installing the Cisco ASR 907 Router 87 Installing the Cisco ASR 907 Router Patch Panel Dimensions ...

Страница 88: ...Figure 67 AMP64 Patch Panel With Brackets Installing the Cisco ASR 907 Router 88 Installing the Cisco ASR 907 Router Patch Panel Dimensions ...

Страница 89: ...Figure 68 3G Patch Panel Without Brackets Single Installing the Cisco ASR 907 Router 89 Installing the Cisco ASR 907 Router Patch Panel Dimensions ...

Страница 90: ...he EIA TIA 232 connector Note Table 5 Interface Cables for 12 in 1 Connector Connector Male Female Length Product Number Cable Type M34 Male 10 ft CAB SS V35MT V 35 DTE M34 Female 10 ft CAB SS V35FC V 35 DCE DB 25 Male 10 ft CAB SS 232MT EIA TIA 232 DTE DB 25 Female 10 ft CAB SS 232FC EIA TIA 232 DCE DB 37 Male 10 ft CAB SS 449MT EIA TIA 449 DTE DB 37 Female 10 ft CAB SS 449FC EIA TIA 449 DCE DB 1...

Страница 91: ...can be controlled through any appropriate third party relay controller The open close configuration is an option controlled in IOS To comply with the Telcordia GR 1089 NEBS standard for electromagnetic compatibility and safety connect the alarm ports only to intra building or unexposed wiring or cable The intrabuilding cable must be shielded and the shield must be grounded at both ends The intra b...

Страница 92: ... to critical major and minor alarm conditions see the Cisco ASR 907 Router Software Configuration Guide Connector and Cable Specifications For more information on cable specifications and pinouts see Troubleshooting chapter Installing the Cisco ASR 907 Router 92 Installing the Cisco ASR 907 Router Connector and Cable Specifications ...

Отзывы: