


Repeat to configure additional contexts.
We recommend that if your system is using Fast Ether Line Cards (FELCs, Ethernet 10/100), at least one
context be configured per physical port in order to ensure adequate bandwidth for subscriber sessions.
Important
Viewing and Verifying Contexts
Step 1
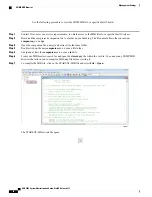
Verify that your contexts were successfully created by entering the following command:
[local]
host_name
#
show context all
The output is a two-column table similar to the example below. This example shows that two contexts were created: one
named
source
and one named
destination
.
Context Name
ContextID
State
------------
---------
-----
local
1
Active
source
2
Active
destination
3
Active
The left column lists the contexts that are currently configured. The center column lists the corresponding context ID
for each of the configured contexts. The third column lists the current state of the context.
Step 2
Save your configuration as described in the
Verifying and Saving Your Configuration
chapter.
Step 3
Now that the context has been created, interfaces and specific functionality can be configured within the context. Proceed
to other sections for instructions on configuring specific services and options.
Ethernet Interfaces and Ports
Regardless of the type of application interface, the procedure to create and configure it consists of the following:
Step 1
Create an interface and assign an IP address and subnet mask to it by applying the example configuration in
Interface, on page 101
.
Step 2
Assign a physical port for use by the interface and bind the port to the interface by applying the example configuration
in
Configuring a Port and Binding It to an Interface, on page 101Configuring a Port and Binding It to an Interface, on
page 101
.
Step 3
Optionally configure a static route for the interface by applying the example configuration in
for an Interface, on page 102
.
Step 4
Repeat the above steps for each interface to be configured.
This section provides the minimum instructions for configuring interfaces and ports to allow the system to communicate
on the network. Commands that configure additional interface or port properties are described in the
Ethernet Port
Configuration Mode Commands
and
Ethernet Interface Configuration Mode Commands
chapters of the
Command Line
Interface Reference.
ASR 5000 System Administration Guide, StarOS Release 21.1
100
System Interfaces and Ports
Viewing and Verifying Contexts
Содержание ASR 5000
Страница 26: ...ASR 5000 System Administration Guide StarOS Release 21 1 xxvi Contents ...
Страница 44: ...ASR 5000 System Administration Guide StarOS Release 21 1 16 System Operation and Configuration Quoted Strings ...
Страница 114: ...ASR 5000 System Administration Guide StarOS Release 21 1 86 Config Mode Lock Mechanisms show administrators Command ...
Страница 184: ...ASR 5000 System Administration Guide StarOS Release 21 1 156 Monitoring the System Monitoring ASR 5000 Hardware Status ...
Страница 308: ...ASR 5000 System Administration Guide StarOS Release 21 1 280 Routing Viewing Routing Information ...
Страница 316: ...ASR 5000 System Administration Guide StarOS Release 21 1 288 VLANs VLAN Related CLI Commands ...
Страница 384: ...ASR 5000 System Administration Guide StarOS Release 21 1 356 Interchassis Session Recovery Fallback Procedure ...
Страница 400: ...ASR 5000 System Administration Guide StarOS Release 21 1 372 Engineering Rules ECMP Groups ...
Страница 426: ...ASR 5000 System Administration Guide StarOS Release 21 1 398 StarOS Tasks Management Processes ...
Страница 466: ...ASR 5000 System Administration Guide StarOS Release 21 1 438 ASR 5000 SDR CLI Strings ASR 5000 SDR CLI Command Strings ...