background image

2

2

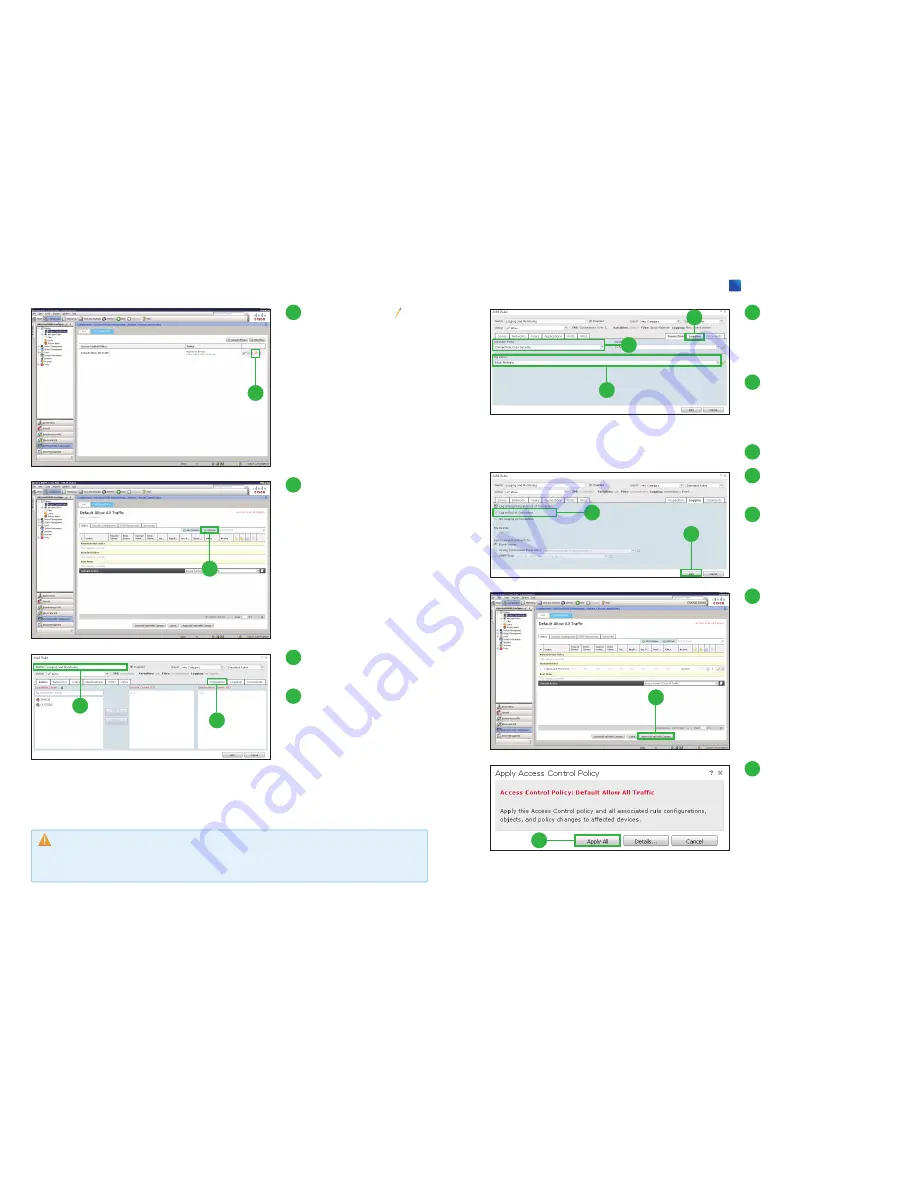
 Click the edit icon ( ) 

next to the [Default Allow 
All Traffic] policy.

3

3

 Click [Add Rule].

The [Add Rule] pop-up window 
appears.

4

5

4

 Enter a name for your new 

rule in the [Name] field.

5

 Click [Inspection].

9

10

9

 Click [Log at End of Con-

nection].

10

 Click [Add].

11

 Click [Apply ASA Fire-

POWER Changes].

The [Apply Access Control Poli-
cy] pop-up window appears.

11

12

 Click [Apply All].

12

6

7

6

 Select [Connectivity Over 

Security] from the [Intru-
sion Policy] drop-down 
list.

7

 Select the policy name of 

the step 2-1 

 from the 

[File Policy] drop-down 
list.

8

 Click [Logging].

8

 Caution

At step 

, the intrusion policies [Connectivity Over Security] and so on require the NGIPS Li-

cense. If you don

ʼ

t have this license, select the [None].

Cisco ASA Firepower Module Easy Setup Guide

2

Configuring Security Policy

Содержание ASA

Страница 1: ...co ASA Firepower Module Easy Setup Guide 1 Preconfiguring 2 Configuring Security Policy 3 Updating Database 4 Reporting Monitoring You can easily set up your ASA Firepower Module in this step by step guide ...

Страница 2: ...application layer and risk based controls that can launch tailored intrusion prevention system IPS threat detection policies to optimize security effectiveness NGIPS Provides highly effective threat prevention and full contextual awareness of users infrastructure applications and content to detect multivector threats and automate defense response AMP Delivers inline network protection against soph...

Страница 3: ...e Add menu bar 6 6 Click Use class default as the traffic class 7 Click Next 7 9 10 9 Click Enable ASA Fire POWER for this traffic flow 10 Click Permit traffic or Close traffic The Permit traffic sets the ASA to allow all traffic through uninspected if the module is unavailable The Close traffic sets the ASA to block all traffic if the module is unavailable 11 Click Finish 11 Cisco ASA Firepower M...

Страница 4: ...ccess Control Policy Visual ization Configuring Security Policy 2 2 1 Configuring File Policy Blocking Malware 1 1 Click ASA FirePOWER Configuration 2 2 Click Policies 3 3 Click Files 4 4 Click New File Policy The New File Policy pop up window appears 5 Enter a name for your new policy in the Name field 6 Click Store ASA Fire POWER Changes 6 5 Cisco ASA Firepower Module Easy Setup Guide 2 Configur...

Страница 5: ... specific file types Malware Cloud Lookup rules allow you to log the malware disposition of files traversing your network based on a cloud lookup while still allowing their transmission Block Malware rules allow you to calculate the SHA 256 hash value of specific file types then use a cloud lookup process to first determine if files traversing your network contain malware then block files that rep...

Страница 6: ...ges The Apply Access Control Poli cy pop up window appears 11 12 Click Apply All 12 6 7 6 Select Connectivity Over Security from the Intru sion Policy drop down list 7 Select the policy name of the step 2 1 from the File Policy drop down list 8 Click Logging 8 Caution At step the intrusion policies Connectivity Over Security and so on require the NGIPS Li cense If you donʼt have this license selec...

Страница 7: ...g 1 1 Click Add Rule The Add Rule pop up window appears Because the Default Allow All Traffic allows all traffic through configure access control rules to block specific traffic for example application or web traffic that is high risk or has low business relevance 2 3 Configuring Access Control Policy Blocking 13 14 13 Click Log at Beginning and End of Connection 14 Click Add Caution At step the U...

Страница 8: ...updates that you can first import onto your ASA Firepower module then implement by applying affected access control network analysis and intrusion policies Rule updates are cumulative and Cisco recommends you always import the latest update 1 Click Updates 1 2 Click Rule Updates 2 Updating Database 3 Cisco ASA Firepower Module Easy Setup Guide 3 Configuring Security Policy ...

Страница 9: ...Daily 7 Click Save 8 Click Geolocation Up dates 7 6 8 9 10 11 9 Click Download and install geolocation update from the Support Site 10 Click Import The update process begins The average duration of update installation is 30 to 40 minutes 11 Click Enable Recurring Weekly Updates The page expands to display options for configuring recurring imports 12 Specify the time and day of the week when you wa...

Страница 10: ...itoring 4 4 2 Monitoring the System 1 Click Monitoring 2 Click ASA FirePOWER Monitoring 1 2 4 1 Viewing Reports 1 Click Home 2 Click ASA FirePOWER Reporting 1 2 3 Click individual items to get more detailed information 3 4 Click individual items to get more detailed information 4 3 Click Real Time Eventing 3 Cisco ASA Firepower Module Easy Setup Guide 4 Reporting Monitoring ...

Страница 11: ...isco and or its affiliates in the U S and other countries To view a list of Cisco trademarks go to this URL www cisco com go trademarks Third party trademarks mentioned are the property of their respective owners The use of the word partner does not imply a partnership relationship between Cisco and any other company 1110R ...

Отзывы: