background image


7-13

Cisco MGC Software Release 7 Operations, Maintenance, and Troubleshooting Guide

OL-0542-06

Chapter 7      Maintaining the Cisco Catalyst 5500 Multiswitch Router

Replacing Hardware Components

Warning

Keep hands and fingers out of the power supply bays. High voltage is present on the power backplane 
when the system is operating. 

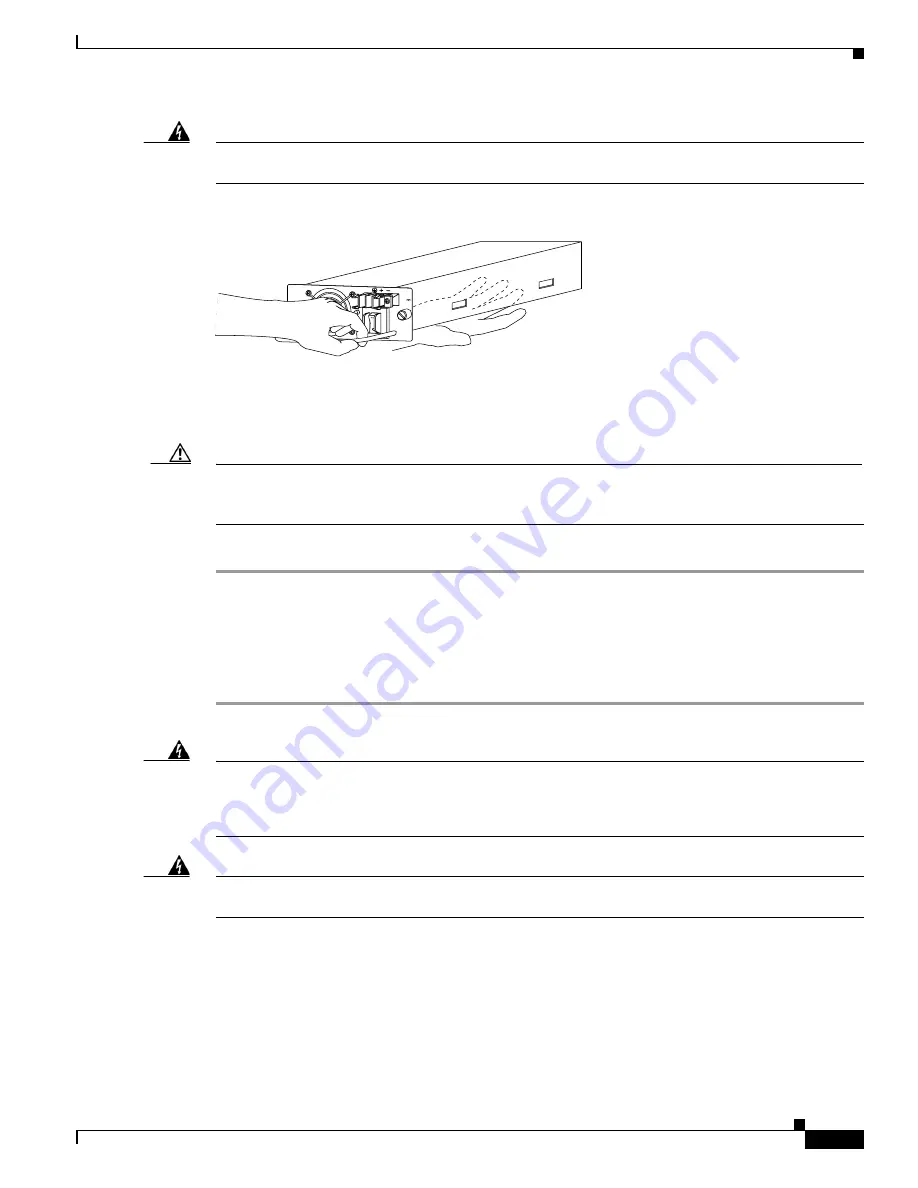
Figure 7-11 Handling a DC Power Supply

Step 8

If the bay is to remain empty, install a blank power supply filler plate (Cisco part number 700-00177-01) 
over the opening and secure it with the mounting screws. This protects the inner chassis from dust and 
prevents accidental contact with live voltage at rear of the bay.

Caution

Always install a filler plate over an empty power supply bay to protect the inner chassis and connectors 
from dust or other contamination and to prevent possible contact with the high current levels of those 
connectors when the chassis is powered on.

Step 9

Reinstall the power supply terminal block cover.

Installing a DC-Input Power Supply

Follow these steps to install a DC-input power supply:

Step 1

Verify that power is off to the DC circuit on the power supply you are installing. 

Warning

Before performing any of the following procedures, ensure that power is removed from the DC circuit. 
To ensure that all power is OFF, locate the circuit breaker on the panel board that services the DC 
circuit, switch the circuit breaker to the OFF position, and tape the switch handle of the circuit 
breaker in the OFF position.

Warning

Before working on a chassis or working near power supplies, unplug the power cord on AC units; 
disconnect the power at the circuit breaker on DC units.

Step 2

Connect the switch to the CO ground through the CO ground connector shown in 

Figure 7-10

. Remove 

the adhesive strip covering the CO ground connector on the switch.

Use the following guidelines when connecting the switch to the CO ground:

The ground wire lug must be less than or equal to 0.320 in. (8.1 mm) to fit within the ground 
connector.

H7805

INPUT
48/60
14.0/8.0 A

Содержание 5500 Series

Страница 1: ...ough an Inter Switch Link ISL trunk enabling them to share VLAN data and provide ensured availability This chapter describes hardware maintenance for information on upgrading and maintaining Catalyst 5500 software refer to the Cisco Media Gateway Controller Software Release 7 Installation and Configuration Guide This chapter includes the following sections Checking Equipment Status page 7 1 Replac...

Страница 2: ...escription SYSTEM STATUS Green Indicates that a series of self tests and diagnostic tests has been passed Red System is being booted or is faulty fails a test or module is disabled Orange Fan modules have failed or redundant power supply is installed but not turned on FAN Green The fan is operational Red The fan is not operational PS1 Green Power supply in left bay is operational Red Power supply ...

Страница 3: ...t is operating at 100 Mbps 1000 Mbps Green The port is operating at 1000 Mbps LINK Green The port is operational Orange The link has been disabled by software Flashing orange The link is bad and has been disabled due to a hardware failure Off No signal is detected Table 7 1 Supervisor Engine III and Uplink Module LED Descriptions continued LED State Description Table 7 2 Ethernet Switching Module ...

Страница 4: ...TX 12 Port LEDs LED Description STATUS The switch performs a series of self tests and diagnostic tests If it passes all the tests the LED is green If it fails a test other than an individual port test fails the LED is red During system boot or if the module is disabled the LED is orange During self test diagnostics the LED is orange If the module is disabled the LED is orange 100 Mbps If the port ...

Страница 5: ... field replaceable units FRUs Removing the Supervisor Engine page 7 6 Using Flash Memory PCMCIA Cards Supervisor Engine III page 7 7 Removing and Replacing the Power Supply page 7 8 Removing and Replacing the Chassis Fan Assembly page 7 15 For instructions on installing and replacing switching modules refer to the Catalyst 5000 Series Module Installation Guide Table 7 4 RSM WS X5302 STATUS LED Des...

Страница 6: ...blank modules and to tighten the captive installation screws that secure the modules in their slots When you handle modules use an ESD preventive wrist strap or other grounding device to prevent electrostatic discharge ESD damage Removing the Supervisor Engine Before you remove a supervisor engine you should first upload the current configuration to a server This saves time when bringing the modul...

Страница 7: ...ion of Cisco Connection Online CCO Replacing the Supervisor Engine To replace the supervisor engine perform the following steps Note that the supervisor engine must go in slot 1 and the redundant supervisor engine in slot 2 Step 1 Remove the module filler plate if any Step 2 Grasp the handle of the module with one hand and carefully align the module with the slot keeping your other hand under the ...

Страница 8: ... protection switch which is shown in Figure 7 6 Step 2 Insert the card into the appropriate slot until the card completely seats in the connector at the back of the slot and the eject button pops out toward you Note that the card does not insert all the way into the slot a portion of the card remains outside the slot Do not attempt to force the card past this point Step 3 To eject a card press the...

Страница 9: ...ch line voltages are present within the power supply when the power cord is connected Caution Failure to turn off the power supply could result in equipment damage Figure 7 7 AC Input Power Supply Front Panels Step 2 Disconnect the power cord from the power source Warning Before working on a chassis or working near power supplies unplug the power cord on AC units disconnect the power at the circui...

Страница 10: ... possible contact with the high current levels of those connectors when the chassis is powered on Installing an AC Input Power Supply Warning Before installing a Cisco Catalyst 5500 AC input power supply read the warning in the Removing an AC Input Power Supply section Follow these steps to install an AC input power supply Step 1 Turn off the power switch on the power supply you are installing see...

Страница 11: ... maintain maximum overcurrent protection for each power connection Step 8 Turn the power switch to the ON position on the power supply Step 9 Verify that power supply operation and the front panel LEDs are in the following states AC OK LED is green FAN OK LED is green OUTPUT FAIL LED is off Step 10 Verify that the appropriate supervisor engine module PS1 and PS2 LEDs are on green Step 11 Enter the...

Страница 12: ...es from the terminal block Disconnect the ground wire last Step 5 Disconnect the central office CO ground from the CO ground connector Figure 7 10 Figure 7 10 DC Input Power Supply CO Ground Step 6 Loosen and remove the captive screws on the power supply see Figure 7 9 Caution Use both hands to remove and install power supplies Step 7 Grasp the power supply handle with one hand and place your othe...

Страница 13: ... on Step 9 Reinstall the power supply terminal block cover Installing a DC Input Power Supply Follow these steps to install a DC input power supply Step 1 Verify that power is off to the DC circuit on the power supply you are installing Warning Before performing any of the following procedures ensure that power is removed from the DC circuit To ensure that all power is OFF locate the circuit break...

Страница 14: ... is 0 300 inch 7 6 mm Suggested lugs are AMP 322985 or 52941 Suggested DC input wires are 10 AWG Caution When stranded wiring is required use approved wiring terminations such as closed loop or spade type with upturned lugs These terminations must be the appropriate size for the wires and clamp both the insulation and conductor Step 8 Connect the DC input wires to the terminal block If not already...

Страница 15: ...the power supply Step 13 Verify power supply operation Verify that the power supply front panel LEDs are in the following states DC OK LED is green FAN OK LED is green OUTPUT FAIL LED is off Verify that the appropriate supervisor engine module PS1 and PS2 LEDs are on and green Enter the show system command to display the power supply and system status Removing and Replacing the Chassis Fan Assembl...

Страница 16: ...stalling the Fan Assembly Perform the following steps to install the new fan assembly Step 1 Hold the fan assembly with the fans facing to the right Step 2 Place the fan assembly into the front chassis cavity so that it rests on the chassis and then lift the fan assembly up slightly aligning the top and bottom guides Step 3 Push the fan assembly into the chassis until the captive installation scre...

Страница 17: ...ediately hear them operating If you do not hear them ensure that the fan assembly is completely inserted in the chassis and that the faceplate is flush with the switch back panel Step 2 If after several attempts the fans do not operate or if you experience trouble with the installation for instance if the captive installation screws do not align with the chassis holes contact the Cisco Technical A...

Страница 18: ...7 18 Cisco MGC Software Release 7 Operations Maintenance and Troubleshooting Guide OL 0542 06 Chapter 7 Maintaining the Cisco Catalyst 5500 Multiswitch Router Replacing Hardware Components ...

Отзывы: