background image


Installing and Upgrading Internal Modules and FRUs in Cisco 1900 Series ISRs

  Modules Internal to the Cisco 1941 Router

16

Installing and Upgrading Internal Modules and FRUs in Cisco 1900 Series ISRs

Note

If the Cisco 1941 ISR has wireless antennas, you must first remove these by unscrewing each 
antenna counter clockwise. See 

Figure 2

.

Step 2

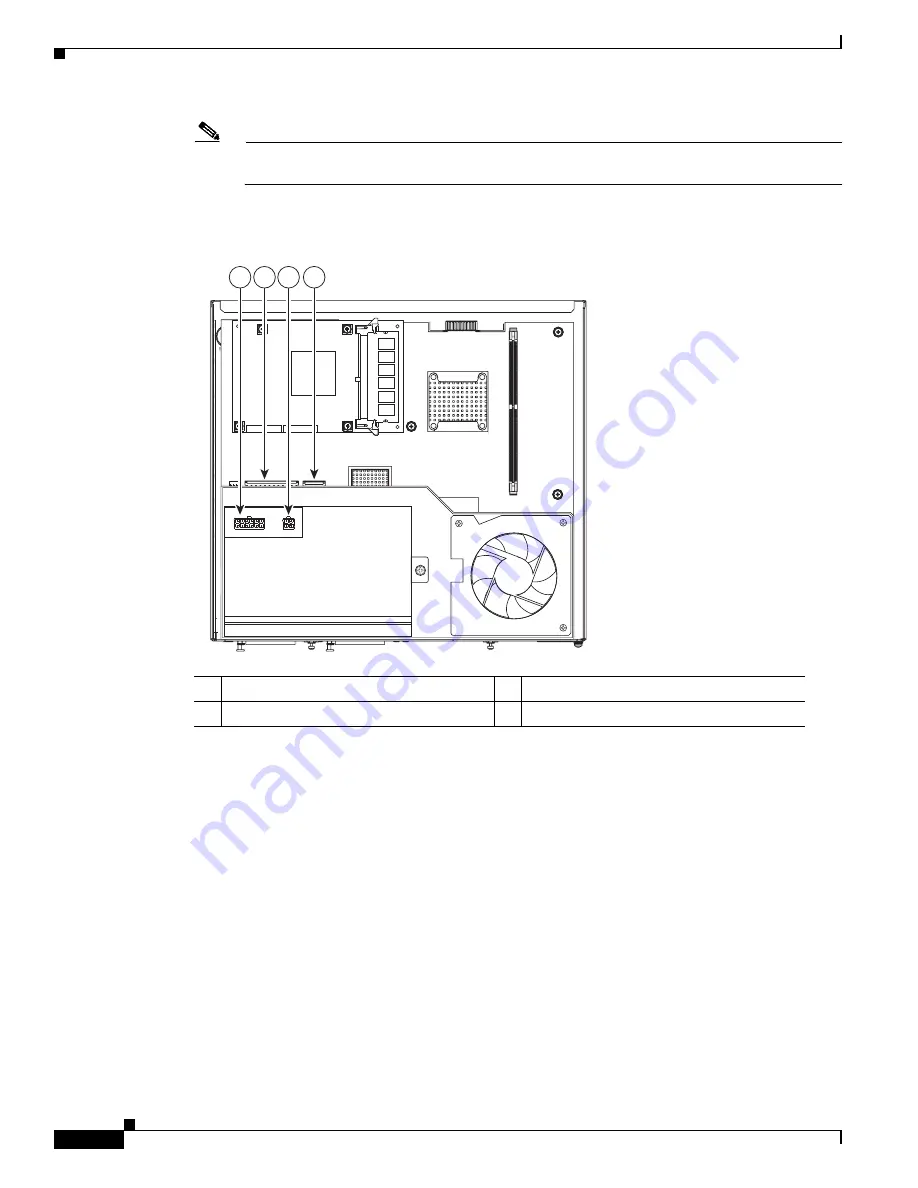
Locate the power supply cable and power supply cable connectors as shown in 

Figure 13

 and 

Figure 14

.

Figure 13

Locating the Power Supply and PoE Connectors

Step 3

Disconnect the power supply cable. See 

Figure 14

.

249711

1

2

3

4

1

AC small power supply cable connector

2

AC large power supply cable connector

3

PoE small cable connector

4

PoE large cable connector

Содержание 1905

Страница 1: ... cover from the router to install or remove any of these items The document contains the following sections Note The Cisco 1905 ISR and Cisco 1921 ISR have no user removable or user installable components Do not remove the chassis cover Safety Warnings page 2 Modules Internal to the Cisco 1905 and 1921 Routers page 4 Modules Internal to the Cisco 1905 and 1921 Routers page 4 Obtaining Documentatio...

Страница 2: ...unding wrist straps to avoid ESD damage to the card Do not directly touch the backplane with your hand or any metal tool or you could shock yourself Statement 94 Warning Do not work on the system or connect or disconnect cables during periods of lightning activity Statement 1001 Warning Read the installation instructions before you connect the system to its power source Statement 1004 Warning This...

Страница 3: ...ough the chassis Do not operate the system unless all cards faceplates front covers and rear covers are in place Statement 1029 Warning Only trained and qualified personnel should be allowed to install replace or service this equipment Statement 1030 Warning To prevent personal injury or damage to the chassis never attempt to lift or tilt the chassis using the handles on modules such as power supp...

Страница 4: ... the product Do not operate the unit without the covers installed Statement 1077 Warning For connections outside the building where the equipment is installed the following ports must be connected through an approved network termination unit with integral circuit protection T1 SFP Statement 1044 Safety Warnings for Finland Norway and Sweden Warning statement 1017 applies to the countries of Finlan...

Страница 5: ...mory Cards All the module replacement procedures in this section require removal of the chassis cover Before you perform any of the module replacement procedures disconnect the power and remove the cover as described in the Opening and Closing the Chassis section on page 5 After you complete the module replacement procedures install the chassis cover as described in the Opening and Closing the Cha...

Страница 6: ...ss antennas Figure 2 you must first remove these by unscrewing them counter clockwise Figure 2 Removing Wireless Antennas Step 4 Turn the router back to its original position top up Step 5 Pull the top of the router which is facing up toward you back from the bottom of the router 1 Router cover fastening screws 4 DO NOT REMOVE DURING NETWORK OPERATION DO NOT REMOVE DURING NETWORK OPERATION 251367 ...

Страница 7: ...the top of the router on a flat surface Step 4 Use the Phillips screwdriver to install the screws that hold the top of the of the case to the chassis as shown in Figure 1 Torque the screws to 6 to 8 in lb 0 68 to 0 90 N m Step 5 Turn the router back to its original position top up Step 6 Reconnect the AC power Locating Modules Figure 3 shows where the locations of the ISM unbuffered dual inline me...

Страница 8: ...MMs by the edges only UDIMMs are ESD sensitive components and can be damaged by mishandling DRAM UDIMM Location and Orientation On Cisco 1900 series routers a single DRAM UDIMM socket is located on the system board See Figure 3 for the location of the UDIMM connector DRAM UDIMMs have a polarization notch on the mating edge to prevent incorrect insertion Figure 4 shows the polarization notch on a D...

Страница 9: ...essary see the Opening and Closing the Chassis section on page 5 Step 2 Locate the DRAM UDIMM connector on the system board See the Locating Modules section on page 7 for the location of the UDIMM connectors Step 3 Make sure that both latches on the UDIMM connector are in the open position Step 4 Orient the UDIMM so that the polarization notch lines up with the polarization key on the connector Se...

Страница 10: ...o an ISM connector on the system board as described in the Installing an ISM section on page 12 Before you remove or install an ISM remove the chassis cover as described in the Opening and Closing the Chassis section on page 5 Note In the 1941W a WLAN module is installed in the ISM connector It is not user removable Caution When you remove or install an ISM always wear an ESD preventive wrist stra...

Страница 11: ...cating Modules section on page 7 for the location of the ISM Removing an ISM Before you remove an ISM remove the chassis cover as described in the Opening and Closing the Chassis section on page 5 To remove an ISM perform the following procedure To complete this procedure you need a number 2 Phillips screwdriver or flat blade screwdriver Step 1 Locate the ISM to be removed See the Locating Modules...

Страница 12: ...number 2 Phillips screwdriver or flat blade screwdriver and a 1 4 inch nut driver or wrench Installing an ISM in a Cisco 1900 Series Router The Cisco 1900 series routers have one ISM connector on the system board To install the ISM perform the following steps The ISM is an optional upgrade The procedure below assumes you are upgrading your router to include an ISM Step 1 Find the location of the f...

Страница 13: ... in place of the four screws removed in Step 2 as shown in Figure 9 Use a 1 4 inch nut driver to tighten the standoffs Torque the standoffs to 6 to 8 in lb 0 68 to 0 90 N m Caution Make sure that the standoffs are straight when installed Tighten them gently but firmly Torque them to 6 to 8 in lb 0 68 to 0 90 N m The shoulder must be seated tightly against the system board Step 5 Insert the connect...

Страница 14: ...nal Service Module is analyzed Internal Service Module insertion time 13 25 34 ago EEPROM contents at hardware discovery Hardware Revision 1 0 Part Number 73 11709 01 Board Revision 01 Deviation Number 0 0 Fab Version 01 PCB Serial Number FHH1228P02T RMA Number 0 0 0 0 RMA History 00 RMA Test History 00 Top Assy Part Number 800 30779 01 Product FRU Number ISM SRE 200 K9 Version Identifier V01 CLEI...

Страница 15: ...ep 3 Remove the one screw from the power supply as shown in Figure 12 Figure 12 Removing the Power Supply and Blower Step 4 Slide and lift the power supply from the chassis and disconnect the power cable Step 5 Insert the replacement power supply Step 6 Tighten the securing screw Step 7 Replace the cover See Opening and Closing the Chassis section on page 5 Installing Power over Ethernet The Power...

Страница 16: ...u must first remove these by unscrewing each antenna counter clockwise See Figure 2 Step 2 Locate the power supply cable and power supply cable connectors as shown in Figure 13 and Figure 14 Figure 13 Locating the Power Supply and PoE Connectors Step 3 Disconnect the power supply cable See Figure 14 249711 1 2 3 4 1 AC small power supply cable connector 2 AC large power supply cable connector 3 Po...

Страница 17: ...sco 1900 Series ISRs Figure 14 Removing the Power Supply Cable Step 4 Locate the power supply See Figure 3 Figure 15 Removing the Power Supply Step 5 Remove the one screw from the power supply as shown in Figure 15 Step 6 Slide and lift the power supply from the chassis 249713 199584 DO NOT REMOVE DURING NETWORK OPERATION DO NOT REMOVE DURING NETWORK OPERATION 1 1 Power supply ...

Страница 18: ...power supply with the PoE power supply Note The PoE power supply reveals the PoE connector Step 8 Tighten the PoE power supply securing screw Step 9 Locate the PoE cable and the AC power supply cable See Figure 16 Figure 16 PoE Cable and AC Power Supply Cable Step 10 Connect the PoE cable to the small PoE connector next to the PoE power supply and the large PoE connector on the mother board as sho...

Страница 19: ...ng and Upgrading Internal Modules and FRUs in Cisco 1900 Series ISRs Figure 17 Installing the PoE Cable Note Be sure to thread the PoE cable through the sheet metal channel shown in Figure 17 Step 11 Connect the AC cable to the connector next to the PoE power supply and the other connector on the mother board See Figure 18 249733 ...

Страница 20: ...age 5 Note If your Cisco 1941 ISR is wireless reattach the wireless antennas Installing a Blower To replace a blower perform the following procedure To complete this procedure you need a number 2 Phillips screwdriver or flat blade screwdriver Step 1 Remove the cover See Opening and Closing the Chassis section on page 5 Step 2 Locate the blower in the chassis See the Locating Modules section on pag...

Страница 21: ...rist or ankle strap and ensure that it makes good skin contact Connect the equipment end of the strap to an unfinished chassis surface Place a removed CompactFlash memory card on an antistatic surface or in a static shielding bag If the card will be returned to the factory immediately place it in a static shielding bag Avoid contact between the card and clothing The wrist strap protects the card f...

Страница 22: ...e panel Step 3 Press the ejector button again See Figure 21 This ejects the CompactFlash memory card part way out of its slot Step 4 Pull the CompactFlash memory card out of its slot Step 5 Push the ejector button in until the button is flush with the bezel Caution To prevent damage to the ejector mechanism the ejector button must remain pressed all the way in flush against the bezel when not bein...

Страница 23: ...ot project out from the panel See Figure 21 Note If the ejector button is projecting out from the panel push it in until it is flush with the bezel Step 2 Insert the CompactFlash memory card into the slot until it is fully seated The ejector button remains flush with the panel Note If the ejector button is projecting from the panel after you insert the CompactFlash memory card remove the CompactFl...

Страница 24: ...o Product Documentation which also lists all new and revised Cisco technical documentation at http www cisco com en US docs general whatsnew whatsnew html Subscribe to the What s New in Cisco Product Documentation as a Really Simple Syndication RSS feed and set content to be delivered directly to your desktop using a reader application The RSS feeds are a free service and Cisco currently supports ...

Отзывы: