


8.0 MAINTENANCE
R599740 - BlackWing Two User Manual
37
Before sending the projector to repair
This unit uses a microcomputer. External noise may cause it to malfunction. If this happens, turn off the
power and remove the plug from the power outlet. Insert plug again into the outlet and check operation of
the unit.
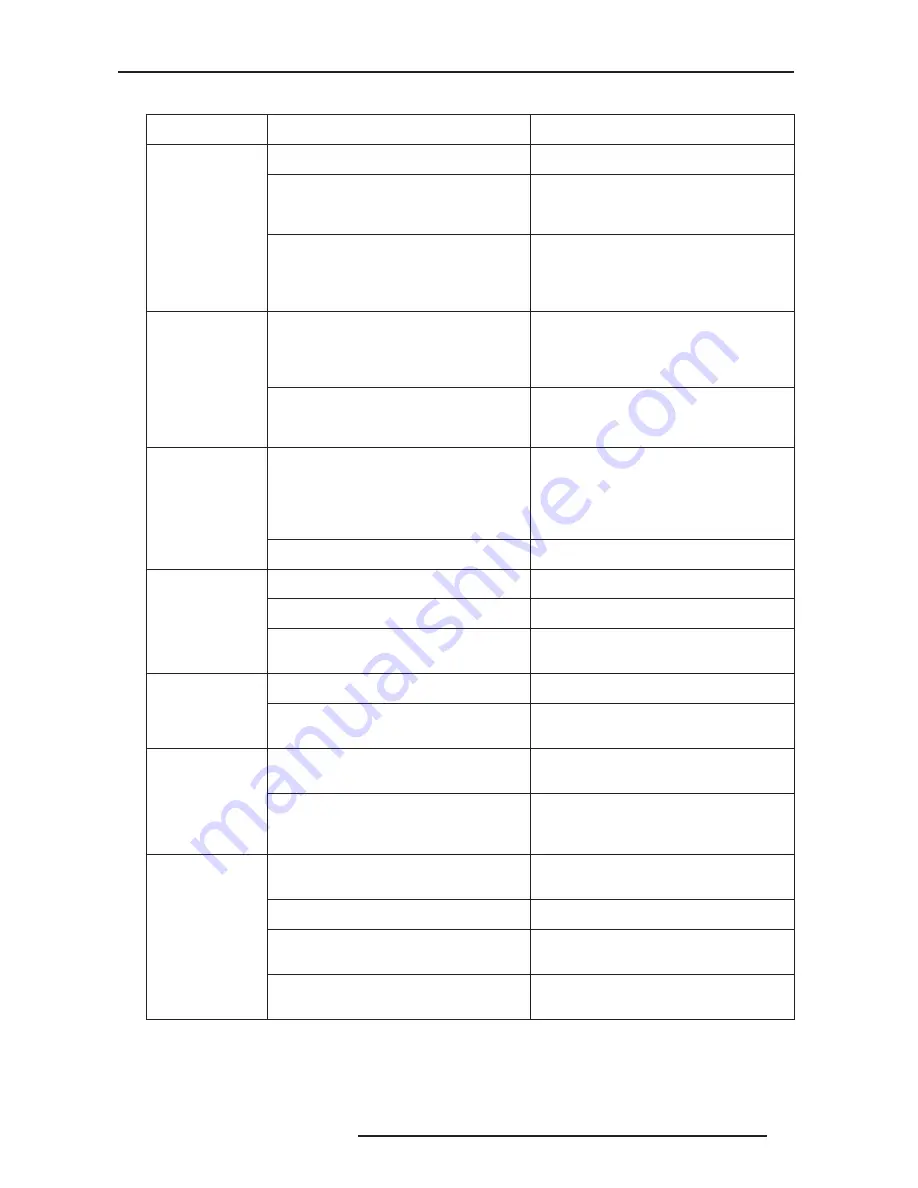
Symptom
Probable Cause
Corrective Action
Power is not
supplied
Is the power cord disconnected?
Insert the power cord, see page 18.
Is the lamp cover properly shut?
Remove the plug when the [STANDBY/ON]
LED is light On red. Close the lamp cover
properly and insert the plug again.
Has the lamp life expired (has the lamp
usage time reached 2000 hours)?
Remove the plug when the [STANDBY/ON]
indicator is light On red. Install a new lamp.
Upon doing so, insert the plug. Reset the
lamp time after installing a new lamp.
Projected image
is too dark
Is the lamp near exhaustion?
Check the lamp usage time on the
Information Menu. Prepare a new lamp or
replace as soon as possible when the lamp
is near exhaustion.
Have the Picture settings been modified?
Reset the current Image Profile settings to
default values. See “Custom Image Profile”,
page 30 for details.
Unit works but
stops abruptly
after a few
minutes
Are the air suction openings (air inlets) and
exhaust vents blocked?
Remove the plug when the [STANDBY/ON]
indicator is light On red. Remove any
blocking object that could prevent the
normal air flow. See “Air-Flow and Space
Requirements”, page 11.
Are the filters dirty?
Clean the filters.
No Picture on
the screen
Are the video devices properly connected?
Connect the devices correctly.
Is the lens cap removed?
Remove the lens cap.
Is the video image temporarily turned off
when the [HIDE] button is being pressed?
Press the [HIDE] button to display the video
image again.
Video image is
fuzzy.
Is the focus correctly adjusted?
Adjust accordingly using the focus button.
Is the unit placed too near or too far away
from the screen?
Set the unit at a correct distance from the
screen.
Video images
are missing
Has setting been performed for screen
mask?
Set the Mask setting of the Setup menu to
Off.
Has setting been performed for picture
shift?
Check in the Setup Menu that the picture
position is correctly set and that there is no
picture portion missing.
Remote control
unit does not
work
Are batteries installed correctly?
Match the polarities (+ or -) correctly when
inserting the batteries.
Are batteries exhausted?
Replace with new batteries.
Is there an obstructive object between the
remote control unit and remote sensor?
Remove any obstructive objects.
Is the remote control held too far away from
the sensor?
Hold the remote control closer to the sensor
when using.


